Vue 3 介绍
文章目录
- Vue 3 介绍
- 为什么要学习 vue 3
- Vue3 动机 和 新特性
- Vite 的使用
- vite介绍
- 为什么选 Vite ?
- Vite 的基本使用
- Vue3.0项目介绍
- vscode插件说明
- 组合式API
- composition API vs options API
- 体验 composition API
- setup 函数
- reactive 函数
- ref 函数
- script setup语法(★)
- 案例:显示鼠标案例
- 计算属性computed函数
- 侦听器watch函数
- 钩子函数的使用
- 组件通讯-父传子
- 组件通讯-子传父
- 依赖注入 - provide 和 inject
- 模板中 ref 的使用
- vue3中废弃了过滤器
- 补充-toRefs 函数
- vue-router4
- 基本使用
- 组件中使用route与router
- vuex4
- 基本使用
- 在main.js中关联store
- 在组件中使用vuex
为什么要学习 vue 3

为什么要学vue3:
- Vue是国内最火的前端框架
- Vue 3 于 2022 年 2 月 7 日星期一成为新的默认版本!
- 原文链接:https://blog.vuejs.org/posts/vue-3-as-the-new-default.html
- 中文链接:https://zhuanlan.zhihu.com/p/460055155
- Vue3性能更高,体积更小
- Vue3.0在经过一年的迭代后,越来越好用
官方文档:
- vue3官方文档:https://vuejs.org/open in new window
- vue3中文文档:https://v3.cn.vuejs.org/open in new window
- 全新新文档地址 https://staging-cn.vuejs.org/open in new window
目前已支持 vue3 的UI组件库:
-
element-plus
https://element-plus.gitee.io/#/zh-CN (PC组件库)

Element Plus,一套为开发者、设计师和产品经理准备的基于 Vue 3.0 的桌面端组件库。
-
vant
https://vant-contrib.gitee.io/vant/v3/#/zh-CN
轻量、可靠的移动端 Vue 组件库。
Vant 是有赞前端团队开源的移动端组件库,于 2016 年开源,已持续维护 4 年时间。
目前 Vant 已完成了对 Vue 3.0 的适配工作,并发布了 Vant 3.0 版本
-
ant-design-vue (PC组件库)
https://antdv.com/docs/vue/introduce-cn/
ant-design-vue 是 Ant Design 的 Vue 实现,组件的风格与 Ant Design 保持同步
Vue3 动机 和 新特性
Vue3 设计理念open in new window
动机与目的:
-
更好的逻辑复用 与 代码组织 (composition组合式api)
optionsAPI(旧) => compositionAPI(新), 效果: 代码组织更方便了, 逻辑复用更方便了 非常利于维护!!
-
更好的类型推导 (typescript支持)
vue3 源码用 ts 重写了, vue3 对 ts 的支持更友好了 (ts 可以让代码更加稳定, 类型检测! )
vue3新特性
vue3新特性:
-
数据响应式原理重新实现 (ES6 proxy 替代了 ES5 的 Object.defineProperty)
只能劫持单个属性,所以属性比较多的情况下只能遍历+递归监听
解决了: 例如数组的更新检测等bug, 大大优化了响应式监听的性能
(原来检测对象属性的变化, 需要一个个对属性递归监听) proxy 可以直接对整个对象劫持
-
虚拟DOM - 新算法 (更快 更小)
-
提供了composition api, 可以更好的逻辑复用
-
模板可以有多个根元素
-
源码用 typescript 重写, 有更好的类型推导 (类型检测更为严格, 更稳定)
…
小结: vue3 性能更高, 体积更小, 更利于复用, 代码维护更方便
Vite 的使用

vite介绍
Vite 官方文档open in new window
Vite(法语意为 “快速的”,发音 /vit/,发音同 “veet”)是一种新型前端构建工具
优势
- 💡 极速的服务启动,使用原生 ESM 文件,无需打包
- ⚡️ 轻量快速的热重载,始终极快的模块热重载(HMR)
- 🛠️丰富的功能,对 TypeScript、JSX、CSS 等支持开箱即用
- 📦等等
vite和webpack关系
vite不基于webpack,是独立的实现
为什么选 Vite ?
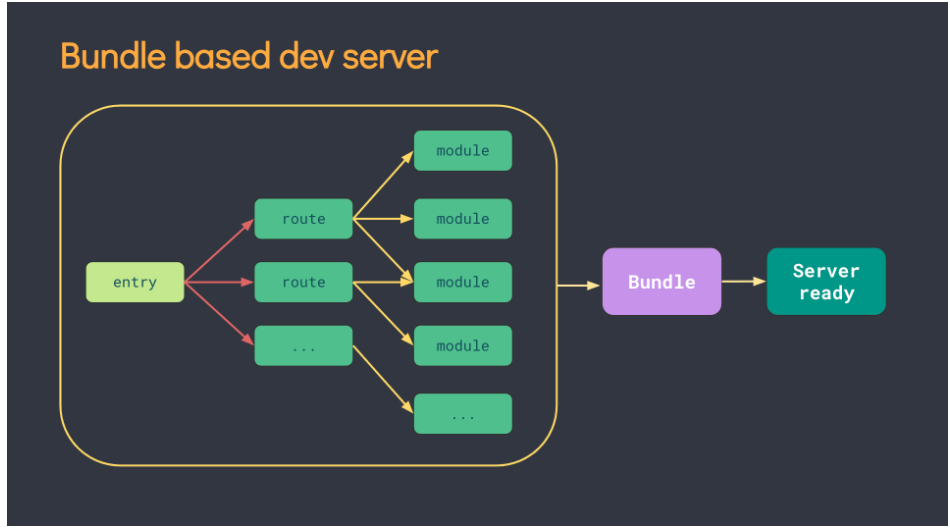
传统方式
- 基于打包器的方式启动,必须优先抓取并构建你的整个应用,然后才能提供服务。
- 更新速度会随着应用体积增长而直线下降。
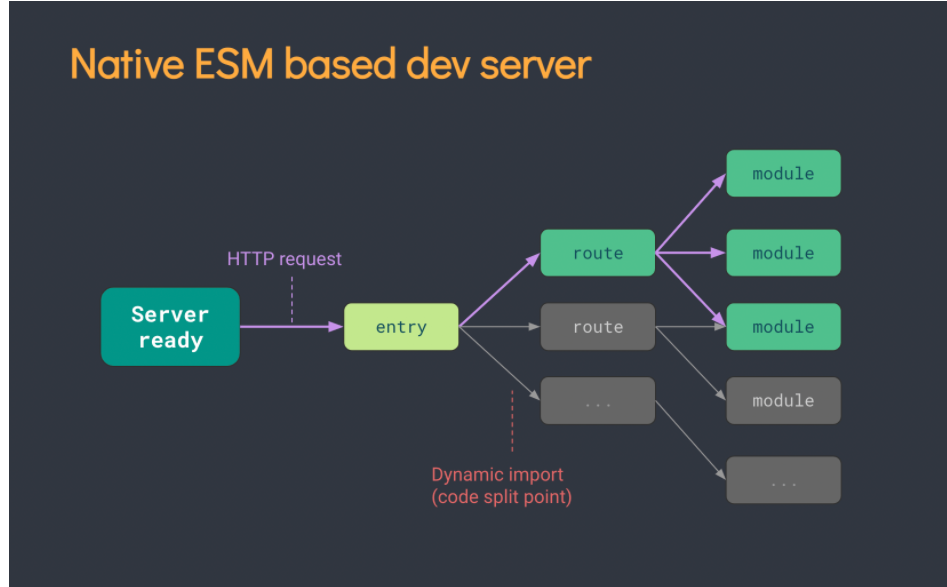
vite 方式
- Vite 以 原生 ESMopen in new window 方式提供源码。这实际上是让浏览器接管了打包程序的部分工作。
- Vite 只需要在浏览器请求源码时进行转换并按需提供源码。
- 根据情景动态导入代码,即只在当前屏幕上实际使用时才会被处理。
问题小结:
Vite 是否需要先打包才能提供服务?
不需要,直接会引用模块,不需要打包
使用webpack能否创建vue3的项目?
可以,但是vite只支持vue3
Vite 的基本使用
目标:能够使用vite创建一个vue3的项目
(1)使用vite创建项目
npm create vite
# or
yarn create vite
(2)输入项目名字,默认为vite-project
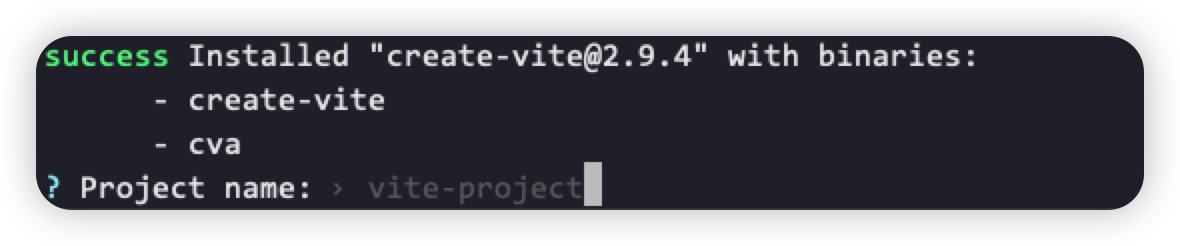
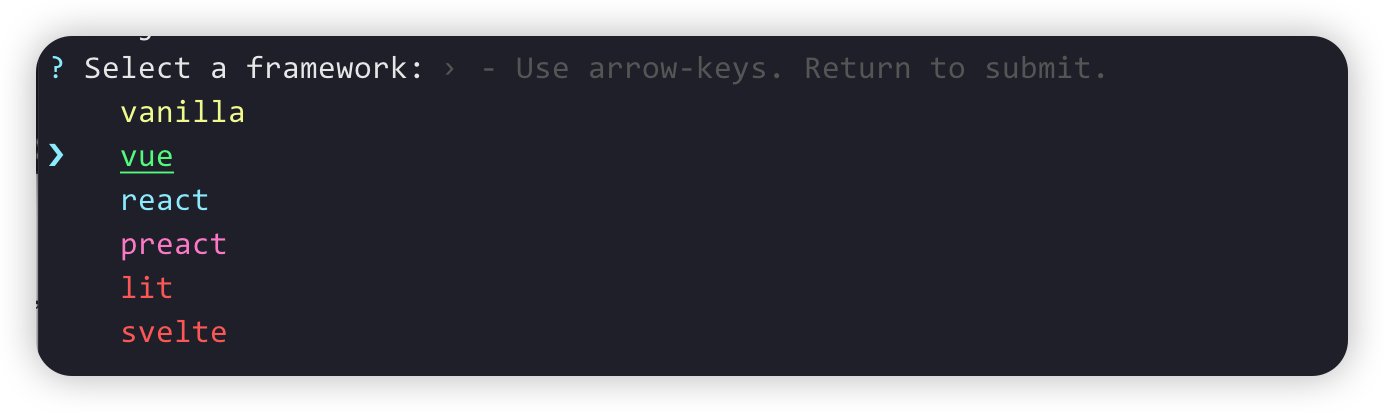
(3)选择创建的项目类型,选择vue即可
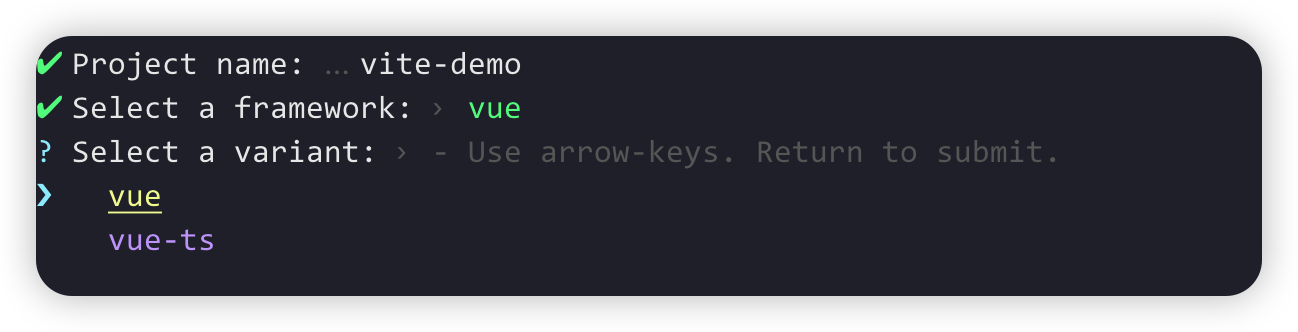
(4)选择创建的vue项目类型, 不选ts
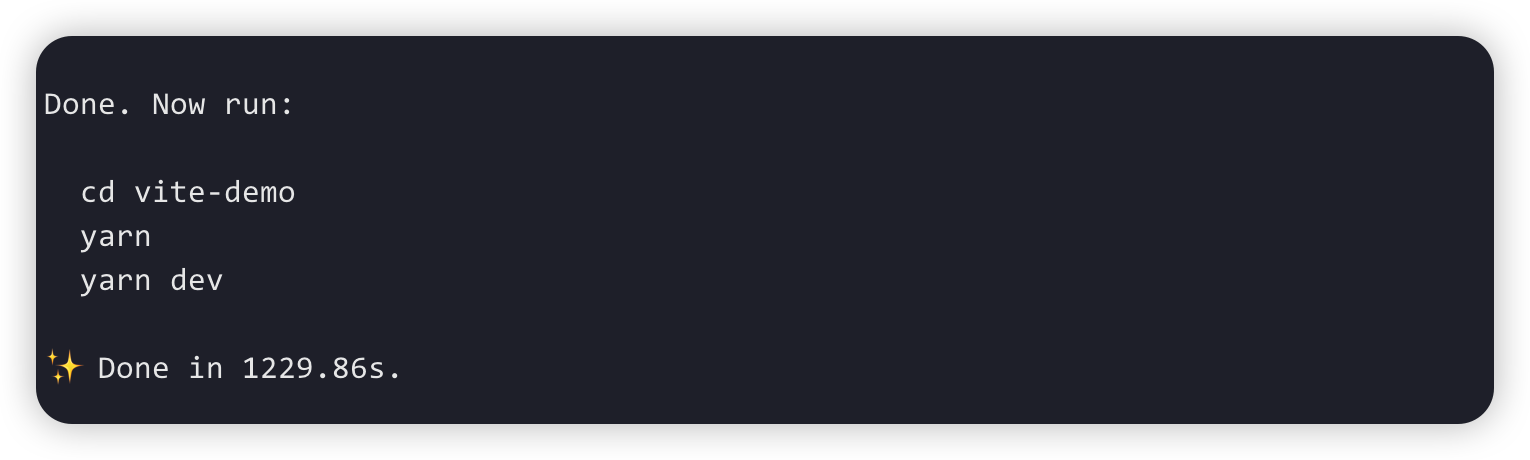
(5)启动项目
vite快捷使用
如果想要快速创建一个vue3项目,可以使用如下命令
- 创建普通vue项目
yarn create vite vite-demo --template vue
- 创建基于ts模板的项目
yarn create vite vite-demo-ts --template vue-ts
Vue3.0项目介绍
任务目标:掌握vue3的项目目录结构
-
删除src下所有的文件和代码
-
创建App.vue
<template><div>我是帅气的App组件</div>
</template>- 创建main.js文件
import { createApp } from 'vue'
import App from './App.vue'createApp(App).mount('#app')
vscode插件说明
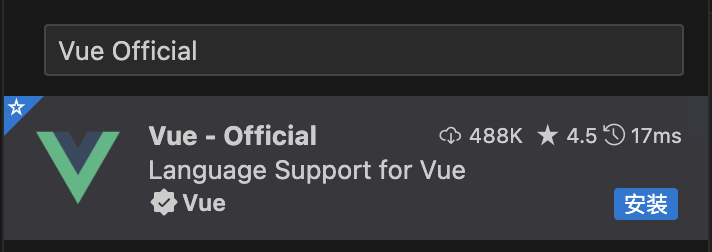
- vue2中需要安装插件
vetur,可以实现组件高亮。但是vue3的一些语法在vetur中报错。 - vue3中需要安装插件
Vue - Official,提供了更加强大的功能。 - 所以,使用功能vue3,需要卸载
vetur插件,安装Vue - Official插件。
组合式API
composition API vs options API
-
vue2 采用的就是
optionsAPI(1) 优点:
易于学习和使用, 每个代码有着明确的位置 (例如: 数据放 data 中, 方法放 methods中)(2) 缺点: 相似的逻辑, 不容易复用, 在大项目中尤为明显
(3) 虽然 optionsAPI 可以通过mixins 提取相同的逻辑, 但是也并不是特别好维护
-
vue3 新增的就是
compositionAPI(1) compositionAPI 是基于 逻辑功能 组织代码的, 一个功能 api 相关放到一起
(2) 即使项目大了, 功能多了, 也能快速定位功能相关的 api
(3) 大大的提升了
代码可读性和可维护性 -
vue3 推荐使用 composition API, 也保留了options API
即就算不用composition API, 用 vue2 的写法也完全兼容!!
问题小结: optionsAPI的优缺点是什么? vue3 新增的 compositionAPI 有什么特征? 有什么优势?
体验 composition API
需求: 鼠标移动显示鼠标坐标 x, y

options API 版本
<template><div>当前鼠标位置</div><div>x: {{ mouse.x }}</div><div>y: {{ mouse.y }}</div><div>当前点击次数:{{ count }}</div><button @click="add">点击</button>
</template><script>
export default {// vue2 中采用的是 options API// 常见的配置项: data created methods watch computed componentsdata() {return {mouse: {x: 0,y: 0,},count: 0,}},mounted() {document.addEventListener('mousemove', this.move)},methods: {move(e) {this.mouse.x = e.pageXthis.mouse.y = e.pageY},add() {this.count++},},destroyed() {document.removeEventListener('mousemove', this.move)},
}
</script>
composition API 版本
<template><div>当前鼠标位置</div><div>x: {{ mouse.x }}</div><div>y: {{ mouse.y }}</div><div>当前点击次数:{{ count }}</div><button @click="add">点击</button>
</template><script>
import { onMounted, onUnmounted, reactive, ref } from 'vue'export default {setup() {const count = ref(0)const add = () => {count.value++}const mouse = reactive({x: 0,y: 0,})const move = (e) => {mouse.x = e.pageXmouse.y = e.pageY}onMounted(() => {document.addEventListener('mousemove', move)})onUnmounted(() => {document.removeEventListener('mousemove', move)})return {count,add,mouse,}},
}
</script>
抽离逻辑
function useMouse() {const mouse = reactive({x: 0,y: 0,})const move = (e) => {mouse.x = e.pageXmouse.y = e.pageY}onMounted(() => {document.addEventListener('mousemove', move)})onUnmounted(() => {document.removeEventListener('mousemove', move)})return mouse
}function useCount() {const count = ref(0)const add = () => {count.value++}return {count,add,}
}
optionsAPI:
- 优点:
易于学习和使用, 每个代码有着明确的位置 - 缺点: 相似的逻辑, 不容易复用
compositionAPI:
- 基于 逻辑功能 组织代码
- 可维护性好!
setup 函数
composition api的使用, 需要配置一个setup 函数
- setup 函数是一个新的组件选项, 作为组件中 compositionAPI 的起点
- 从生命周期角度来看, setup 会在 beforeCreate 钩子函数之前执行
- setup 中不能使用 this, this 指向 undefined
- 在模版中需要使用的数据和函数,需要在
setup返回。
<template><div class="container"><h1 @click="say()">{{msg}}</h1></div>
</template><script>
export default {setup () {console.log('setup执行了')console.log(this)// 定义数据和函数const msg = 'hi vue3'const say = () => {console.log(msg)}return { msg , say}},beforeCreate() {console.log('beforeCreate执行了')console.log(this)}
}
</script>
reactive 函数
前置说明:
- setup 需要有返回值, 只有返回的值才能在模板中使用
- 默认普通的数据, 不是响应式的
作用: 传入一个复杂数据类型,将复杂类型数据, 转换成响应式数据 (返回该对象的响应式代理)
<template><div>{{ obj.name }}</div><div>{{ obj.age }}</div><button @click="obj.name = 'ls'">改值</button>
</template><script>
import { reactive } from 'vue'export default {setup () {// 1. setup 需要返回值, 返回的值才能在模板中使用// 2. 默认的普通的值不是响应式的, 需要用 reactive 函数const obj = reactive({name: '贫僧法号依平',age: 18})return {obj}}
}
</script>
如果直接使用reactive处理基本类型则会报出警告,因为vue3是基于proxy代理的,proxy是对象的特性
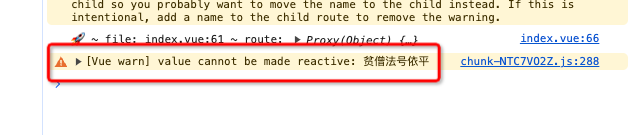
export default {setup () {const obj = reactive('贫僧法号依平')return {obj}}
}
总结: 通常是用来定义响应式 对象数据
问题小结:
- 默认 setup 函数中返回的 普通对象 是响应式的么 ?
- reactive 函数的作用是什么 ?
ref 函数
reactive 处理的数据, 必须是复杂类型, 如果是简单类型无法处理成响应式, 所以有 ref 函数!
作用: 对传入的数据(一般简单数据类型),包裹一层对象, 转换成响应式。
- ref 函数接收一个的值, 返回一个ref 响应式对象, 有唯一的属性 value
- 在 setup 函数中, 通过 ref 对象的 value 属性, 可以访问到值
- 在模板中, ref 属性会自动解套, 不需要额外的 .value
- ref函数也支持传入复杂类型,传入复杂类型,也会做响应式处理
<template><div>{{ money }}</div><button @click="money++">改值</button>
</template><script>
import { reactive, ref } from 'vue'
export default {setup() {let money = ref(100)money.value++return {money}}
}
</script>
ref 和 reactive 的最佳使用方式:
- 明确的对象,明确的属性,用reactive,其他用 ref
- 从vue3.2之后,更推荐使用ref(更新之后的性能有所提升)
问题小结:
- ref 函数的作用是什么 ?
- ref 函数包裹简单类型后, 会包裹成对象, 在模板中需要 .value 么? 在 setup 中需要 .value 么?
script setup语法(★)
script setup是在单文件组件 (SFC) 中使用组合式 API 的编译时语法糖。相比于普通的 script 语法更加简洁
要使用这个语法,需要将 setup attribute 添加到 <script> 代码块上:
<script setup>console.log('hello script setup')
</script>
顶层的绑定会自动暴露给模板,所以定义的变量,函数和import导入的内容都可以直接在模板中直接使用
<template><div><h3>根组件</h3><div>点击次数:{{ count }}</div><button @click="add">点击修改</button></div>
</template><script setup>
import { ref } from 'vue'const count = ref(0)
const add = () => {count.value++
}
</script>
案例:显示鼠标案例
使用setup语法完成鼠标案例
<template><div>当前鼠标位置</div><div>x: {{ mouse.x }}</div><div>y: {{ mouse.y }}</div><div>当前点击次数:{{ count }}</div><button @click="add">点击</button>
</template><script setup>
import { onMounted, onUnmounted, reactive, ref } from 'vue'
const count = ref(0)
const add = () => {count.value++
}
const mouse = reactive({x: 0,y: 0,
})
const move = (e) => {mouse.x = e.pageXmouse.y = e.pageY
}
onMounted(() => {document.addEventListener('mousemove', move)
})
onUnmounted(() => {document.removeEventListener('mousemove', move)
})
</script>
计算属性computed函数
computed函数调用时, 要接收一个处理函数, 处理函数中, 需要返回计算属性的值
<template><div>我今年的年纪 <input type="text" v-model="age" /></div><div>我明年的年龄 {{ nextAge }}</div><div>我后年的年龄 <input type="text" v-model="nextAge2" /></div>
</template><script setup>
import { computed, ref } from 'vue'
const age = ref(10)
// 不带set的计算属性
const nextAge = computed(() => {return +age.value + 1
})// 带set的计算属性
const nextAge2 = computed({get() {return +age.value + 2},set(value) {age.value = value - 2},
})
</script>
问题小结: computed 函数提供计算属性, 有几种写法?
侦听器watch函数
watch监视, 接收三个参数
1. 参数1: 监视的数据源
2. 参数2: 回调函数
3. 参数3: 额外的配置
- 监听单个ref
const money = ref(100)
watch(money, (value, oldValue) => {console.log(value)
})
- 监听多个ref
const money = ref(100)
const count = ref(0)
watch([money, count], ([newMoney, newCount], [oldMoney, oldCount]) => {console.log(value)
})
- 监听ref复杂数据
const user = ref({name: '贫僧法号依平',age: 18,
})
watch(user,(value) => {console.log('user变化了', value)},{// 深度监听,,,当ref的值是一个复杂数据类型,需要深度监听deep: true,immediate: true}
)
- 监听对象的某个属性的变化
const user = ref({name: '贫僧法号依平',age: 18,
})
watch(() => user.value.name,(value) => {console.log(value)}
)
钩子函数的使用
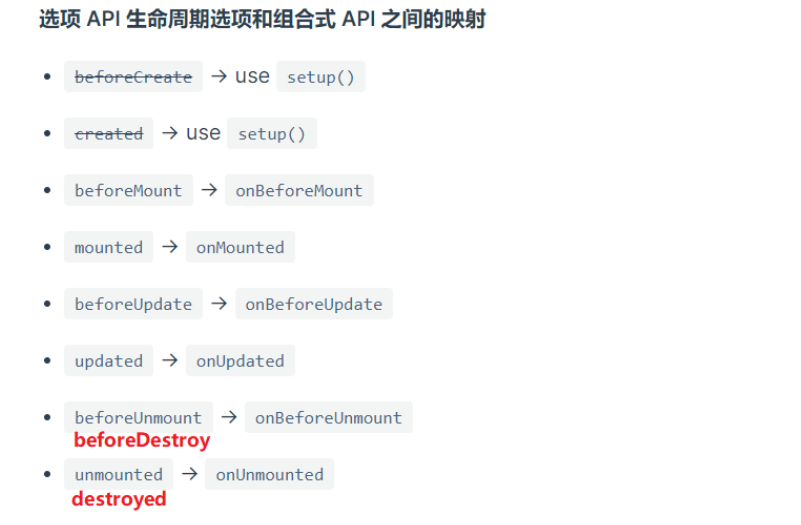
生命周期函数open in new window vue3 中的生命周期函数, 需要在 setup 中调用
import { onMounted, onUpdated, onUnmounted } from 'vue'const MyComponent = {setup() {onMounted(() => {console.log('mounted!')})onUpdated(() => {console.log('updated!')})onUnmounted(() => {console.log('unmounted!')})}
}
组件通讯-父传子
目标:能够实现组件通讯中的父传子组件通讯
步骤:
- 父组件提供数据
- 父组件将数据传递给子组件
- 子组件通过defineProps进行接收
- 子组件渲染父组件传递的数据
核心代码:
父组件
<script setup>
import { ref } from 'vue'
// 在setup语法中,组件导入之后就能够直接使用,不需要使用components进行局部注册
import Son from './components/Son.vue'const money = ref(100000000)
const car = ref('劳斯莱斯')
</script><template><div><h1>我是父组件</h1><div>金钱:{{ money }}</div><div>车辆:{{ car }}</div><hr /><Son :money="money" :car="car"></Son></div>
</template><style lang="less" scoped></style>
子组件
<script setup>
import { computed } from 'vue'// defineProps: 接收父组件传递的数据
const props = defineProps({money: Number,car: String,
})const myMoney = computed(() => {return props.money + 100
})
</script><template><div><h3>我是子组件</h3><div>{{ money }} --- {{ car }}</div></div>
</template><style lang="less" scoped></style>
注意
如果使用defineProps接收数据,这个数据只能在模板中渲染,如果想要在script中也操作props属性,应该接收返回值。
组件通讯-子传父
目标:能够实现组件通讯中的子传父
步骤:
- 子组件通过defineEmit获取emit对象(因为没有this)
- 子组件通过emit触发事件,并且传递数据
- 父组件提供方法
- 父组件通过自定义事件的方式给子组件注册事件
核心代码
子组件
<script setup>
defineProps({money: Number,car: String,
})const emit = defineEmits(['changeMoney'])const change = () => {emit('changeMoney', 10)
}
</script>
父组件
<script setup>
import { ref } from 'vue'
// 在setup语法中,组件导入之后就能够直接使用,不需要使用components进行局部注册
import Son from './components/Son.vue'const money = ref(100000000)
const car = ref('劳斯莱斯')
const changeMoney = (num) => {money.value = money.value - num
}
</script><Son :money="money" :car="car" @changeMoney="changeMoney"></Son>
依赖注入 - provide 和 inject
依赖注入, 可以非常方便的实现 跨层级的 组件通信
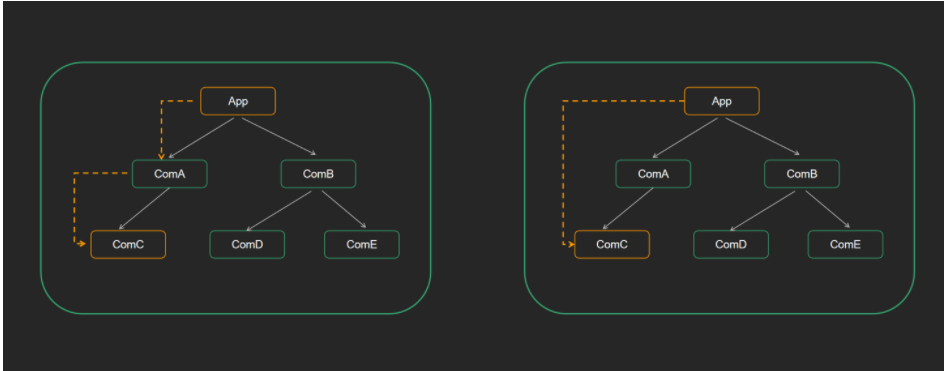
父组件利用 provide 提供数据
<script setup>
import { provide, ref } from 'vue'
import Son from './components/Son.vue'
const money = ref(1000000000)
provide('money', money)
</script><template><div><h1>我是父组件</h1><div>金钱:{{ money }}</div><hr /><Son></Son></div>
</template><style lang="less" scoped></style>
子组件 (子孙后代, 都可以拿到这个数据)
<script setup>
import { inject } from 'vue'const money = inject('money')
</script><template><div><h3>我是子组件--{{ money }}</h3><button>修改数据</button></div>
</template><style lang="less" scoped></style>
如果希望子传父, 可以 provide 传递一个方法
父组件
```vue
<script setup>import { provide, ref } from 'vue'import Son from './components/Son.vue'const money = ref(100000000)const changeMoney = (num) => {money.value = money.value - num}provide('money', money)provide('changeMoney', changeMoney)
</script>
`子组件````javascript<script setup>import { inject } from 'vue'const money = inject('money')const changeMoney = inject('changeMoney')
</script>
模板中 ref 的使用
联想之前的 ref 和 $refs, 获取模板的元素(dom元素,组件)
1 创建 ref => const hRef = ref(null)
2 模板中建立关联 => <h1 ref="hRef">钩子函数-----123</h1>
3 使用 => hRef.value
<script setup>
import { ref } from 'vue'const hRef = ref(null)
const clickFn = () => {hRef.value.innerText = '我不是标题'
}
</script><template><div><h1 ref="hRef">我是标题</h1><button @click="clickFn">操作DOM</button></div>
</template>
ref操作组件
<script setup>
import { ref } from 'vue'
import Form from './components/Form.vue'// 1. 提供一个ref
const formRef = ref(null)const fn = () => {console.log(formRef.value.count)formRef.value.validate()
}
</script><template><Form ref="formRef"></Form>
</template>
需要配合defineExpose
<script setup>
import { ref } from 'vue'const count = ref(0)
const validate = () => {console.log('表单校验方法')
}
// 暴露属性给外部组件使用
defineExpose({count,validate,
})
</script><template><h3>我是Form组件</h3>
</template>
ref添加给组件的注意事项
- 父组件想要调用子组件的方法必须子组件通过defineExpose主动暴露出来才可以访问的到
vue3中废弃了过滤器
vue3.0中不能使用过滤器,直接使用函数进行替代
<template><h1>ref的使用</h1><h3>我是一个h3的内容 {{ formatTime(now) }}</h3><h3>{{ formatTime(other) }}</h3><hr />
</template><script>
import moment from 'moment'
export default {setup() {// 过滤器const now = new Date()const other = new Date('2020-11-12 12:00:00')const formatTime = (value) => {return moment(value).format('YYYY-MM-DD')}return {now,formatTime,other,}},
}
</script>
补充-toRefs 函数
使用场景: 如果对一个响应数据, 进行解构 或者 展开, 会丢失他的响应式特性!
原因: vue3 底层是对 对象 进行监听劫持
作用: 对一个响应式对象的所有内部属性, 都做响应式处理
- reactive/ref的响应式功能是赋值给对象的, 如果给对象解构或者展开, 会让数据丢失响应式的能力
- 使用 toRefs 可以保证该对象展开的每个属性都是响应式的
<template><div>{{ money }}</div><div>{{ car }}</div><div>{{ name }}</div><button @click="money++">改值</button>
</template><script setup>
import { reactive, ref, toRefs } from 'vue'
const user = ref({name: '贫僧法号依平',age: 18,
})
const { name, age } = toRefs(user.value)
</script>
vue-router4
vue升级vue3之后,配套的vue-router也升级为vue-router@4.x版本
vue-router4的语法和3的版本语法基本一致,但是有一些细微的修改。
vue-router官网: https://router.vuejs.org/
vue@2 + vue-router@3 + vuex@3 options apivue@3 + vue-router@4 + vuex@4 composition api
基本使用
(0)安装vue-router
yarn add vue-router
(1)创建组件Home.vue和Login.vue
(2)创建文件router/index.js
import {createRouter,createWebHashHistory,createWebHistory,
} from 'vue-router'// 1. 创建路由
const router = createRouter({// 创建history模式的路由// history: createWebHistory(),// 创建hash模式的路由history: createWebHashHistory(),// 配置路由规则routes: [{ path: '/home', component: () => import('../pages/Home.vue') },{ path: '/login', component: () => import('../pages/Login.vue') },],
})export default router
(3)在main.js中引入
import { createApp } from 'vue'
import App from './App.vue'
import router from './router'createApp(App).use(router).mount('#app')
(4)App.vue中使用
<template><ul><li><router-link to="/home">首页</router-link></li><li><router-link to="/login">登陆</router-link></li></ul><!-- 路由出口 --><router-view></router-view>
</template>
组件中使用route与router
由于组件中无法访问this,因为无法访问this.r o u t e 与 t h i s . route与this.route与this.router
(1)通过useRoute()可以获取route信息
<script>
import { useRoute } from 'vue-router'export default {setup() {const route = useRoute()console.log(route.path)console.log(route.fullPath)},
}
</script>
(2)通过useRouter()可以获取router信息
<script>
import { useRouter } from 'vue-router'export default {setup() {const router = useRouter()const login = () => {router.push('/home')}return {login,}},
}
</script>
vuex4
基本使用
1、安装依赖包
yarn add vuex
2、创建文件 store/index.js
import { createStore } from 'vuex'const store = createStore({state: {money: 100000000,},mutations: {changeMoney(state) {state.money += 10},},actions: {changeMoneyAsync(context) {setTimeout(() => {context.commit('changeMoney')}, 1000)},},getters: {double(state) {return state.money * 2},},
})export default store
在main.js中关联store
import { createApp } from 'vue'
import App from './App.vue'
import router from './router'
import store from './store'
const app = createApp(App)app.use(router)
app.use(store)
app.mount('#app')
在组件中使用vuex
const store = useStore()const money = computed(() => store.state.money)
const double = computed(() => store.getters.double)// mapState  mapMutations mapActions mapGetters  需要配合options api才能使用
总结:vuex4 在vue3项目中能用,但是不好用


)


)
)
用 Android Studio 从 0 到 1 进行 Processing 安卓开发)


