一、前言
最近通过群友了解到了allure这个报告,开始还不以为然,但还是逃不过真香定律。
经过试用之后,发现这个报告真的很好,很适合自动化测试结果的展示。下面说说我的探索历程吧。
- 选用的项目为
Selenium自动化测试Pytest框架实战,在这个项目的基础上说allure报告。
二、allure安装
- 首先安装python的allure-pytest包
-
<span style="color:#596172"><span style="background-color:#ffffff"><code class="language-shell">pip install allure-pytest -
</code></span></span>
- 然后安装allure的command命令行程序
MacOS直接使用homebrew工具执行 brew install allure 即可安装,不用配置下载包和配置环境
在GitHub下载安装程序https://github.com/allure-framework/allure2/releases
但是由于GitHub访问太慢,我已经下载好并放在了群文件里面
下载完成后解压放到一个文件夹。我的路径是D:\Program Files\allure-2.13.3
然后配置环境变量: 在系统变量path中添加D:\Program Files\allure-2.13.3\bin,然后确定保存。
打开cmd,输入allure,如果结果显示如下则表示成功了:
-
<span style="color:#596172"><span style="background-color:#ffffff"><code class="language-powershell">C:\Users\hoou>allure -
Usage: allure [<span style="color:#d19a66">options</span>] [<span style="color:#d19a66">command</span>] [<span style="color:#d19a66">command</span> <span style="color:#d19a66">options</span>] -
Options: -
<span style="color:#56b6c2">--help</span> -
Print commandline help. -
<span style="color:#56b6c2">-q</span>, <span style="color:#56b6c2">--quiet</span> -
<span style="color:#7171bf">Switch</span> on the quiet mode. -
Default: false -
<span style="color:#56b6c2">-v</span>, <span style="color:#56b6c2">--verbose</span> -
<span style="color:#7171bf">Switch</span> on the verbose mode. -
Default: false -
<span style="color:#56b6c2">--version</span> -
Print commandline version. -
Default: false -
Commands: -
generate Generate the report -
Usage: generate [<span style="color:#d19a66">options</span>] The directories with allure results -
Options: -
<span style="color:#56b6c2">-c</span>, <span style="color:#56b6c2">--clean</span> -
Clean Allure report directory before generating a new one. -
Default: false -
<span style="color:#56b6c2">--config</span> -
Allure commandline config path. <span style="color:#7171bf">If</span> specified overrides values from -
<span style="color:#56b6c2">--profile</span> and <span style="color:#56b6c2">--configDirectory</span>. -
<span style="color:#56b6c2">--configDirectory</span> -
Allure commandline configurations directory. By default uses -
ALLURE_HOME directory. -
<span style="color:#56b6c2">--profile</span> -
Allure commandline configuration profile. -
<span style="color:#56b6c2">-o</span>, <span style="color:#56b6c2">--report-dir</span>, <span style="color:#56b6c2">--output</span> -
The directory to generate Allure report into. -
Default: allure<span style="color:#56b6c2">-report</span> -
serve Serve the report -
Usage: serve [<span style="color:#d19a66">options</span>] The directories with allure results -
Options: -
<span style="color:#56b6c2">--config</span> -
Allure commandline config path. <span style="color:#7171bf">If</span> specified overrides values from -
<span style="color:#56b6c2">--profile</span> and <span style="color:#56b6c2">--configDirectory</span>. -
<span style="color:#56b6c2">--configDirectory</span> -
Allure commandline configurations directory. By default uses -
ALLURE_HOME directory. -
<span style="color:#56b6c2">-h</span>, <span style="color:#56b6c2">--host</span> -
This host will be used to <span style="color:#7171bf">start</span> web server <span style="color:#7171bf">for</span> the report. -
<span style="color:#56b6c2">-p</span>, <span style="color:#56b6c2">--port</span> -
This port will be used to <span style="color:#7171bf">start</span> web server <span style="color:#7171bf">for</span> the report. -
Default: <span style="color:#d19a66">0</span> -
<span style="color:#56b6c2">--profile</span> -
Allure commandline configuration profile. -
open Open generated report -
Usage: open [<span style="color:#d19a66">options</span>] The report directory -
Options: -
<span style="color:#56b6c2">-h</span>, <span style="color:#56b6c2">--host</span> -
This host will be used to <span style="color:#7171bf">start</span> web server <span style="color:#7171bf">for</span> the report. -
<span style="color:#56b6c2">-p</span>, <span style="color:#56b6c2">--port</span> -
This port will be used to <span style="color:#7171bf">start</span> web server <span style="color:#7171bf">for</span> the report. -
Default: <span style="color:#d19a66">0</span> -
plugin Generate the report -
Usage: plugin [<span style="color:#d19a66">options</span>] -
Options: -
<span style="color:#56b6c2">--config</span> -
Allure commandline config path. <span style="color:#7171bf">If</span> specified overrides values from -
<span style="color:#56b6c2">--profile</span> and <span style="color:#56b6c2">--configDirectory</span>. -
<span style="color:#56b6c2">--configDirectory</span> -
Allure commandline configurations directory. By default uses -
ALLURE_HOME directory. -
<span style="color:#56b6c2">--profile</span> -
Allure commandline configuration profile. -
</code></span></span>
三、allure初体验
改造一下之前的测试用例代码
-
<span style="color:#596172"><span style="background-color:#ffffff"><code class="language-python"><span style="color:#5c6370"><em>#!/usr/bin/env python3</em></span> -
<span style="color:#5c6370"><em># -*- coding:utf-8 -*-</em></span> -
<span style="color:#7171bf">import</span> re -
<span style="color:#7171bf">import</span> pytest -
<span style="color:#7171bf">import</span> allure -
<span style="color:#7171bf">from</span> utils.logger <span style="color:#7171bf">import</span> log -
<span style="color:#7171bf">from</span> common.readconfig <span style="color:#7171bf">import</span> ini -
<span style="color:#7171bf">from</span> page_object.searchpage <span style="color:#7171bf">import</span> SearchPage -
<span style="color:#61aeee">@allure.feature(<span style="color:#3388aa">"测试百度模块"</span>)</span> -
<span style="color:#7171bf">class</span> <span style="color:#61aeee">TestSearch</span>: -
<span style="color:#61aeee"> @pytest.fixture(scope=<span style="color:#3388aa">'function'</span>, autouse=<span style="color:#56b6c2">True</span>)</span> -
<span style="color:#7171bf">def</span> <span style="color:#61aeee">open_baidu</span>(self, drivers): -
<span style="color:#98c379">"""打开百度"""</span> -
search = SearchPage(drivers) -
search.get_url(ini.url) -
<span style="color:#61aeee"> @allure.story(<span style="color:#3388aa">"搜索selenium结果用例"</span>)</span> -
<span style="color:#7171bf">def</span> <span style="color:#61aeee">test_001</span>(self, drivers): -
<span style="color:#98c379">"""搜索"""</span> -
search = SearchPage(drivers) -
search.input_search(<span style="color:#98c379">"selenium"</span>) -
search.click_search() -
result = re.search(<span style="color:#98c379">r'selenium'</span>, search.get_source) -
log.info(result) -
<span style="color:#7171bf">assert</span> result -
<span style="color:#61aeee"> @allure.story(<span style="color:#3388aa">"测试搜索候选用例"</span>)</span> -
<span style="color:#7171bf">def</span> <span style="color:#61aeee">test_002</span>(self, drivers): -
<span style="color:#98c379">"""测试搜索候选"""</span> -
search = SearchPage(drivers) -
search.input_search(<span style="color:#98c379">"selenium"</span>) -
log.info(<span style="color:#7171bf">list</span>(search.imagine)) -
<span style="color:#7171bf">assert</span> <span style="color:#7171bf">all</span>([<span style="color:#98c379">"selenium"</span> <span style="color:#7171bf">in</span> i <span style="color:#7171bf">for</span> i <span style="color:#7171bf">in</span> search.imagine]) -
<span style="color:#7171bf">if</span> __name__ == <span style="color:#98c379">'__main__'</span>: -
pytest.main([<span style="color:#98c379">'TestCase/test_search.py'</span>, <span style="color:#98c379">'--alluredir'</span>, <span style="color:#98c379">'./allure'</span>]) -
os.system(<span style="color:#98c379">'allure serve allure'</span>) -
</code></span></span>
然后运行一下:
注意:如果你使用的是pycharm编辑器,请跳过该运行方式,直接使用.bat或.sh的方式运行
-
<span style="color:#596172"><span style="background-color:#ffffff"><code class="language-shell">*** -
------------------------------- generated html file: file://C:\Users\hoou\PycharmProjects\web-demotest\report.html -------------------------------- -
Results (12.97s): -
2 passed -
Generating report to temp directory... -
Report successfully generated to C:\Users\hoou\AppData\Local\Temp\112346119265936111\allure-report -
Starting web server... -
2020-06-18 22:52:44.500:INFO::main: Logging initialized @1958ms to org.eclipse.jetty.util.log.StdErrLog -
Server started at <http://172.18.47.241:6202/>. Press <Ctrl+C> to exit -
</code></span></span>
命令行会出现如上提示,接着浏览器会自动打开:
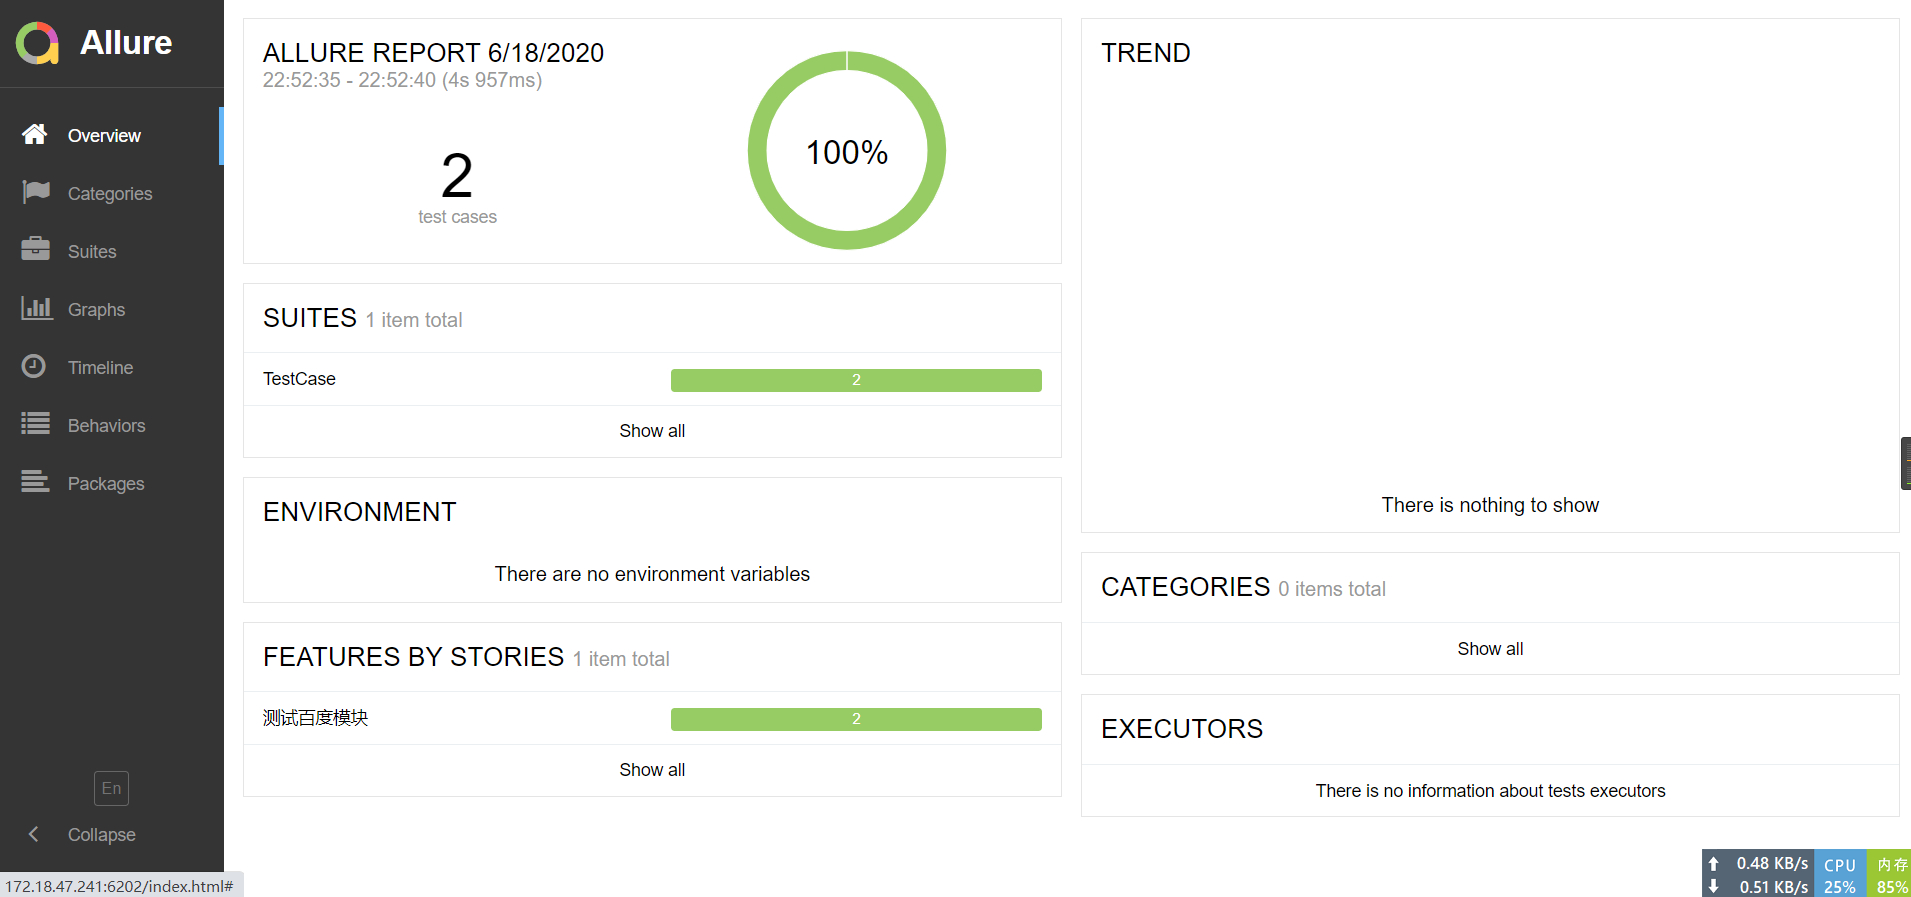
点击左下角En即可选择切换为中文。
是不是很清爽很友好,比pytest-html更舒服。
四、allure装饰器介绍

五、报告的生成和展示
刚才的两个命令:
- 生成allure原始报告到report/allure目录下,生成的全部为json或txt文件。
-
<span style="color:#596172"><span style="background-color:#ffffff"><code class="language-powershell">pytest TestCase/test_search.py <span style="color:#56b6c2">--alluredir</span> ./allure -
</code></span></span>
- 在一个临时文件中生成报告并启动浏览器打开
-
<span style="color:#596172"><span style="background-color:#ffffff"><code class="language-powershell">allure serve allure -
</code></span></span>
但是在关闭浏览器之后这个报告就再也打不开了。不建议使用这种。
所以我们必须使用其他的命令,让allure可以指定生成的报告目录。
我们在项目的根目录中创建run_case.py文件,内容如下:
-
<span style="color:#596172"><span style="background-color:#ffffff"><code class="language-python"><span style="color:#5c6370"><em>#!/usr/bin/env python3</em></span> -
<span style="color:#5c6370"><em># -*- coding:utf-8 -*-</em></span> -
<span style="color:#7171bf">import</span> sys -
<span style="color:#7171bf">import</span> subprocess -
WIN = sys.platform.startswith(<span style="color:#98c379">'win'</span>) -
<span style="color:#7171bf">def</span> <span style="color:#61aeee">main</span>(): -
<span style="color:#98c379">"""主函数"""</span> -
steps = [ -
<span style="color:#98c379">"venv\\Script\\activate"</span> <span style="color:#7171bf">if</span> WIN <span style="color:#7171bf">else</span> <span style="color:#98c379">"source venv/bin/activate"</span>, -
<span style="color:#98c379">"pytest --alluredir allure-results --clean-alluredir"</span>, -
<span style="color:#98c379">"allure generate allure-results -c -o allure-report"</span>, -
<span style="color:#98c379">"allure open allure-report"</span> -
] -
<span style="color:#7171bf">for</span> step <span style="color:#7171bf">in</span> steps: -
subprocess.run(<span style="color:#98c379">"call "</span> + step <span style="color:#7171bf">if</span> WIN <span style="color:#7171bf">else</span> step, shell=<span style="color:#56b6c2">True</span>) -
<span style="color:#7171bf">if</span> __name__ == <span style="color:#98c379">"__main__"</span>: -
main() -
</code></span></span>
命令释义:
1、使用pytest生成原始报告,里面大多数是一些原始的json数据,加入--clean-alluredir参数清除allure-results历史数据。
-
<span style="color:#596172"><span style="background-color:#ffffff"><code class="language-powershell">pytest <span style="color:#56b6c2">--alluredir</span> allure<span style="color:#56b6c2">-results</span> <span style="color:#56b6c2">--clean-alluredir</span> -
</code></span></span>
- --clean-alluredir 清除allure-results历史数据
2、使用generate命令导出HTML报告到新的目录
-
<span style="color:#596172"><span style="background-color:#ffffff"><code class="language-powershell">allure generate allure<span style="color:#56b6c2">-results</span> <span style="color:#56b6c2">-o</span> allure<span style="color:#56b6c2">-report</span> -
</code></span></span>
- -c 在生成报告之前先清理之前的报告目录
- -o 指定生成报告的文件夹
3、使用open命令在浏览器中打开HTML报告
-
<span style="color:#596172"><span style="background-color:#ffffff"><code class="language-powershell">allure open allure<span style="color:#56b6c2">-report</span> -
</code></span></span>
好了我们运行一下该文件。
-
<span style="color:#596172"><span style="background-color:#ffffff"><code class="language-powershell">Results (<span style="color:#d19a66">12.85</span>s): -
<span style="color:#d19a66">2</span> passed -
Report successfully generated to c:\Users\hoou\PycharmProjects\web<span style="color:#56b6c2">-demotest</span>\allure<span style="color:#56b6c2">-report</span> -
Starting web server... -
<span style="color:#d19a66">2020</span><span style="color:#56b6c2">-06-18</span> <span style="color:#d19a66">23</span>:<span style="color:#d19a66">30</span>:<span style="color:#d19a66">24.122</span>:INFO::main: Logging initialized @<span style="color:#d19a66">260</span>ms to org.eclipse.jetty.util.log.StdErrLog -
Server started at <http://<span style="color:#d19a66">172.18</span>.<span style="color:#d19a66">47.241</span>:<span style="color:#d19a66">7932</span>/>. Press <Ctrl+C> to <span style="color:#7171bf">exit</span> -
</code></span></span>
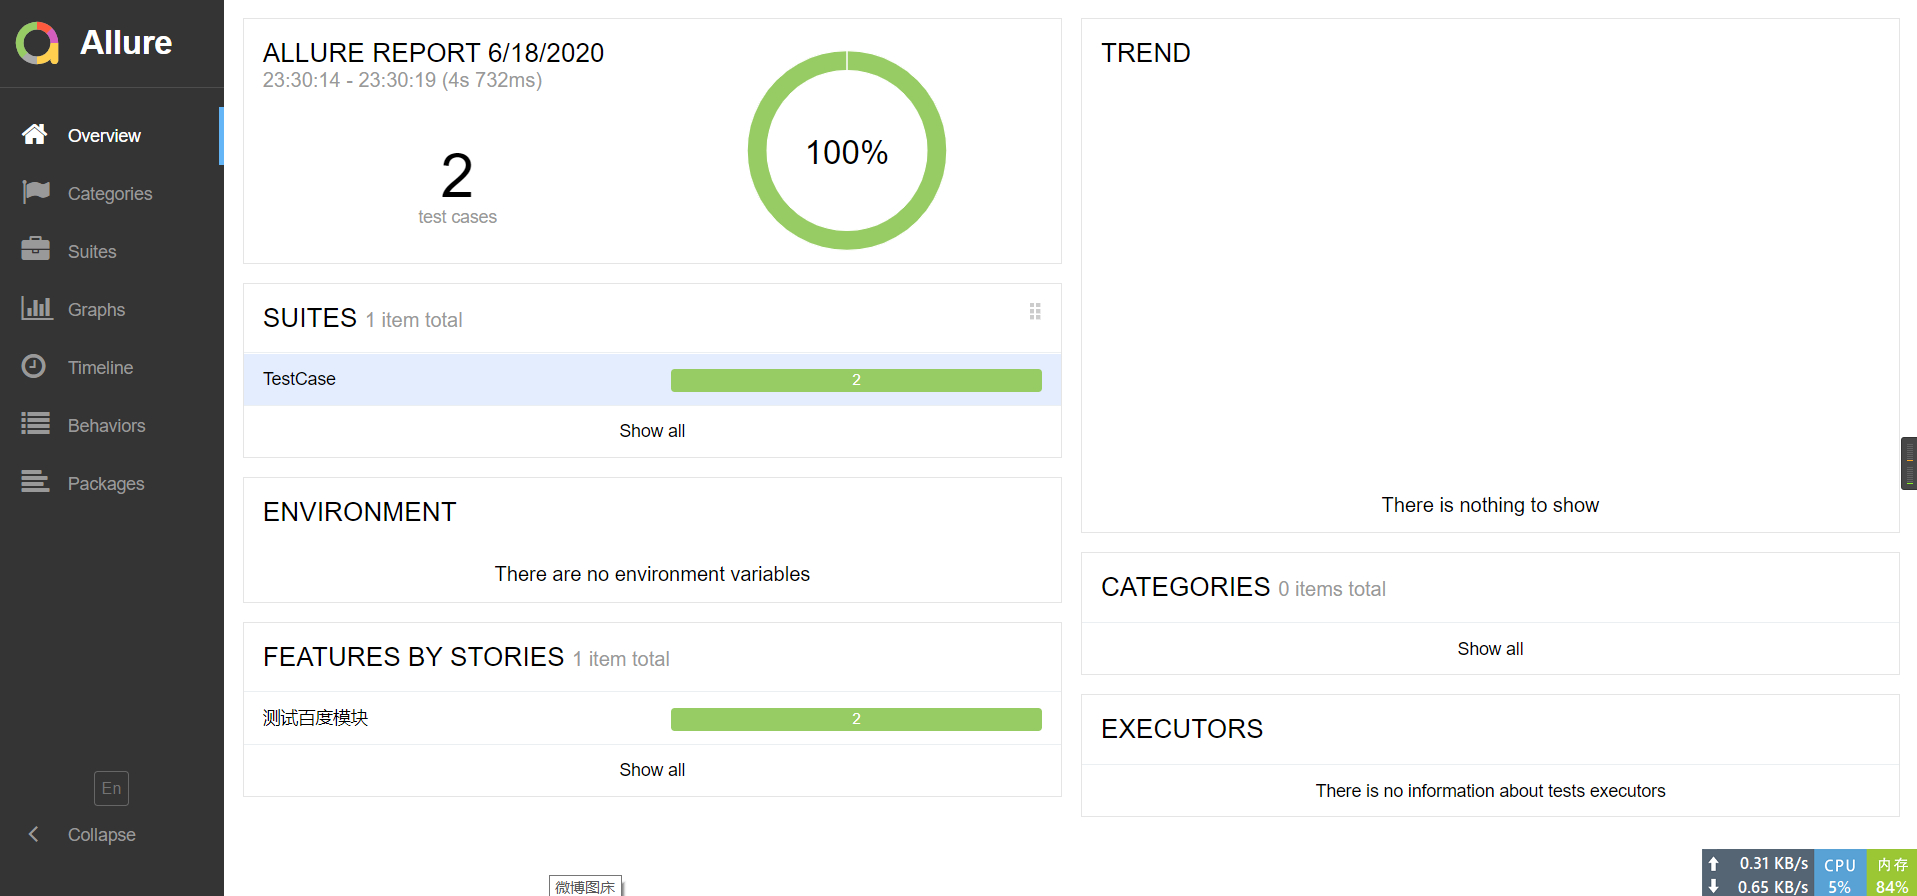
可以看到运行成功了。
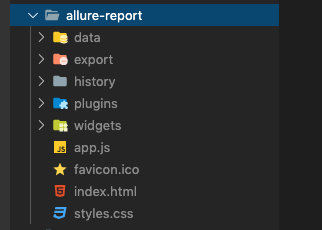
在项目中的allure-report文件夹也生成了相应的报告。
六、allure发生错误截图
上面的用例全是运行成功的,没有错误和失败的,那么发生了错误怎么样在allure报告中生成错误截图呢,我们一起来看看。
首先我们先在config/conf.py文件中添加一个截图目录和截图文件的配置。
-
<span style="color:#596172"><span style="background-color:#ffffff"><code class="language-python">+++ -
<span style="color:#7171bf">class</span> <span style="color:#61aeee">ConfigManager</span>(<span style="color:#61aeee">object</span>): -
... -
<span style="color:#61aeee"> @property</span> -
<span style="color:#7171bf">def</span> <span style="color:#61aeee">screen_path</span>(self): -
<span style="color:#98c379">"""截图目录"""</span> -
screenshot_dir = os.path.join(self.BASE_DIR, <span style="color:#98c379">'screen_capture'</span>) -
<span style="color:#7171bf">if</span> <span style="color:#7171bf">not</span> os.path.exists(screenshot_dir): -
os.makedirs(screenshot_dir) -
now_time = dt_strftime(<span style="color:#98c379">"%Y%m%d%H%M%S"</span>) -
screen_file = os.path.join(screenshot_dir, <span style="color:#98c379">"{}.png"</span>.<span style="color:#7171bf">format</span>(now_time)) -
<span style="color:#7171bf">return</span> now_time, screen_file -
... -
+++ -
</code></span></span>
然后我们修改项目目录中的conftest.py:
-
<span style="color:#596172"><span style="background-color:#ffffff"><code class="language-python"><span style="color:#5c6370"><em>#!/usr/bin/env python3</em></span> -
<span style="color:#5c6370"><em># -*- coding:utf-8 -*-</em></span> -
<span style="color:#7171bf">import</span> base64 -
<span style="color:#7171bf">import</span> pytest -
<span style="color:#7171bf">import</span> allure -
<span style="color:#7171bf">from</span> py.xml <span style="color:#7171bf">import</span> html -
<span style="color:#7171bf">from</span> selenium <span style="color:#7171bf">import</span> webdriver -
<span style="color:#7171bf">from</span> config.conf <span style="color:#7171bf">import</span> cm -
<span style="color:#7171bf">from</span> common.readconfig <span style="color:#7171bf">import</span> ini -
<span style="color:#7171bf">from</span> utils.times <span style="color:#7171bf">import</span> timestamp -
<span style="color:#7171bf">from</span> utils.send_mail <span style="color:#7171bf">import</span> send_report -
driver = <span style="color:#56b6c2">None</span> -
<span style="color:#61aeee">@pytest.fixture(scope=<span style="color:#3388aa">'session'</span>, autouse=<span style="color:#56b6c2">True</span>)</span> -
<span style="color:#7171bf">def</span> <span style="color:#61aeee">drivers</span>(request): -
<span style="color:#7171bf">global</span> driver -
<span style="color:#7171bf">if</span> driver <span style="color:#7171bf">is</span> <span style="color:#56b6c2">None</span>: -
driver = webdriver.Chrome() -
driver.maximize_window() -
<span style="color:#7171bf">def</span> <span style="color:#61aeee">fn</span>(): -
driver.quit() -
request.addfinalizer(fn) -
<span style="color:#7171bf">return</span> driver -
<span style="color:#61aeee">@pytest.hookimpl(hookwrapper=<span style="color:#56b6c2">True</span>)</span> -
<span style="color:#7171bf">def</span> <span style="color:#61aeee">pytest_runtest_makereport</span>(item): -
<span style="color:#98c379">""" -
当测试失败的时候,自动截图,展示到html报告中 -
:param item: -
"""</span> -
pytest_html = item.config.pluginmanager.getplugin(<span style="color:#98c379">'html'</span>) -
outcome = <span style="color:#7171bf">yield</span> -
report = outcome.get_result() -
report.description = <span style="color:#7171bf">str</span>(item.function.__doc__) -
extra = <span style="color:#7171bf">getattr</span>(report, <span style="color:#98c379">'extra'</span>, []) -
<span style="color:#7171bf">if</span> report.when == <span style="color:#98c379">'call'</span> <span style="color:#7171bf">or</span> report.when == <span style="color:#98c379">"setup"</span>: -
xfail = <span style="color:#7171bf">hasattr</span>(report, <span style="color:#98c379">'wasxfail'</span>) -
<span style="color:#7171bf">if</span> (report.skipped <span style="color:#7171bf">and</span> xfail) <span style="color:#7171bf">or</span> (report.failed <span style="color:#7171bf">and</span> <span style="color:#7171bf">not</span> xfail): -
screen_img = _capture_screenshot() -
<span style="color:#7171bf">if</span> screen_img: -
html = <span style="color:#98c379">'<div><img src="data:image/png;base64,%s" alt="screenshot" style="width:1024px;height:768px;" '</span> \ -
<span style="color:#98c379">'onclick="window.open(this.src)" align="right"/></div>'</span> % screen_img -
extra.append(pytest_html.extras.html(html)) -
report.extra = extra -
<span style="color:#7171bf">def</span> <span style="color:#61aeee">pytest_html_results_table_header</span>(cells): -
cells.insert(<span style="color:#d19a66">1</span>, html.th(<span style="color:#98c379">'用例名称'</span>)) -
cells.insert(<span style="color:#d19a66">2</span>, html.th(<span style="color:#98c379">'Test_nodeid'</span>)) -
cells.pop(<span style="color:#d19a66">2</span>) -
<span style="color:#7171bf">def</span> <span style="color:#61aeee">pytest_html_results_table_row</span>(report, cells): -
cells.insert(<span style="color:#d19a66">1</span>, html.td(report.description)) -
cells.insert(<span style="color:#d19a66">2</span>, html.td(report.nodeid)) -
cells.pop(<span style="color:#d19a66">2</span>) -
<span style="color:#7171bf">def</span> <span style="color:#61aeee">pytest_html_results_table_html</span>(report, data): -
<span style="color:#7171bf">if</span> report.passed: -
<span style="color:#7171bf">del</span> data[:] -
data.append(html.div(<span style="color:#98c379">'通过的用例未捕获日志输出.'</span>, class_=<span style="color:#98c379">'empty log'</span>)) -
<span style="color:#7171bf">def</span> <span style="color:#61aeee">pytest_html_report_title</span>(report): -
report.title = <span style="color:#98c379">"pytest示例项目测试报告"</span> -
<span style="color:#7171bf">def</span> <span style="color:#61aeee">pytest_configure</span>(config): -
config._metadata.clear() -
config._metadata[<span style="color:#98c379">'测试项目'</span>] = <span style="color:#98c379">"测试百度官网搜索"</span> -
config._metadata[<span style="color:#98c379">'测试地址'</span>] = ini.url -
<span style="color:#7171bf">def</span> <span style="color:#61aeee">pytest_html_results_summary</span>(prefix, summary, postfix): -
<span style="color:#5c6370"><em># prefix.clear() # 清空summary中的内容</em></span> -
prefix.extend([html.p(<span style="color:#98c379">"所属部门: XX公司测试部"</span>)]) -
prefix.extend([html.p(<span style="color:#98c379">"测试执行人: 随风挥手"</span>)]) -
<span style="color:#7171bf">def</span> <span style="color:#61aeee">pytest_terminal_summary</span>(terminalreporter, exitstatus, config): -
<span style="color:#98c379">"""收集测试结果"""</span> -
result = { -
<span style="color:#98c379">"total"</span>: terminalreporter._numcollected, -
<span style="color:#98c379">'passed'</span>: <span style="color:#7171bf">len</span>(terminalreporter.stats.get(<span style="color:#98c379">'passed'</span>, [])), -
<span style="color:#98c379">'failed'</span>: <span style="color:#7171bf">len</span>(terminalreporter.stats.get(<span style="color:#98c379">'failed'</span>, [])), -
<span style="color:#98c379">'error'</span>: <span style="color:#7171bf">len</span>(terminalreporter.stats.get(<span style="color:#98c379">'error'</span>, [])), -
<span style="color:#98c379">'skipped'</span>: <span style="color:#7171bf">len</span>(terminalreporter.stats.get(<span style="color:#98c379">'skipped'</span>, [])), -
<span style="color:#5c6370"><em># terminalreporter._sessionstarttime 会话开始时间</em></span> -
<span style="color:#98c379">'total times'</span>: timestamp() - terminalreporter._sessionstarttime -
} -
<span style="color:#7171bf">print</span>(result) -
<span style="color:#7171bf">if</span> result[<span style="color:#98c379">'failed'</span>] <span style="color:#7171bf">or</span> result[<span style="color:#98c379">'error'</span>]: -
send_report() -
<span style="color:#7171bf">def</span> <span style="color:#61aeee">_capture_screenshot</span>(): -
<span style="color:#98c379">"""截图保存为base64"""</span> -
now_time, screen_file = cm.screen_path -
driver.save_screenshot(screen_file) -
allure.attach.file(screen_file, -
<span style="color:#98c379">"失败截图{}"</span>.<span style="color:#7171bf">format</span>(now_time), -
allure.attachment_type.PNG) -
<span style="color:#7171bf">with</span> <span style="color:#7171bf">open</span>(screen_file, <span style="color:#98c379">'rb'</span>) <span style="color:#7171bf">as</span> f: -
imagebase64 = base64.b64encode(f.read()) -
<span style="color:#7171bf">return</span> imagebase64.decode() -
</code></span></span>
来看看我们修改了什么:
- 我们修改了_capture_screenshot函数
在里面我们使用了webdriver截图生成文件,并使用allure.attach.file方法将文件添加到了allure测试报告中。
并且我们还返回了图片的base64编码,这样可以让pytest-html的错误截图和allure都能生效。
运行一次得到两份报告,一份是简单的一份是好看内容丰富的。
现在我们在测试用例中构建一个预期的错误测试一个我们的这个代码。
修改test_002测试用例
-
<span style="color:#596172"><span style="background-color:#ffffff"><code class="language-python"> <span style="color:#7171bf">assert</span> <span style="color:#7171bf">not</span> <span style="color:#7171bf">all</span>([<span style="color:#98c379">"selenium"</span> <span style="color:#7171bf">in</span> i <span style="color:#7171bf">for</span> i <span style="color:#7171bf">in</span> search.imagine]) -
</code></span></span>
运行一下:
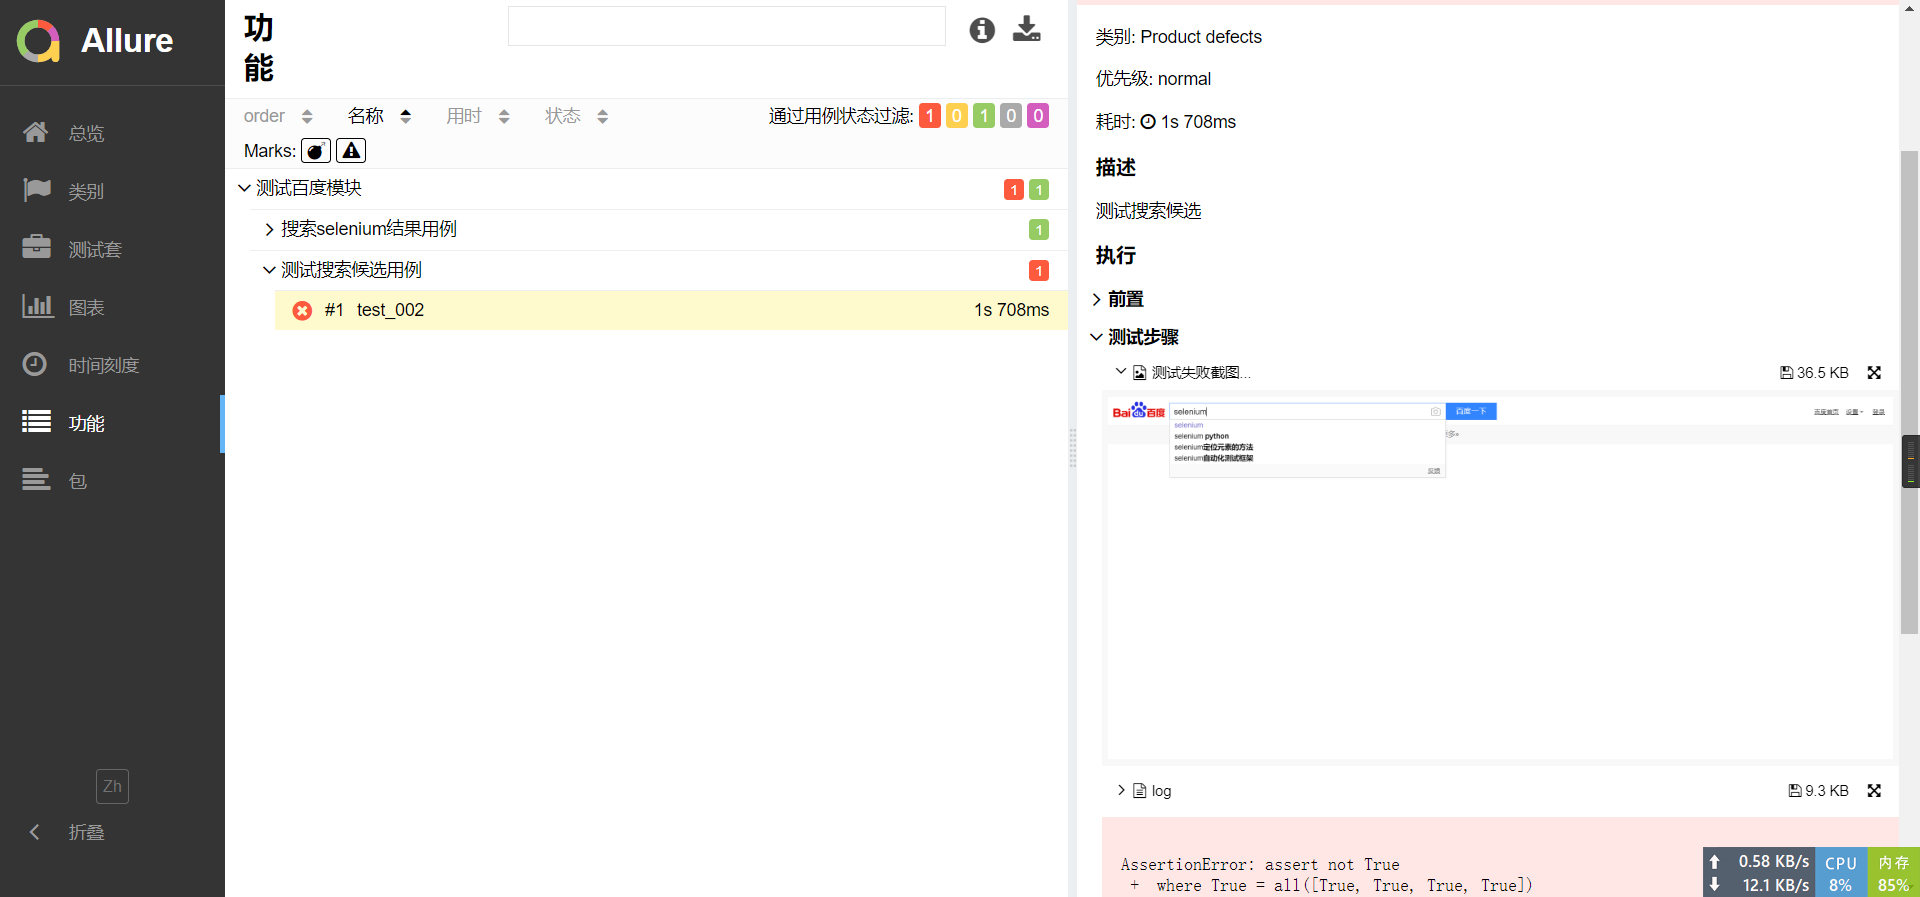
可以看到allure报告中已经有了这个错误的信息。
再来看看pytest-html中生成的报告:
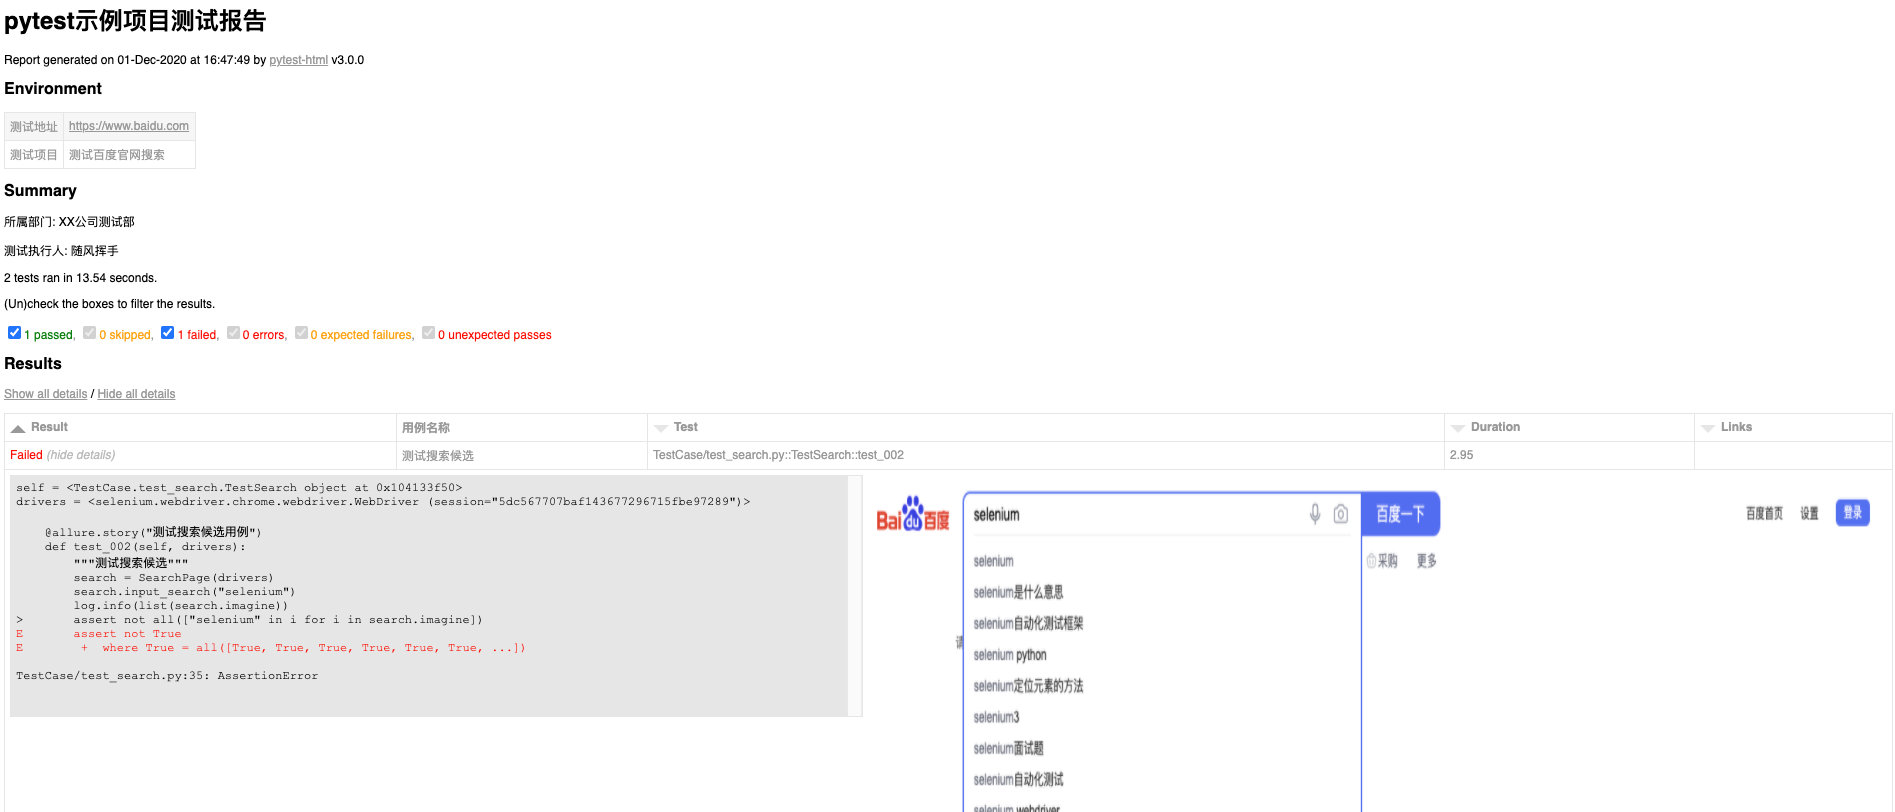
可以看到两份生成的报告都附带了错误的截图,真是鱼和熊掌可以兼得呢。
好了,到这里可以说allure的报告就先到这里了,以后发现allure其他的精彩之处我再来分享。
总结:
感谢每一个认真阅读我文章的人!!!
作为一位过来人也是希望大家少走一些弯路,如果你不想再体验一次学习时找不到资料,没人解答问题,坚持几天便放弃的感受的话,在这里我给大家分享一些自动化测试的学习资源,希望能给你前进的路上带来帮助。
这份文档,对于想从事【软件测试】的朋友来说应该是最全面最完整的备战仓库,这个仓库也陪伴我走过了最艰难的路程,希望也能帮助到你!
以上均可以分享,只需要你搜索vx公众号:程序员雨果,即可免费领取

)


