Web API,是一个能让前后端分离、解放前后端生产力的好东西。不过大部分公司应该都没能做到完全的前后端分离。API的实现方式有很
多,可以用ASP.NET Core、也可以用ASP.NET Web API、ASP.NET MVC、NancyFx等。说到Web API,不同的人有不同的做法,可能前台、
中台和后台各一个api站点,也有可能一个模块一个api站点,也有可能各个系统共用一个api站点,当然这和业务有必然的联系。
安全顺其自然的成为Web API关注的重点之一。现在流行的OAuth 2.0是个很不错的东西,不过本文是暂时没有涉及到的,只是按照最最最
原始的思路做的一个授权验证。在之前的MVC中,我们可能是通过过滤器来处理这个身份的验证,在Core中,我自然就是选择Middleware来处
理这个验证。
下面开始本文的正题:
先编写一个能正常运行的api,不进行任何的权限过滤。
using Dapper;
using Microsoft.AspNetCore.Mvc;
using System.Data;
using System.Linq;
using System.Threading.Tasks;
using WebApi.CommandText;
using WebApi.Common;
using Common;
namespace WebApi.Controllers
{
[Route("api/[controller]")]
public class BookController : Controller
{
private DapperHelper _helper;
public BookController(DapperHelper helper)
{
this._helper = helper;
}
// GET: api/book
[HttpGet]
public async Task<IActionResult> Get()
{
var res = await _helper.QueryAsync(BookCommandText.GetBooks);
CommonResult<Book> json = new CommonResult<Book>
{
Code = "000",
Message = "ok",
Data = res
};
return Ok(json);
}
// GET api/book/5
[HttpGet("{id}")]
public IActionResult Get(int id)
{
DynamicParameters dp = new DynamicParameters();
dp.Add("@Id", id, DbType.Int32, ParameterDirection.Input);
var res = _helper.Query<Book>(BookCommandText.GetBookById, dp, null, true, null, CommandType.StoredProcedure).FirstOrDefault();
CommonResult<Book> json = new CommonResult<Book>
{
Code = "000",
Message = "ok",
Data = res
};
return Ok(json);
}
// POST api/book
[HttpPost]
public IActionResult Post([FromForm]PostForm form)
{
DynamicParameters dp = new DynamicParameters();
dp.Add("@Id", form.Id, DbType.Int32, ParameterDirection.Input);
var res = _helper.Query<Book>(BookCommandText.GetBookById, dp, null, true, null, CommandType.StoredProcedure).FirstOrDefault();
CommonResult<Book> json = new CommonResult<Book>
{
Code = "000",
Message = "ok",
Data = res
};
return Ok(json);
}
}
public class PostForm
{
public string Id { get; set; }
}
}
api这边应该没什么好说的,都是一些常规的操作,会MVC的应该都可以懂。主要是根据id获取图书信息的方法(GET和POST)。这是我们后
面进行单元测试的两个主要方法。这样部署得到的一个API站点,是任何一个人都可以访问http://yourapidomain.com/api/book 来得到相关
的数据。现在我们要对这个api进行一定的处理,让只有权限的站点才能访问它。
下面就是编写自定义的授权验证中间件了。
Middleware这个东西大家应该都不会陌生了,OWIN出来的时候就有中间件这样的概念了,这里就不展开说明,在ASP.NET Core中是如何
实现这个中间件的可以参考官方文档 Middleware。
我们先定义一个我们要用到的option,ApiAuthorizedOptions
namespace WebApi.Middlewares
{
public class ApiAuthorizedOptions
{
//public string Name { get; set; }
public string EncryptKey { get; set; }
public int ExpiredSecond { get; set; }
}
}
option内容比较简单,一个是EncryptKey ,用于对我们的请求参数进行签名,另一个是ExpiredSecond ,用于检验我们的请求是否超时。
与之对应的是在appsettings.json中设置的ApiKey节点
"ApiKey": {
//"username": "123",
//"password": "123",
"EncryptKey": "@*api#%^@",
"ExpiredSecond": "300"
}
有了option,下面就可以编写middleware的内容了
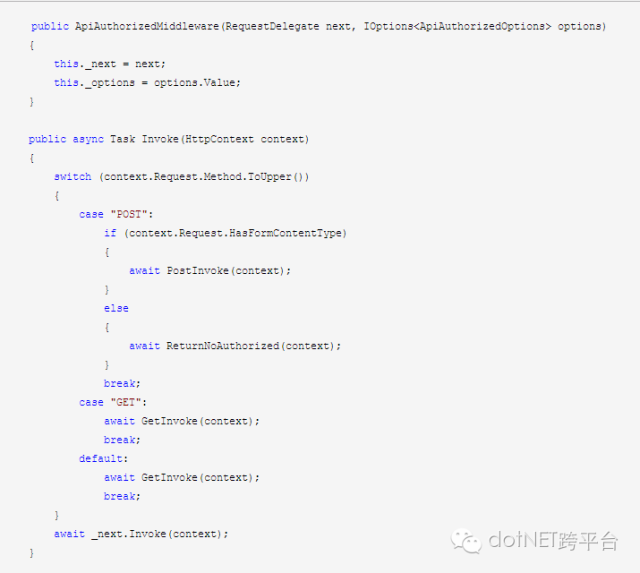
我们的api中就实现了get和post的方法,所以这里也就对get和post做了处理,其他http method,有需要的可以自己补充。
这里的验证主要是下面的几个方面:
1.参数是否被篡改
2.请求是否已经过期
3.请求的应用是否合法
主检查方法:Check
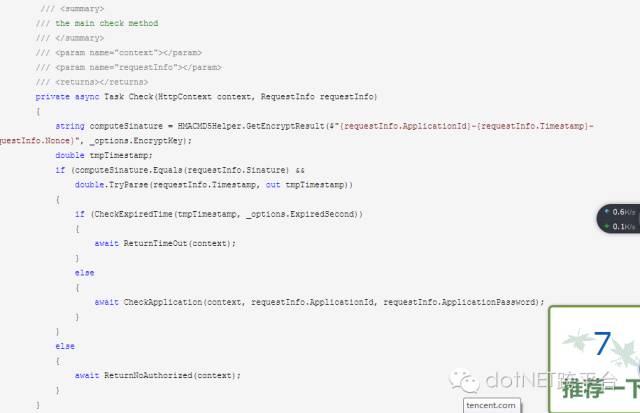
Check方法带了2个参数,一个是当前的httpcontext对象和请求的内容信息,当签名一致,并且时间戳能转化成double时才去校验是否超时
和Applicatioin的相关信息。这里的签名用了比较简单的HMACMD5加密,同样是可以换成SHA等加密来进行这一步的处理,加密的参数和规则是
随便定的,要有一个约定的过程,缺少灵活性(就像跟银行对接那样,银行说你就要这样传参数给我,不这样就不行,只好乖乖从命)。
Check方法还用到了下面的4个处理
1.子检查方法--超时判断CheckExpiredTime
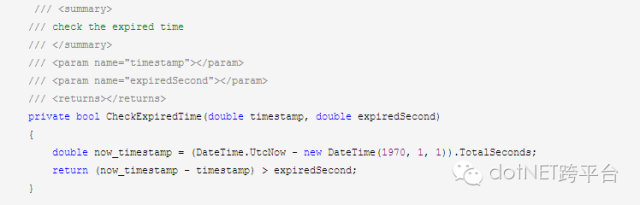
这里取了当前时间与1970年1月1日的间隔与请求参数中传过来的时间戳进行比较,是否超过我们在appsettings中设置的那个值,超过就是
超时了,没超过就可以继续下一个步骤。
2.子检查方法--应用程序判断CheckApplication
应用程序要验证什么呢?我们会给每个应用程序创建一个ID和一个访问api的密码,所以我们要验证这个应用程序的真实身份,是否是那些有权限的应用程序。
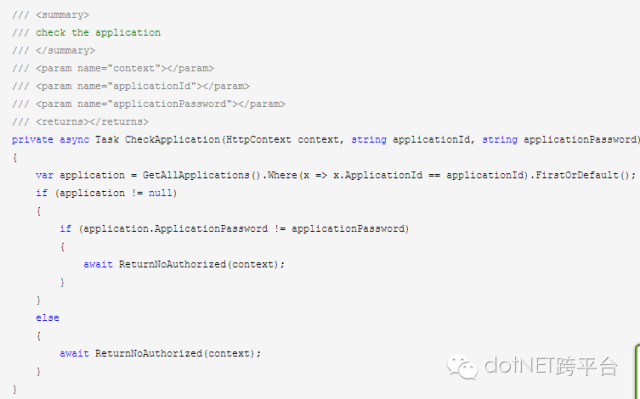
先根据请求参数中的应用程序id去找到相应的应用程序,不能找到就说明不是合法的应用程序,能找到再去验证其密码是否正确,最后才确
定其能否取得api中的数据。
下面两方法是处理没有授权和超时处理的实现:
没有授权的返回方法ReturnNoAuthorized
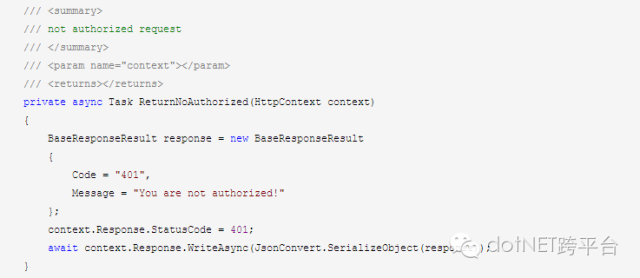
这里做的处理是将响应的状态码设置成401(Unauthorized)。
超时的返回方法ReturnTimeOut
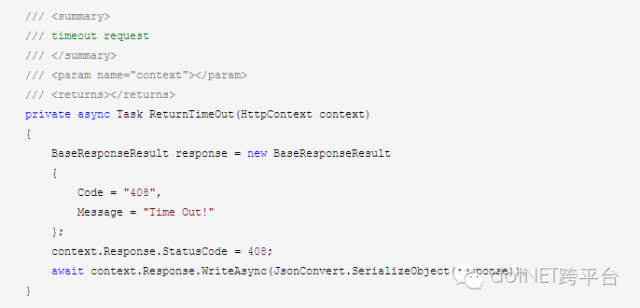
这里做的处理是将响应的状态码设置成408(Time Out)。
下面就要处理Http的GET请求和POST请求了。
HTTP GET请求的处理方法GetInvoke
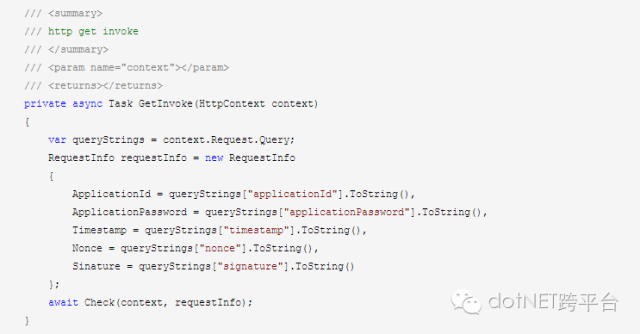
处理比较简单,将请求的参数赋值给RequestInfo,然后将当前的httpcontext和这个requestinfo交由我们的主检查方法Check去校验
这个请求的合法性。
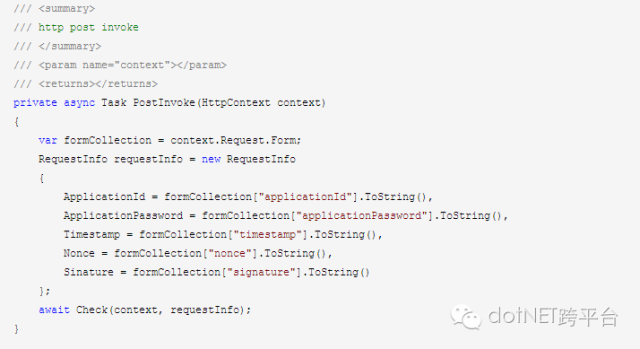
同理,HTTP POST请求的处理方法PostInvoke,也是同样的处理。
最后是Middleware的构造函数和Invoke方法。
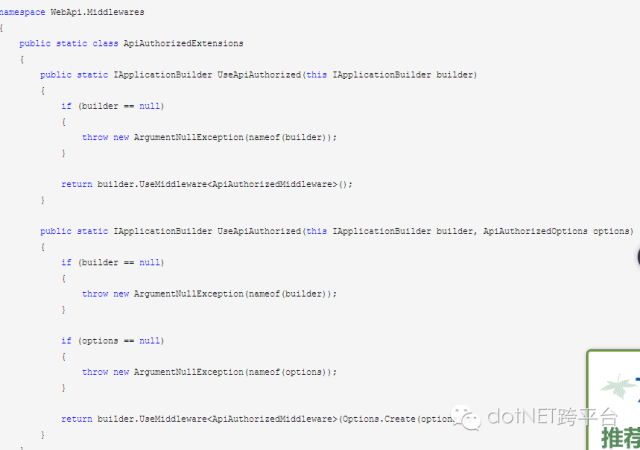
到这里,Middleware是已经编写好了,要在Startup中使用,还要添加一个拓展方法ApiAuthorizedExtensions
using Microsoft.AspNetCore.Builder;
using Microsoft.Extensions.Options;
using System;
到这里我们已经可以在Startup的Configure和ConfigureServices方法中配置这个中间件了
这里还有一个不一定非要实现的拓展方法ApiAuthorizedServicesExtensions,但我个人还是倾向于实现这个ServicesExtensions。
using Microsoft.Extensions.DependencyInjection;
using System;
namespace WebApi.Middlewares
{
public static class ApiAuthorizedServicesExtensions
{
/// <summary>
/// Add response compression services.
/// </summary>
/// <param name="services">The <see cref="IServiceCollection"/> for adding services.</param>
/// <returns></returns>
public static IServiceCollection AddApiAuthorized(this IServiceCollection services)
{
if (services == null)
{
throw new ArgumentNullException(nameof(services));
}
return services;
}
/// <summary>
/// Add response compression services and configure the related options.
/// </summary>
/// <param name="services">The <see cref="IServiceCollection"/> for adding services.</param>
/// <param name="configureOptions">A delegate to configure the <see cref="ResponseCompressionOptions"/>.</param>
/// <returns></returns>
public static IServiceCollection AddApiAuthorized(this IServiceCollection services, Action<ApiAuthorizedOptions> configureOptions)
{
if (services == null)
{
throw new ArgumentNullException(nameof(services));
}
if (configureOptions == null)
{
throw new ArgumentNullException(nameof(configureOptions));
}
services.Configure(configureOptions);
return services;
}
}
}
ApiAuthorizedServicesExtensions
为什么要实现这个拓展方法呢?个人认为
Options、Middleware、Extensions、ServicesExtensions这四个是实现一个中间件的标配(除去简单到不行的那些中间件)
Options给我们的中间件提供了一些可选的处理,提高了中间件的灵活性;
Middleware是我们中间件最最重要的实现;
Extensions是我们要在Startup的Configure去表明我们要使用这个中间件;
ServicesExtensions是我们要在Startup的ConfigureServices去表明我们把这个中间件添加到容器中。
下面是完整的Startup
using Microsoft.AspNetCore.Builder;
using Microsoft.AspNetCore.Hosting;
using Microsoft.Extensions.Configuration;
using Microsoft.Extensions.DependencyInjection;
using Microsoft.Extensions.Logging;
using System;
using WebApi.Common;
using WebApi.Middlewares;
namespace WebApi
{
public class Startup
{
public Startup(IHostingEnvironment env)
{
var builder = new ConfigurationBuilder()
.SetBasePath(env.ContentRootPath)
.AddJsonFile("appsettings.json", optional: true, reloadOnChange: true)
.AddJsonFile($"appsettings.{env.EnvironmentName}.json", optional: true);
if (env.IsEnvironment("Development"))
{
// This will push telemetry data through Application Insights pipeline faster, allowing you to view results immediately.
builder.AddApplicationInsightsSettings(developerMode: true);
}
builder.AddEnvironmentVariables();
Configuration = builder.Build();
}
public IConfigurationRoot Configuration { get; }
// This method gets called by the runtime. Use this method to add services to the container
public void ConfigureServices(IServiceCollection services)
{
// Add framework services.
services.AddApplicationInsightsTelemetry(Configuration);
services.Configure<IISOptions>(options =>
{
});
services.Configure<DapperOptions>(options =>
{
options.ConnectionString = Configuration.GetConnectionString("DapperConnection");
});
//api authorized middleware
services.AddApiAuthorized(options =>
{
options.EncryptKey = Configuration.GetSection("ApiKey")["EncryptKey"];
options.ExpiredSecond = Convert.ToInt32(Configuration.GetSection("ApiKey")["ExpiredSecond"]);
});
services.AddMvc();
services.AddSingleton<DapperHelper>();
}
// This method gets called by the runtime. Use this method to configure the HTTP request pipeline
public void Configure(IApplicationBuilder app, IHostingEnvironment env, ILoggerFactory loggerFactory)
{
loggerFactory.AddConsole(Configuration.GetSection("Logging"));
loggerFactory.AddDebug();
app.UseDapper();
//api authorized middleware
app.UseApiAuthorized();
app.UseApplicationInsightsRequestTelemetry();
app.UseApplicationInsightsExceptionTelemetry();
app.UseMvc();
}
}
}
万事具备,只欠测试!!
建个类库项目,写个单元测试看看。
using Common;
using Newtonsoft.Json;
using System;
using System.Collections.Generic;
using System.Net.Http;
using System.Threading.Tasks;
using Xunit;
namespace WebApiTest
{
public class BookApiTest
{
private HttpClient _client;
private string applicationId = "1";
private string applicationPassword = "123";
private string timestamp = (DateTime.UtcNow - new DateTime(1970, 1, 1)).TotalSeconds.ToString();
private string nonce = new Random().Next(1000, 9999).ToString();
private string signature = string.Empty;
public BookApiTest()
{
_client = new HttpClient();
_client.BaseAddress = new Uri("http://localhost:8091/");
_client.DefaultRequestHeaders.Clear();
signature = HMACMD5Helper.GetEncryptResult($"{applicationId}-{timestamp}-{nonce}", "@*api#%^@");
}
[Fact]
public async Task book_api_get_by_id_should_success()
{
string queryString = $"applicationId={applicationId}×tamp={timestamp}&nonce={nonce}&signature={signature}&applicationPassword={applicationPassword}";
HttpResponseMessage message = await _client.GetAsync($"api/book/4939?{queryString}");
var result = JsonConvert.DeserializeObject<CommonResult<Book>>(message.Content.ReadAsStringAsync().Result);
Assert.Equal("000", result.Code);
Assert.Equal(4939, result.Data.Id);
Assert.True(message.IsSuccessStatusCode);
}
[Fact]
public async Task book_api_get_by_id_should_failure()
{
string inValidSignature = Guid.NewGuid().ToString();
string queryString = $"applicationId={applicationId}×tamp={timestamp}&nonce={nonce}&signature={inValidSignature}&applicationPassword={applicationPassword}";
HttpResponseMessage message = await _client.GetAsync($"api/book/4939?{queryString}");
var result = JsonConvert.DeserializeObject<CommonResult<Book>>(message.Content.ReadAsStringAsync().Result);
Assert.Equal("401", result.Code);
Assert.Equal(System.Net.HttpStatusCode.Unauthorized, message.StatusCode);
}
[Fact]
public async Task book_api_post_by_id_should_success()
{
var data = new Dictionary<string, string>();
data.Add("applicationId", applicationId);
data.Add("applicationPassword", applicationPassword);
data.Add("timestamp", timestamp);
data.Add("nonce", nonce);
data.Add("signature", signature);
data.Add("Id", "4939");
HttpContent ct = new FormUrlEncodedContent(data);
HttpResponseMessage message = await _client.PostAsync("api/book", ct);
var result = JsonConvert.DeserializeObject<CommonResult<Book>>(message.Content.ReadAsStringAsync().Result);
Assert.Equal("000", result.Code);
Assert.Equal(4939, result.Data.Id);
Assert.True(message.IsSuccessStatusCode);
}
[Fact]
public async Task book_api_post_by_id_should_failure()
{
string inValidSignature = Guid.NewGuid().ToString();
var data = new Dictionary<string, string>();
data.Add("applicationId", applicationId);
data.Add("applicationPassword", applicationPassword);
data.Add("timestamp", timestamp);
data.Add("nonce", nonce);
data.Add("signature", inValidSignature);
data.Add("Id", "4939");
HttpContent ct = new FormUrlEncodedContent(data);
HttpResponseMessage message = await _client.PostAsync("api/book", ct);
var result = JsonConvert.DeserializeObject<CommonResult<Book>>(message.Content.ReadAsStringAsync().Result);
Assert.Equal("401", result.Code);
Assert.Equal(System.Net.HttpStatusCode.Unauthorized, message.StatusCode);
}
}
}
测试用的是XUnit。这里写了get和post的测试用例。
下面来看看测试的效果。
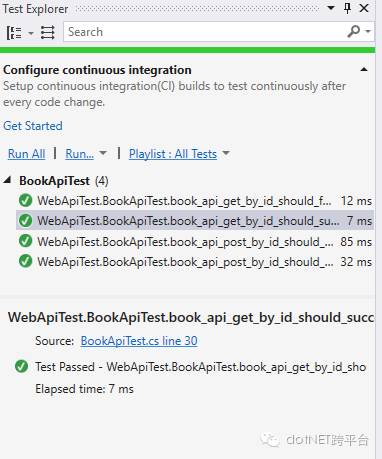
测试通过。这里是直接用VS自带的测试窗口来运行测试,比较直观。
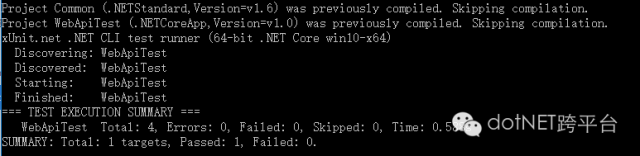
当然也可以通过我们的dotnet test命令来运行测试。
本文的Demo已经上传到Github:
https://github.com/hwqdt/Demos/tree/master/src/ASPNETCoreAPIAuthorizedDemo
原文地址:http://www.cnblogs.com/catcher1994/p/6021046.html
.NET社区新闻,深度好文,微信中搜索dotNET跨平台或扫描二维码关注


、jmap(查看内存)和jstat(性能分析)命令)


)


)
)

