Redux,带你从入门到进阶
- 🌂序言
- ☂️一、基础知识
- 1、Redux概念简述
- 2、Redux的工作流程
- 🎃二、使用Antd实现TodoList页面布局
- 1、在项目中使用Antd
- 2、使用Antd实现TodoList的基本布局
- 3、创建redux中的store
- (1)创建store
- (2)在项目中使用store
- 🧵三、Action和Reducer的编写 - 增添功能
- 1、主体页面内容改造
- 2、改变action中的数据
- 3、store数据改造
- 🧶四、使用Redux实现TodoList的删除功能
- 1、对组件进行事件绑定
- 2、在reducer中进行数据通信
- 👓五、逻辑归纳
- 1、ActionTypes的拆分
- 2、使用actionCreator统一创建action
- 👔六、Redux的一些总结
- 1、Redux设计和使用的三项原则
- 2、Redux的核心API
- 👝七、进阶组件的拆分
- 1、UI组件和容器组件的拆分
- 2、无状态组件
- 🎩八、Redux发起异步请求
- 1、Redux中发送异步请求数据
- 2、Redux-thunk中间件
- (1)解决什么问题
- (2)如何使用
- (3)为什么要使用 redux-thunk ?
- (4)什么是 Redux-thunk 中间件?
- 💼九、Redux的其他中间件
- 1、Redux-logger
- 2、Redux-saga
- (1)Redux-saga是什么
- (2)Redux-saga如何使用
- 🛵十、React-Redux
- 1、React-Redux是什么
- 2、React-Redux的使用
- (1)安装React-Redux
- (2)项目目录
- (3)核心内容
- 🚦十一、结束语
- 🐣彩蛋 One More Thing
- (:往期推荐
- (:番外篇
🌂序言
大家都知道, react 是单向数据流,所以它传递数据也较为简单,父子之间的关系也较为明确。但是呢,如果我们要做更多复杂数据的传递,单单使用 react 是完全不够的。因此,我们需要用到 redux 来做更为复杂的数据传递。
那在下面的这篇文章中,将从入门到进阶,讲解 redux 的工作流程。
叮!开始 redux 之旅吧~👏
☂️一、基础知识
1、Redux概念简述
对于 react 来说,它是一个非视图层的轻量级框架,如果要用它来传递数据的话,则要先父传子,然后再慢慢地一层一层往上传递。
但如果用 redux 的话,假设我们想要某个组件的数据,那这个组件的数据则会通过 redux 来存放到 store 中进行管理。之后呢,通过 store ,再来将数据一步步地往下面的组件进行传递。
值得注意的是,我们可以视 Redux 为 Reducer 和 Flux 的结合。
2、Redux的工作流程
Redux ,实际上就是一个数据层的框架,它把所有的数据都放在了 store 之中。我们先来看一张图:

大家可以看到中间的 store ,它里面就存放着所有的数据。继续看 store 向下的箭头,然后呢,每个组件都要向 store 里面去拿数据。
我们用一个例子来梳理整张图,具体如下:
- ①整张图上有一个
store,它存放着所有的数据,也就是存储数据的公共区域; - ②每个组件,都要从
store里面拿数据; - ③假设现在有一个场景,模拟我们要在图书馆里面借书。那么我们可以把
react Component理解为借书人,之后呢,借书人要去找图书馆管理员才能借到这本书。而借书这个过程中数据的传递,就可以把它视为是Action Creators,可以理解为 “你想要借什么书” 这句话。 - ④
Action Creatures去到store。这个时候我们把store当做是图书馆管理员,但是,图书馆管理员是没有办法记住所有图书的数据情况的。一般来说,它都需要一个记录本,你想要借什么样的书,那么她就先查一下;又或者你想要还什么书,她也要查一下,需要放回什么位置上。 - ⑤这个时候就需要跟
reducers去通信,我们可以把reducers视为是一个记录本,图书馆管理员用这个记录本来记录需要的数据。管理员store通过reducer知道了应该给借书人Components什么样的数据。
🎃二、使用Antd实现TodoList页面布局
1、在项目中使用Antd
打开 antdesign 的官网👉antd官网传送门,我们先来在项目中引入它。具体步骤如下:
第一步,安装 antd 。命令如下:
npm install antd --save
第二步,引入样式。代码如下:
import 'antd/dist/antd.css'; // or 'antd/dist/antd.less'
2、使用Antd实现TodoList的基本布局
首先,我们在项目的 src 文件夹下创建一个新的文件,命名为 TodoList.js 。具体代码如下:
import React, { Component } from 'react';
import 'antd/dist/antd.css';
import { Input, Button, List } from 'antd';const data = ['Racing car sprays burning fuel into crowd.','Japanese princess to wed commoner.','Australian walks 100km after outback crash.','Man charged over missing wedding girl.','Los Angeles battles huge wildfires.',
];class TodoList extends Component {render() {return (<div style={{marginTop: '10px', marginLeft: '10px'}}><div><Input placeholder="todo info" style={{ width: '300px' }} /><Button type="primary">提交</Button></div><ListbordereddataSource={data}renderItem={item => <List.Item>{item}</List.Item>}/></div>)}
}export default TodoList;
此时浏览器的显示效果为:

3、创建redux中的store
(1)创建store
接下来我们来创建项目中的 store 。首先在项目的 src 文件夹下创建一个新的文件夹,命名为 store 。接着,我们在 store 文件夹下面,创建一个新的文件,命名为 index.js 。具体代码如下:
import { createStore } from "redux";
import reducer from './reducer';const store = createStore(reducer);export default store;
然后呢,继续在 store 文件夹下面创建一个新的文件,命名为 reducer.js 。具体代码如下:
const defaultStore = {inputValue: '',list: []
};export default (state = defaultStore, action) => {return state;
}
由此,我们就创建完成了项目中的 store 。
(2)在项目中使用store
创建完 store 之后,我们先初步在项目中使用这个 store ,以便于看看效果。先来添加 store 中的数据,首先改造在 store 中的 reducer.js 文件,具体代码如下:
const defaultStore = {inputValue: '123',list: [1, 2]
};export default (state = defaultStore, action) => {return state;
}
之后改造 TodoList.js 。具体代码如下:
import React, { Component } from 'react';
import 'antd/dist/antd.css';
import { Input, Button, List } from 'antd';
import store from './store'; class TodoList extends Component {constructor(props) {super(props);this.state = store.getState()}render() {return (<div style={{marginTop: '10px', marginLeft: '10px'}}><div><Input placeholder={this.state.inputValue} style={{ width: '300px' }} /><Button type="primary">提交</Button></div><ListbordereddataSource={this.state.list}renderItem={item => <List.Item>{item}</List.Item>}/></div>)}
}export default TodoList;
此时浏览器的显示效果为:

🧵三、Action和Reducer的编写 - 增添功能
1、主体页面内容改造
接下来,我们使用 action 和 reducer ,来对这个组件的数据进行前后传递。首先,先来改造 TodoList.js 文件。具体代码如下:
import React, { Component } from 'react';
import 'antd/dist/antd.css';
import { Input, Button, List } from 'antd';
import store from './store'; class TodoList extends Component {constructor(props) {super(props);this.state = store.getState()this.handleInputChange = this.handleInputChange.bind(this)this.handleStoreChange = this.handleStoreChange.bind(this)this.handleBtnClick = this.handleBtnClick.bind(this)store.subscribe(this.handleStoreChange)}render() {return (<div style={{marginTop: '10px', marginLeft: '10px'}}><div><Inputvalue={this.state.inputValue}placeholder="todo info"style={{ width: '300px', marginRight: '10px'}}onChange={this.handleInputChange}/><Button type="primary" onClick={this.handleBtnClick}>提交</Button></div><Liststyle={{marginTop: '10px', width: '300px'}}bordereddataSource={this.state.list}renderItem={item => <List.Item>{item}</List.Item>}/></div>)}handleInputChange(e) {// 在react中,action是一个对象的形式// type旨在告诉react说,你帮我去改变input的值,这个值是下面的value,也就是e.target.valueconst action = {type: 'change_input_value',value: e.target.value}store.dispatch(action)// console.log(e.target.value)}handleStoreChange() {// 当感知到store的数据发生变化时,那么就去调用store.getState方法,从store里面再重新取一次数据,// 然后去调用setState,替换掉当前store里面的数据this.setState(store.getState())}handleBtnClick() {const action = {type: 'add_todo_item'}store.dispatch(action)}
}export default TodoList;
接下来我们来分析以上代码。首先,每一个动作分别会先去绑定对应的事件,之后呢,在事件里面,去创造 action 。而对于创造的 action 来说,它旨在告诉 react ,让 react 去帮忙 action 去改变某个值,而这个值就是它绑定的 value 。
最后, action 要做的事情结束了,那么它的数据就需要去存储到 store 里面。于是通过 store.dispatch(action) 来进行处理,将 action 的数据传递到 store 里面。
2、改变action中的数据
对于 action 一开始的值来说,它是固定的。但有时候我们是想要去修改action中的值,这个时候就需要用到 reducer 。现在,我们来改造下 reducer.js 文件,让 input 框可以自由的输入值,同时,点击提交按钮之后,进行列表的增添操作。具体代码如下:
const defaultStore = {inputValue: '123',list: [1, 2]
};// reducer 可以接收state,但是绝不能修改state
const reducer = (state = defaultStore, action) => {if (action.type === 'change_input_value') {const newState = JSON.parse(JSON.stringify(state));newState.inputValue = action.value;return newState;}if (action.type === 'add_todo_item') {const newState = JSON.parse(JSON.stringify(state));newState.list.push(newState.inputValue);newState.inputValue = '';console.log(newState);return newState;}return state;
}
export default reducer;
3、store数据改造
下面,我们来看下 store 文件夹下 index.js 的内容。我们需要对其进行简单的改造,具体代码如下:
import { createStore } from "redux";
import reducer from './reducer';const store = createStore(reducer,window.__REDUX_DEVTOOLS_EXTENSION__ && window.__REDUX_DEVTOOLS_EXTENSION__()
);export default store;
除了 reducer 之外,我们还要将 window.__REDUX_DEVTOOLS_EXTENSION__ && window.__REDUX_DEVTOOLS_EXTENSION__() 给传递进去并调用这个方法。
最后,我们来看下浏览器的显示效果:

🧶四、使用Redux实现TodoList的删除功能
1、对组件进行事件绑定
上面我们实现了增添功能,那么现在,我们继续来实现删除功能,实现每点击每一项时,能够删除点击项的数据。先来在 TodoList.js 文件中绑定对应的事件,具体代码如下:
import React, { Component } from 'react';
import 'antd/dist/antd.css';
import { Input, Button, List } from 'antd';
import store from './store'; class TodoList extends Component {constructor(props) {// 此处省略上述已有代码}render() {return ({/* 此处省略上述已有代码 */}<Liststyle={{marginTop: '10px', width: '300px'}}bordereddataSource={this.state.list}renderItem={(item, index) => <List.Item onClick={this.handleItemDelete.bind(this, index)}>{item}</List.Item>}/></div>)}// 此处省略上述已有代码handleItemDelete(index) {const action = {type: 'delete_todo_item',index}store.dispatch(action);}
}export default TodoList;
2、在reducer中进行数据通信
接着,我们在 reducer.js 文件中,对数据进行通信。具体代码如下:
const defaultStore = {inputValue: '123',list: [1, 2]
};// reducer 可以接收state,但是绝不能修改state
const reducer = (state = defaultStore, action) => {// 此处省略上述已有代码if (action.type === 'delete_todo_item') {const newState = JSON.parse(JSON.stringify(state));newState.list.splice(action.index, 1);return newState;}return state;
}
export default reducer;
现在,我们来看下浏览器的显示效果:

👓五、逻辑归纳
1、ActionTypes的拆分
在上面的 TodoList.js 中,大家可以看到,我们会频繁地去操作 action 。同时,假设说其中的 type 如果我们稍微写错了一个字母,那排错的过程总是不好定位的。
因此,我们要来做的一件事情就是 ActionTypes 的拆分。
首先,我们在 store 文件夹下新增一个文件,命名为 actionTypes.js 。具体代码如下:
export const CHANGE_INPUT_VALUE = 'change_input_value';
export const ADD_TODO_ITEM = 'add_todo_item';
export const DELETE_TODO_ITEM = 'delete_todo_item';
其次,改造 TodoList.js 下的内容。具体代码如下:
import {CHANGE_INPUT_VALUE,ADD_TODO_ITEM,DELETE_TODO_ITEM
} from './store/actionTypes'class TodoList extends Component {handleInputChange(e) {const action = {type: CHANGE_INPUT_VALUE,value: e.target.value}store.dispatch(action)}handleStoreChange() {this.setState(store.getState())}handleBtnClick() {const action = {type: ADD_TODO_ITEM}store.dispatch(action)} handleItemDelete(index) {const action = {type: DELETE_TODO_ITEM,index}store.dispatch(action);}
}export default TodoList;
最后,改造 reducer.js 文件。具体代码如下:
import {CHANGE_INPUT_VALUE,ADD_TODO_ITEM,DELETE_TODO_ITEM
} from './actionTypes';const defaultStore = {inputValue: '123',list: [1, 2]
};const reducer = (state = defaultStore, action) => {if (action.type === CHANGE_INPUT_VALUE) {const newState = JSON.parse(JSON.stringify(state));newState.inputValue = action.value;return newState;}if (action.type === ADD_TODO_ITEM) {const newState = JSON.parse(JSON.stringify(state));newState.list.push(newState.inputValue);newState.inputValue = '';console.log(newState);return newState;}if (action.type === DELETE_TODO_ITEM) {const newState = JSON.parse(JSON.stringify(state));newState.list.splice(action.index, 1);return newState;}return state;
}
export default reducer;
通过将 change_input_value 、 add_todo_item 和 delete_todo_item 进行整合,将其整合到 actionTypes.js 文件下,这样,如果我们遇到字母写错的情况下,也能够更好的进行排错。
2、使用actionCreator统一创建action
在上面的 TodoList.js 中,大家可以看到,对于几个绑定的事件来说,我们总是要频繁的去创建 action ,重复性地操作是在程序中最忌讳的一个事情。因此呢,我们要使用 actionCreator ,来对 action 进行统一管理,使得逻辑更加地统一完整。
首先,我们在 store 文件夹下新创建一个文件,命名为 actionCreators.js 。具体代码如下:
import { CHANGE_INPUT_VALUE, ADD_TODO_ITEM, DELETE_TODO_ITEM } from "./actionTypes";export const getInputChangeAction = (value) => ({type: CHANGE_INPUT_VALUE,value: value
});export const getAddItemAction = (value) => ({type: ADD_TODO_ITEM
});export const getDeleteItemAction = (index) => ({type: DELETE_TODO_ITEM,index: index
});
继续,我们来改造 TodoList.js 。具体代码如下:
import { getInputChangeAction, getAddItemAction, getDeleteItemAction } from './store/actionCreators'class TodoList extends Component {handleInputChange(e) {const action = getInputChangeAction(e.target.value);store.dispatch(action)}handleBtnClick() {const action = getAddItemAction();store.dispatch(action)} handleItemDelete(index) {const action = getDeleteItemAction(index);store.dispatch(action);}
}export default TodoList;
通过将 action 中的操作统一抽离到 actionCreators.js 当中,使得最终的逻辑更加的统一。
👔六、Redux的一些总结
讲到这里,我们对上面的一些知识点进行归纳总结,具体如下
1、Redux设计和使用的三项原则
Redux 的设计和使用遵循以下三大原则:
store必须是唯一的👉即整个应用之中必须且只能有一个store;- 只有
store能够改变自己的内容👉即store不是reducer去更新的,而是store在拿到reducer的数据之后,自己对自己的数据进行一次更新;因此,我们回到上面的reducer.js文件,在react中,是不允许state.inputValue === 某个值之类的事情发生的哦,也就是说不能对其直接进行赋值。 Reducer必须是纯函数👉所谓纯函数,即给定固定的输入,就一定有固定的输出,而且不会产生任何的副作用。回到我们上面的reducer.js文件,大家可以看到,state是固定的,action也是固定的,那么最终返回的newState自然也就是固定的。
2、Redux的核心API
我们再来复习 Redux 的几个核心 API 。先看下图:

现在来回顾下这几个核心 API 的作用。具体如下:
- createStore —— 可以帮助我们创建一个
store; - store.dispatch ——
dispatch方法帮助我们派发action,同时,这个action会传递给store; - store.getState ——
getState方法帮助我们获取到所有的数据; - store.subscribe ——
subscribe帮助我们订阅store的改变,只要store发生改变,store.subscribe接收的回调函数就会被执行。
👝七、进阶组件的拆分
1、UI组件和容器组件的拆分
在上面的代码中,我们已经基本完成了 TodoList 的功能。但是呢,大家有没有发现,在 TodoList.js 文件中,页面的渲染和页面的逻辑编写是放在一起的。
往往在实际开发中,我们都会直接把 UI 组件和容器组件给拆分开来。其中, UI 组件专门用于负责页面的渲染,而容器组件用于负责页面的逻辑。
下面我们来对其进行拆分。首先,我们现在 src 文件夹下新增一个文件,命名为 TodoListUI.js 。具体代码如下:
import React, { Component } from 'react';
import 'antd/dist/antd.css';
import { Input, Button, List } from 'antd';class TodoListUI extends Component {render() {return (<div style={{ marginTop: '10px', marginLeft: '10px' }}><div><Inputvalue={this.props.inputValue}placeholder="todo info"style={{ width: '300px', marginRight: '10px' }}onChange={this.props.handleInputChange}/><Button type="primary" onClick={this.props.handleBtnClick}>提交</Button></div><Liststyle={{ marginTop: '10px', width: '300px' }}bordereddataSource={this.props.list}renderItem={(item, index) => <List.Item onClick={() => { this.props.handleItemDelete(index) }}>{item}</List.Item>}/></div>)}
}export default TodoListUI;
继续,我们来改造 TodoList.js 文件的内容。具体代码如下:
import React, { Component } from 'react';import store from './store';
import { getInputChangeAction, getAddItemAction, getDeleteItemAction } from './store/actionCreators';
import TodoListUI from './TodoListUI';class TodoList extends Component {constructor(props) {super(props);this.state = store.getState()this.handleInputChange = this.handleInputChange.bind(this)this.handleStoreChange = this.handleStoreChange.bind(this)this.handleBtnClick = this.handleBtnClick.bind(this)this.handleItemDelete = this.handleItemDelete.bind(this)store.subscribe(this.handleStoreChange)}render() {return (<TodoListUIinputValue={this.state.inputValue}list={this.state.list}handleInputChange={this.handleInputChange}handleBtnClick={this.handleBtnClick}handleItemDelete={this.handleItemDelete}/>)}handleInputChange(e) {const action = getInputChangeAction(e.target.value);store.dispatch(action)}handleStoreChange() {this.setState(store.getState())}handleBtnClick() {const action = getAddItemAction();store.dispatch(action)}handleItemDelete(index) {const action = getDeleteItemAction(index);store.dispatch(action);}
}export default TodoList;
大家可以看到,我们把页面的内容给单独抽离出来放到 TodoListUI.js 文件当中,让它只做渲染这一件事情。这样,我们就成功的把 UI 组件和逻辑组件进行拆分。
2、无状态组件
有了 UI 组件之后,我们再来看另外一种组件,无状态组件。所谓无状态组件,就是整个页面什么逻辑都没有,只有一个 render 函数时,我们可以把它称之为是一个无状态组件。
那无状态组件怎么定义呢??
我们可以定义一个函数,这个函数接收一个参数,props 。 TodoListUI.js 文件的具体代码如下:
import React from 'react';
import { Input, Button, List } from 'antd';const TodoListUI = (props) => {return (<div style={{ marginTop: '10px', marginLeft: '10px' }}><div><Inputvalue={props.inputValue}placeholder="todo info"style={{ width: '300px', marginRight: '10px' }}onChange={props.handleInputChange}/><Button type="primary" onClick={props.handleBtnClick}>提交</Button></div><Liststyle={{ marginTop: '10px', width: '300px' }}bordereddataSource={props.list}renderItem={(item, index) => <List.Item onClick={() => { props.handleItemDelete(index) }}>{item}</List.Item>}/></div>)
}export default TodoListUI;
当一个普通函数只有 render 函数的时候,我们完全可以通过一个无状态的组件来替换掉这个普通的组件。那为什么要做这样子的替换呢?
如果我们改造为只有一个函数的时候,那么程序就只需要去运行这个函数,也只需要做这一件事情。换言之,如果我们用 class 的话,那么它的类背后是一个对象,而这个对象又有很多的生命周期函数等等,这就显得没有那么纯粹了。因此,我们定义无状态组件这样的方式,来让组件更加地纯正。
🎩八、Redux发起异步请求
1、Redux中发送异步请求数据
往往在实际的项目中,我们总是需要去和后端请求接口数据并发送 AJAX 请求。那想要在 react 中请求到后端接口数据,该怎么处理呢?
首先我们在 TodoList.js 下面,来请求数据。具体代码如下:
import { getInputChangeAction, getAddItemAction, getDeleteItemAction, initListAction } from './store/actionCreators';class TodoList extends Component {componentDidMount() {axios.get('./list.json').then((res) => {const data = res.data;const action = initListAction(data);store.dispatch(action);})}
}
接着,修改 actionTypes.js 代码。具体如下:
export const CHANGE_INPUT_VALUE = 'change_input_value';
export const ADD_TODO_ITEM = 'add_todo_item';
export const DELETE_TODO_ITEM = 'delete_todo_item';
export const INIT_LIST_ACTION = 'init_list_action';
继续,我们在 actionCreators.js 中对封装 action 。具体代码如下:
import { CHANGE_INPUT_VALUE, ADD_TODO_ITEM, DELETE_TODO_ITEM, INIT_LIST_ACTION } from "./actionTypes";export const getInputChangeAction = (value) => ({type: CHANGE_INPUT_VALUE,value: value
});export const getAddItemAction = (value) => ({type: ADD_TODO_ITEM
});export const getDeleteItemAction = (index) => ({type: DELETE_TODO_ITEM,index: index
});export const initListAction = (data) => ({type: INIT_LIST_ACTION,data: data
})
最后,修改 reducer.js 代码。具体代码如下:
import {CHANGE_INPUT_VALUE,ADD_TODO_ITEM,DELETE_TODO_ITEM,INIT_LIST_ACTION
} from './actionTypes';const defaultStore = {inputValue: '123',list: [1, 2, 3]
};// reducer 可以接收state,但是绝不能修改state
const reducer = (state = defaultStore, action) => {if (action.type === CHANGE_INPUT_VALUE) {const newState = JSON.parse(JSON.stringify(state));newState.inputValue = action.value;return newState;}if (action.type === INIT_LIST_ACTION) {const newState = JSON.parse(JSON.stringify(state));newState.list = action.data;return newState;}if (action.type === ADD_TODO_ITEM) {const newState = JSON.parse(JSON.stringify(state));newState.list.push(newState.inputValue);newState.inputValue = '';console.log(newState);return newState;}if (action.type === DELETE_TODO_ITEM) {const newState = JSON.parse(JSON.stringify(state));newState.list.splice(action.index, 1);return newState;}return state;
}
export default reducer;
由此,我们就实现了通过 axios 的方式来发布 AJAX 请求,请让其获取到数据。
2、Redux-thunk中间件
(1)解决什么问题
在上面的例子中,我们成功地对接口的数据发起了请求。上面这种情况是属于比较简单的例子,但是往往在实际场景中我们遇到的,都是比较复杂的例子。
因此,我们希望的是,当遇到异步请求或者是有着非常复杂逻辑的时候,把它移出到其他文件下进行管理。
那这个时候就需要用到 Redux-thunk 中间件来进行问题解决。接下来我们来看下 Redux-thunk 中间件如何使用?
(2)如何使用
第一步: 安装 redux-thunk 。具体命令如下:
npm i redux-thunk -D
第二步: 引入 redux-thunk 。往往我们在实际调试中,都会受用 redux-devtools 去对项目的 store 进行调试。但如果我们既要引入 redux-devtools ,又要引入 redux-thunk 中间件,该怎么处理呢?在 store|index.js 文件中进行处理。具体代码如下:
// compose函数来自于redux中
import { createStore, applyMiddleware, compose } from "redux";
import reducer from './reducer';
import thunk from 'redux-thunk';const composeEnhancers = window.__REDUX_DEVTOOLS_EXTENSION_COMPOSE__ ?   window.__REDUX_DEVTOOLS_EXTENSION_COMPOSE__({}) : compose;const enhancer = composeEnhancers(applyMiddleware(thunk)
);const store = createStore(reducer,enhancer
);export default store;
通过这种形式的编码,使得我们的 store 既支持 windows 下的 devtools ,也就是可以去调试 store ,又可以成功的引入 redux-thunk 。
第三步: 将异步逻辑进行抽离。先来修改 TodoList.js 的代码。具体如下:
import { getTodoList, getInputChangeAction, getAddItemAction, getDeleteItemAction } from './store/actionCreators';class TodoList extends Component {componentDidMount() {// 这里的action是一个函数const action = getTodoList();// 只有用了thunk,action才能是用函数的形式去进行传递store.dispatch(action);}
}
接着,修改 actionCreators.js 的代码。具体代码如下:
// getTodoList 是一个函数
// 以这种形式生成的函数,可以直接接收dispatch方法
export const getTodoList = () => {return (dispatch) => {axios.get('./list.json').then((res) => {const data = res.data;// 这里的 action 是一个对象const action = initListAction(data);dispatch(action);})}
}
下面,我们来解释下上面这两段代码,具体如下:
配置好 redux-thunk 的环境之后,它使得我们可以在 action 里面,写异步的代码了!为什么这么说呢?
- 以前我们在创建
action时,只能是一个JS对象,而现在,当使用了redux-thunk之后,即使getTodoList()返回的不是一个对象而是一个函数,也可以通过store.dispatch()的方式,把函数发送给到store了。 - 那为什么能够把函数给发送出去呢?就是因为用了
redux-thunk。
继续,我们要谈论具体的实现步骤👇:
- 首先让
TodoList.js中的store,去执行action函数。而这个action函数,来自于actionCreators.js中的getTodoList()。 - 对于
getTodoList()来说,它要做的事情是去请求json的数据和获取json的数据。 - 而获取好了数据之后,接下来,要改变
store里面的数据,那么要先去创建一个action,这个action用来提供给store.dispatch()进行调用。但是呢,store.dispatch()要怎么去获取呢?我们所返回的那个函数中,就会自动地接收到store.dispatch()方法。所以,只要通过dispatch(action),将action给派发出去就可以了。 - 也就是说,
redux-thunk使得我们去创建action或者支持action时,是一个函数的形式。
(3)为什么要使用 redux-thunk ?
看完上面的解释之后,相信大家也就知道 redux-thunk 的奇妙之处了。那为什么要使用 redux-thunk 呢?👇
如果把异步函数放在组件的生命周期中来使用的话,那么这个组件的逻辑就会变得越来越复杂,组件的内容也会变得越来越多。因此,我们通常就会把这种复杂的异步逻辑给拆分出去进行单独管理。那么现在,我们就借助 redux-thunk 中间件,把异步逻辑给拆分到 actionCreators.js 去进行单独管理。由此,使得代码更加规范和统一。
(4)什么是 Redux-thunk 中间件?
在有了上面内容的铺垫之后,接下来,我们返回到中间件的源头,来谈谈 Redux-thunk 中间件的原理。
所谓中间件,肯定就是说是谁和谁的中间。我们先来看一张图:

Redux 中间件的这个中间,指的是 action 和 store 之间。
之前我们说过,在 redux 中, action 只能是一个对象,就因为它是对象,因此直接把它派发给 store 。现在,当我们使用了 redux-thunk 之后, action 就可以是函数了。那为什么可以是函数呢?
看上面的图中不难发现, action 通过 dispatch 的方法,将数据递交给了 store 。且 action 和 store 之间,是一个 dispatch 方法,那我们说的中间件 middleware ,实际上就是对 dispatch 方法的封装和升级。
对于最原始的 dispatch 方法来说,它会接收到一个 JS 对象并将其传递给 store 。
但如果我们传递的是一个 函数 的话,那么这个 dispatch 就升级了。 dispatch 不会直接把函数传递给 store ,它会通过 redux-thunk 中间件的方式,先执行对应的函数,等执行到需要调用 store 的时候,再去调用 store 。
💼九、Redux的其他中间件
1、Redux-logger
redux 的中间件非常的多,比如 redux-logger 可以记录 action 每一次派发的日志。那它怎么记录呢?
它在每一次调用 action 的时候,会通过 dispatch 方法把 action 传递给 store ,之后呢,我们可以对 dispatch 做一个升级,让 dispatch 不仅把 action 传递给 store ,而且在每一次传递之前,我们还通过 console.log 的方式将其打印出来,这样的话,我们就写了一个 redux-logger 的中间件, 它可以在我们派发 action 的时候,把 action 打印在我们的控制台里面。
2、Redux-saga
(1)Redux-saga是什么
在现如今的项目中,用的比较火的中间件不仅有 redux-thunk , redux-logger ,还有 reudx-saga 的使用范围也非常的广。
reudx-saga 也是解决 react 中异步问题的一个中间件,不同于 redux-thunk 的是, redux-thunk 采用的是把异步操作放到 action 里面去操作。而 redux-saga 采用的设计思想是,单独地把异步逻辑拆分出来,放到另一个文件中去进行管理。那 redux-saga 这个中间件该如何使用呢?
(2)Redux-saga如何使用
我们把上面的 TodoList 组件进行升级改造。首先是 store|index.js 文件。具体代码如下:
import { createStore, applyMiddleware, compose } from "redux";
import reducer from './reducer';
import createSagaMiddleware from 'redux-saga';
import todoSagas from './sagas';const sagaMiddleware = createSagaMiddleware()
const composeEnhancers = window.__REDUX_DEVTOOLS_EXTENSION_COMPOSE__ ?   window.__REDUX_DEVTOOLS_EXTENSION_COMPOSE__({}) : compose;
const enhancer = composeEnhancers(sagaMiddleware(sagaMiddleware));const store = createStore(reducer, enhancer);
sagaMiddleware.run(todoSagas);export default store;
在这个文件当中,主要是要把基础配置做好。那这里主要有几个要注意的点是:
- 引入
createSagaMiddleware; - 之后是使用
const sagaMiddleware = createSagaMiddleware()将其进行引入; - 使用
apllyMiddleware去使用这个中间件; - 使用完中间件之后,我们又创建了
saga.js。
接下来我们在 store 文件夹下创建 saga.js 。具体代码如下:
import { takeEvery, put } from 'redux-saga/effects';
import { initListAction } from './actionCreators';
import { GET_INIT_LIST } from './actionTypes';
import axios from 'axios';function getInitList() {try {const res = yield axios.get('./list.json');const action = initListAction(res.data);yield put(action);} catch (e) {console.log('list.json网络请求失败');}
}function* mySaga() {// 通过takeEvery去捕获到每一次派发下来的actionyield takeEvery(GET_INIT_LIST, getInitList);
}export default mySaga;
对于 saga.js 来说,有几个要注意的点是:
- 在
saga.js里面,一定要导出一个generator函数,在这个函数里面,我们写了一些逻辑。逻辑是,当我们接收到的action类型是GET_INIT_LIST时,那么我们就会去执行getInitList这个方法。 getInitList()方法是一个函数,它将会去帮我们取数据,取完数据之后,再将这个数据创建出来一个新的action,并将这个action通过yield put(action)的方式,派发给store。
下面我们来看 actionTypes.js 中的内容。具体代码如下:
// CHANGE_INPUT_VALUE、ADD_TODO_ITEM、DELETE_TODO_ITEM、INIT_LIST_ACTION
export const GET_INIT_LIST = 'get_init_list';
接着,我们来到 TodoList.js 。具体代码如下:
import { getInputChangeAction, getAddItemAction, getDeleteItemAction, getInitList } from './store/actionCreators';class TodoList extends Component {// 此处省略n多内容componentDidMount() {const action = getInitList();store.dispatch(action);}
}export default TodoList;
最后是 store|actionCreators.js 。具体代码如下:
import { GET_INIT_LIST, CHANGE_INPUT_VALUE, ADD_TODO_ITEM, DELETE_TODO_ITEM, INIT_LIST_ACTION } from "./actionTypes";// 此处省略n多内容export const getInitList = () => ({type: GET_INIT_LIST
});
在 TodoList.js 中,我们创建了一个 action ,并将这个 action 派发给 store 。
🛵十、React-Redux
1、React-Redux是什么
在学习了 react 之后,紧接着,我们学习了 redux 。那如果把它们俩结合起来, react-redux 是什么呢?
实际上,它是一个第三方模块,它使得我们在 react 中更加方便地使用 redux 。
2、React-Redux的使用
(1)安装React-Redux
同样地,我们以 TodoList 组件为例,来看下 react-redux 的使用。首先新创建一个 react 项目,同时安装 react-redux 。具体命令如下:
npm install react-redux
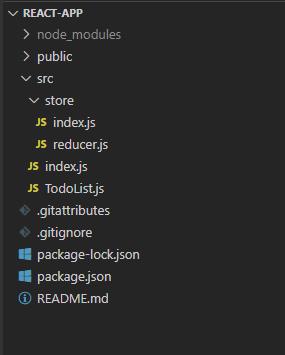
(2)项目目录
下面先来看项目目录。具体如下图:
(3)核心内容
第一步,将 TodoList 组件挂载到页面上。src|index.js 文件下的内容如下:
import React from 'react';
import ReactDOM from 'react-dom';
import TodoList from './TodoList';
import { Provider } from 'react-redux';
import store from './store';const App = (// 表示Provider里面所有的组件,都有能力获取到store<Provider store={store}><TodoList /></Provider>
)ReactDOM.render(App, document.getElementById('root'));
Provider 是 react 提供的第一个核心 API ,它旨在表明, Provider 里面所有的组件,都有能力获取到 store 。
第二步,编写 src|TodoList.js 的内容。具体代码如下:
import React from 'react';
import { connect } from 'react-redux';const TodoList = (props) => {const { inputValue, list, changeInputValue, handleClick, handleDelete } = props;return (<div><div><input value={inputValue} onChange={ changeInputValue }/><button onClick={ handleClick }>提交</button></div><ul>{list.map((item, index) => {return <li onClick={handleDelete} key={index}>{ item }</li>})}</ul></div>)
}const mapStateToProps = (state) => {return {inputValue: state.inputValue,list: state.list}
}// store, dispatch, props
const mapDispatchToProps = (dispatch) => {return {changeInputValue(e) {const action = {type: 'change_input_value',value: e.target.value};// console.log(action.value)dispatch(action);},handleClick() {const action = {type: 'add_item'}dispatch(action);},handleDelete() {}}
}// 让我们的TodoList和store做连接
// TodoList是一个UI组件,connect把这个UI组件和前边的业务逻辑相结合,可以把前面括号的内容称为是容器组件
export default connect(mapStateToProps, mapDispatchToProps)(TodoList);
在上面的代码中,我们要注意的是 react-redux 中的 connect 。
connect 表示的是连接,那么是谁和谁做连接呢? TodoList 和 store 做连接。它们俩做连接需要一个映射关系,这个映射关系就在 mapStateToProps 里面。
在 mapStateToProps 中, state 指的是 store 里面的数据,那 store 里面的数据,就把它映射到 props 里面,之后我们就可以通过 this.props.xxx 的方式,去获取到 store 里面的数据。
第三步,创建 reducer 。在 src|store|reducer.js 下进行编写,具体代码如下:
const defaultState = {inputValue: '',list: []
}export default (state = defaultState, action) => {if (action.type === 'change_input_value') {const newState = JSON.parse(JSON.stringify(state));newState.inputValue = action.value;return newState;}if (action.type === 'add_item') {const newState = JSON.parse(JSON.stringify(state));newState.list.push(newState.inputValue);newState.inputValue = '';return newState;}return state;
}
将 store 中的数据给放到 reducer 当中去进行记录。
第四步,将 reducer 传给 store 。在 src|store|index.js 下进行编写,具体代码如下:
import { createStore } from 'redux';
import reducer from './reducer';const store = createStore(reducer);export default store;
我们将 reducer 中存放的内容进行深拷贝,并把它传回给 store 。这样,就形成了一个数据传递的闭环。
最后,我们来看一下浏览器显示的效果:

相比于使用中间件来说, React-Redux 的使用更加地直观和简洁。在实际项目中,不管是 redux 中间件,还是 react-redux ,都值得拿来做状态管理。
那么要注意的是,redux 中间件和 react-redux 之间,各自在使用过程中不同的点,区分好即可。至于在项目中使用哪一种类型,就依据当下的项目场景去决定就好啦!
🚦十一、结束语
在上面的文章中,我们讲解了 Redux 设计和使用的三项原则,同时,也讲解了 Redux 中的一些核心 API 。除此之外呢,我们还学习了 redux 的中间件, redux-thunk 和 redux-saga 。同时,还学习了另外一个做状态管理的内容, react-redux 。
到这里,关于 redux 的内容就介绍完毕啦!不知道大家是否对 redux 又有了新的了解呢?
🐣彩蛋 One More Thing
(:往期推荐
👉初探react,用react实现一个todoList功能
👉react只停留在表层?五大知识点带你梳理进阶知识
(:番外篇
- 关注公众号星期一研究室,第一时间关注优质文章,更有 「offer来了」面试专栏 待你解锁~
- 如果您觉得这篇文章有帮助到您的的话不妨点赞支持一下哟~~😉
- 以上就是本文的全部内容!我们下期见!👋👋👋


)


)


:ABP模块化开发-文件管理)


