一、Nginx
Nginx是一款高性能的开源Web服务器和反向代理服务器,被广泛用于构建现代化的Web应用和提供静态内容。
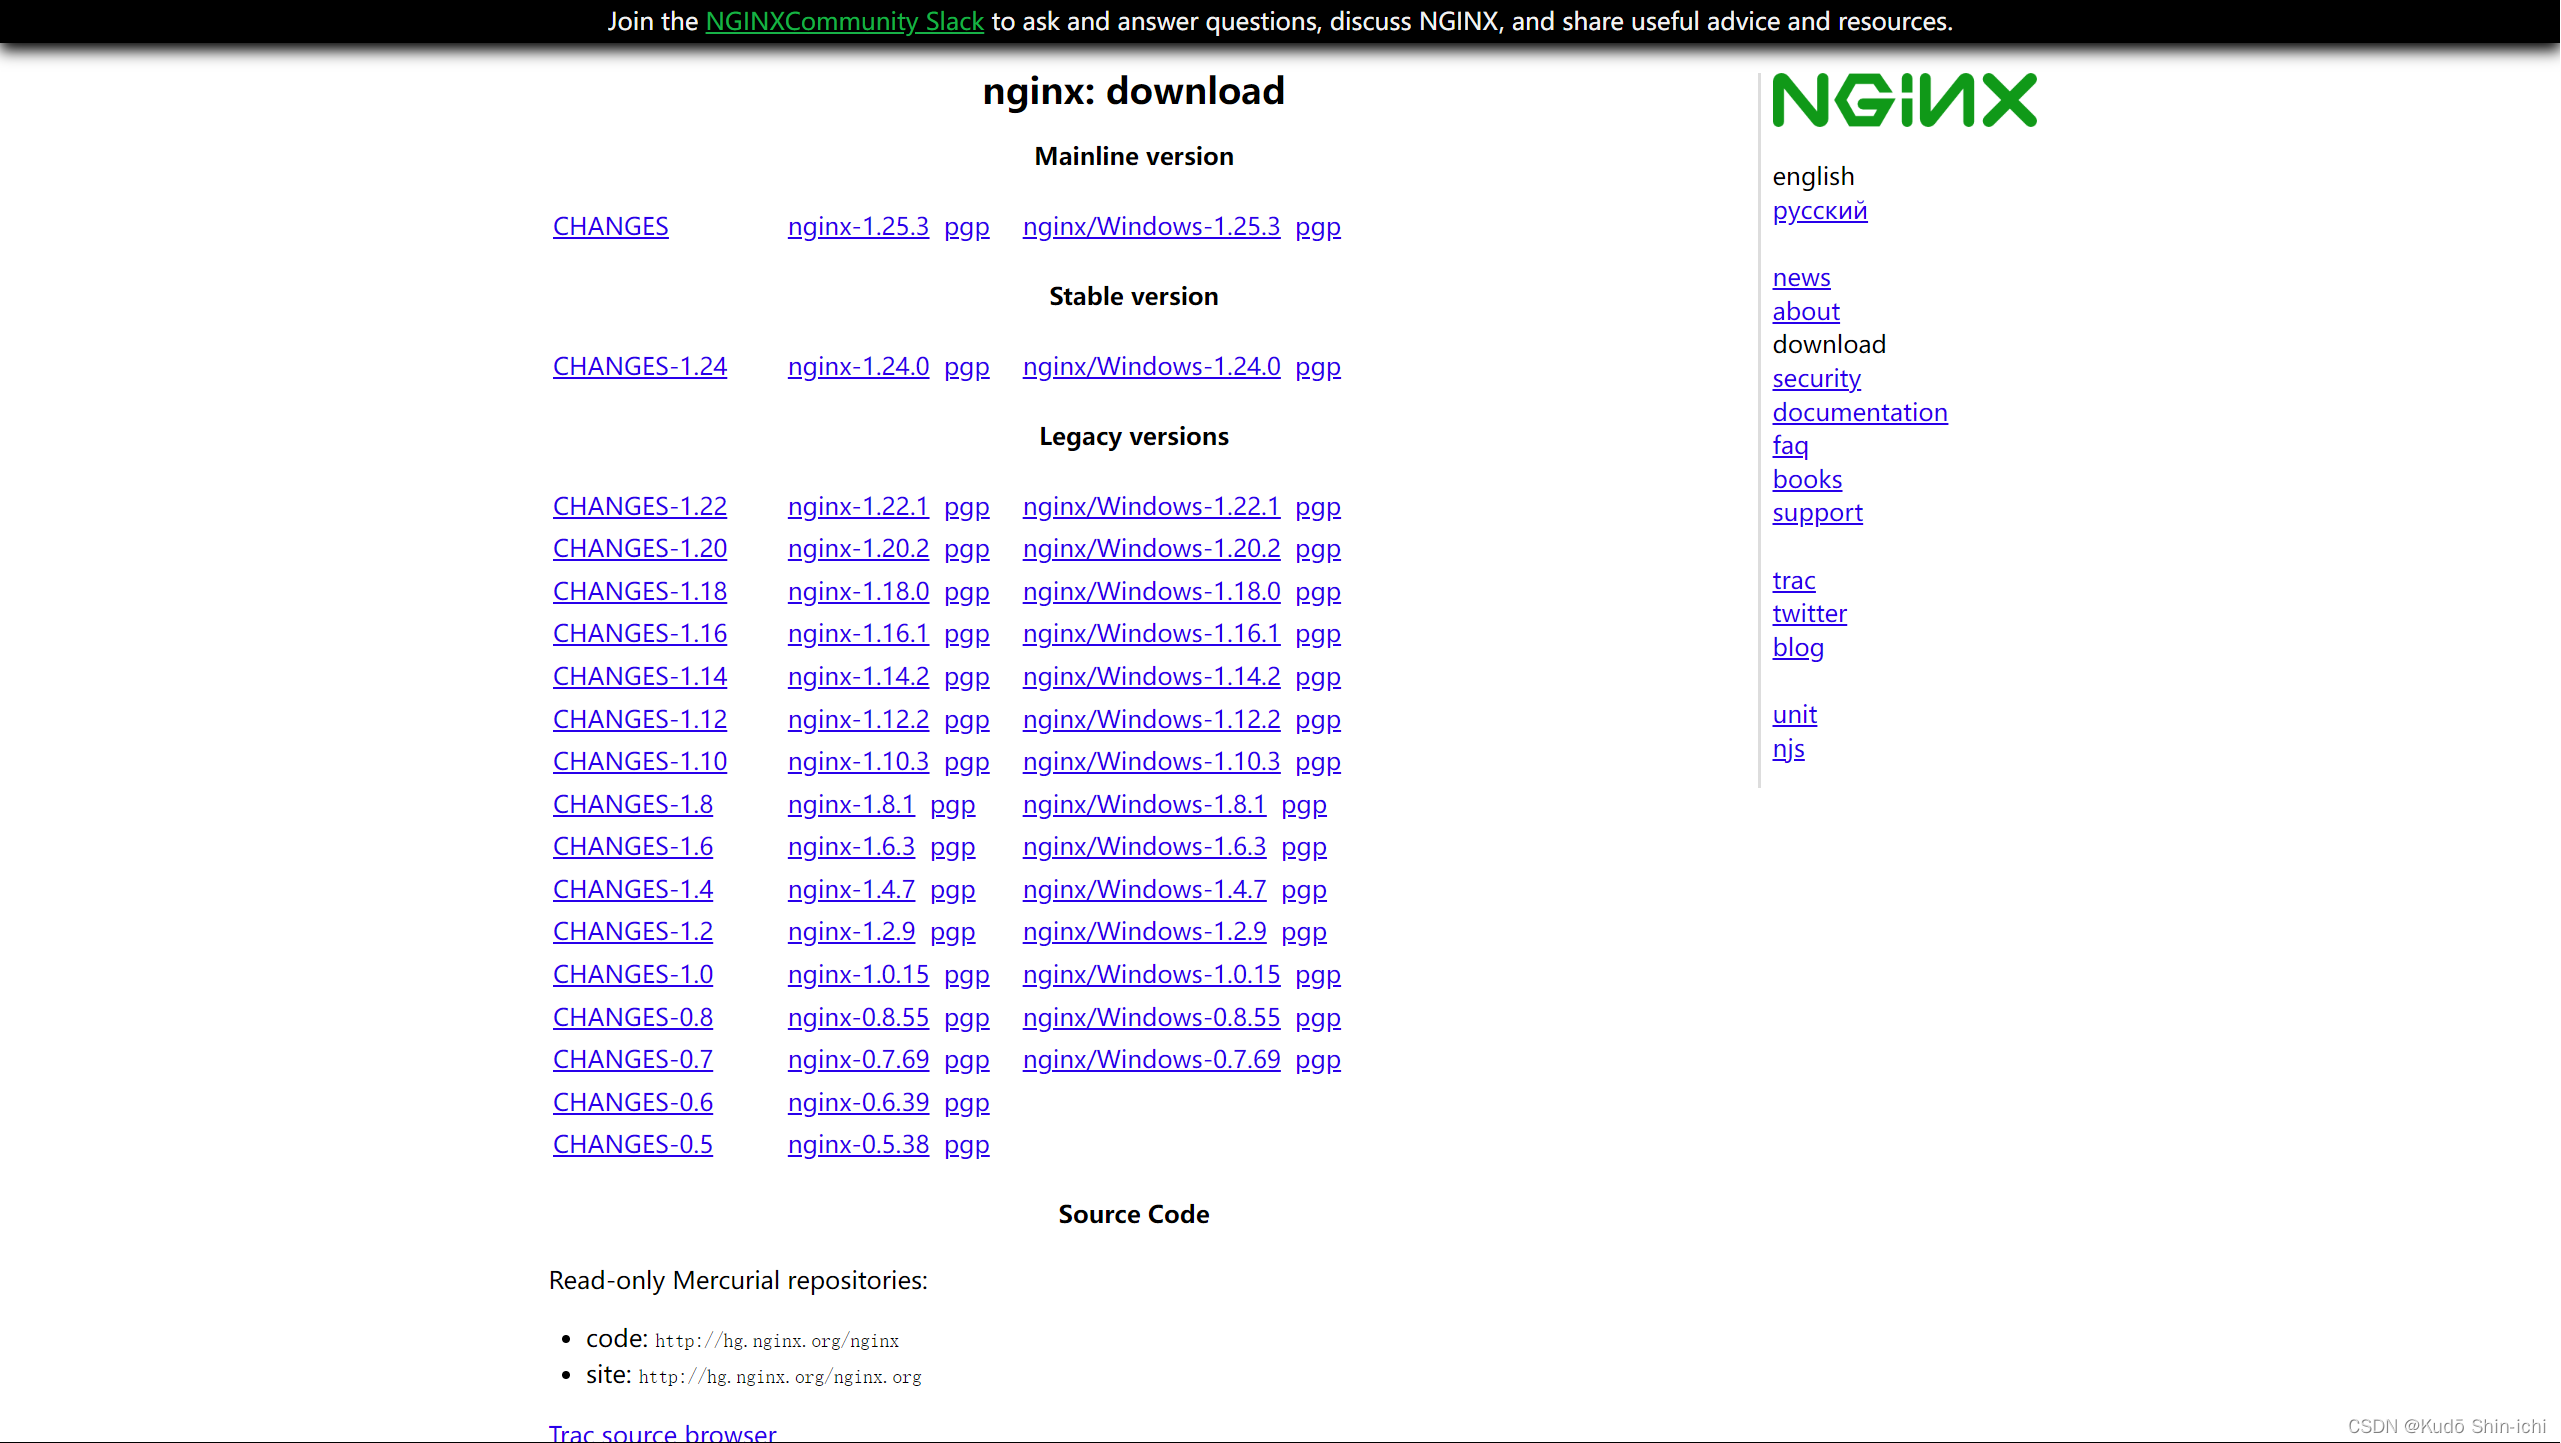
nginx官网
这里下载nginx-1.24.0-zip
Nginx是一款高性能的开源Web服务器和反向代理服务器,被广泛用于构建现代化的Web应用和提供静态内容。
Nginx是位于互联网和后端基础设置之间的网关,当你访问网络应用程序时,请求(request)会首先发送到网络服务器,Nginx会查看请求的资源并确定资源在服务器上的位置,然后将其作为响应(response)发送回客户端(浏览器)。
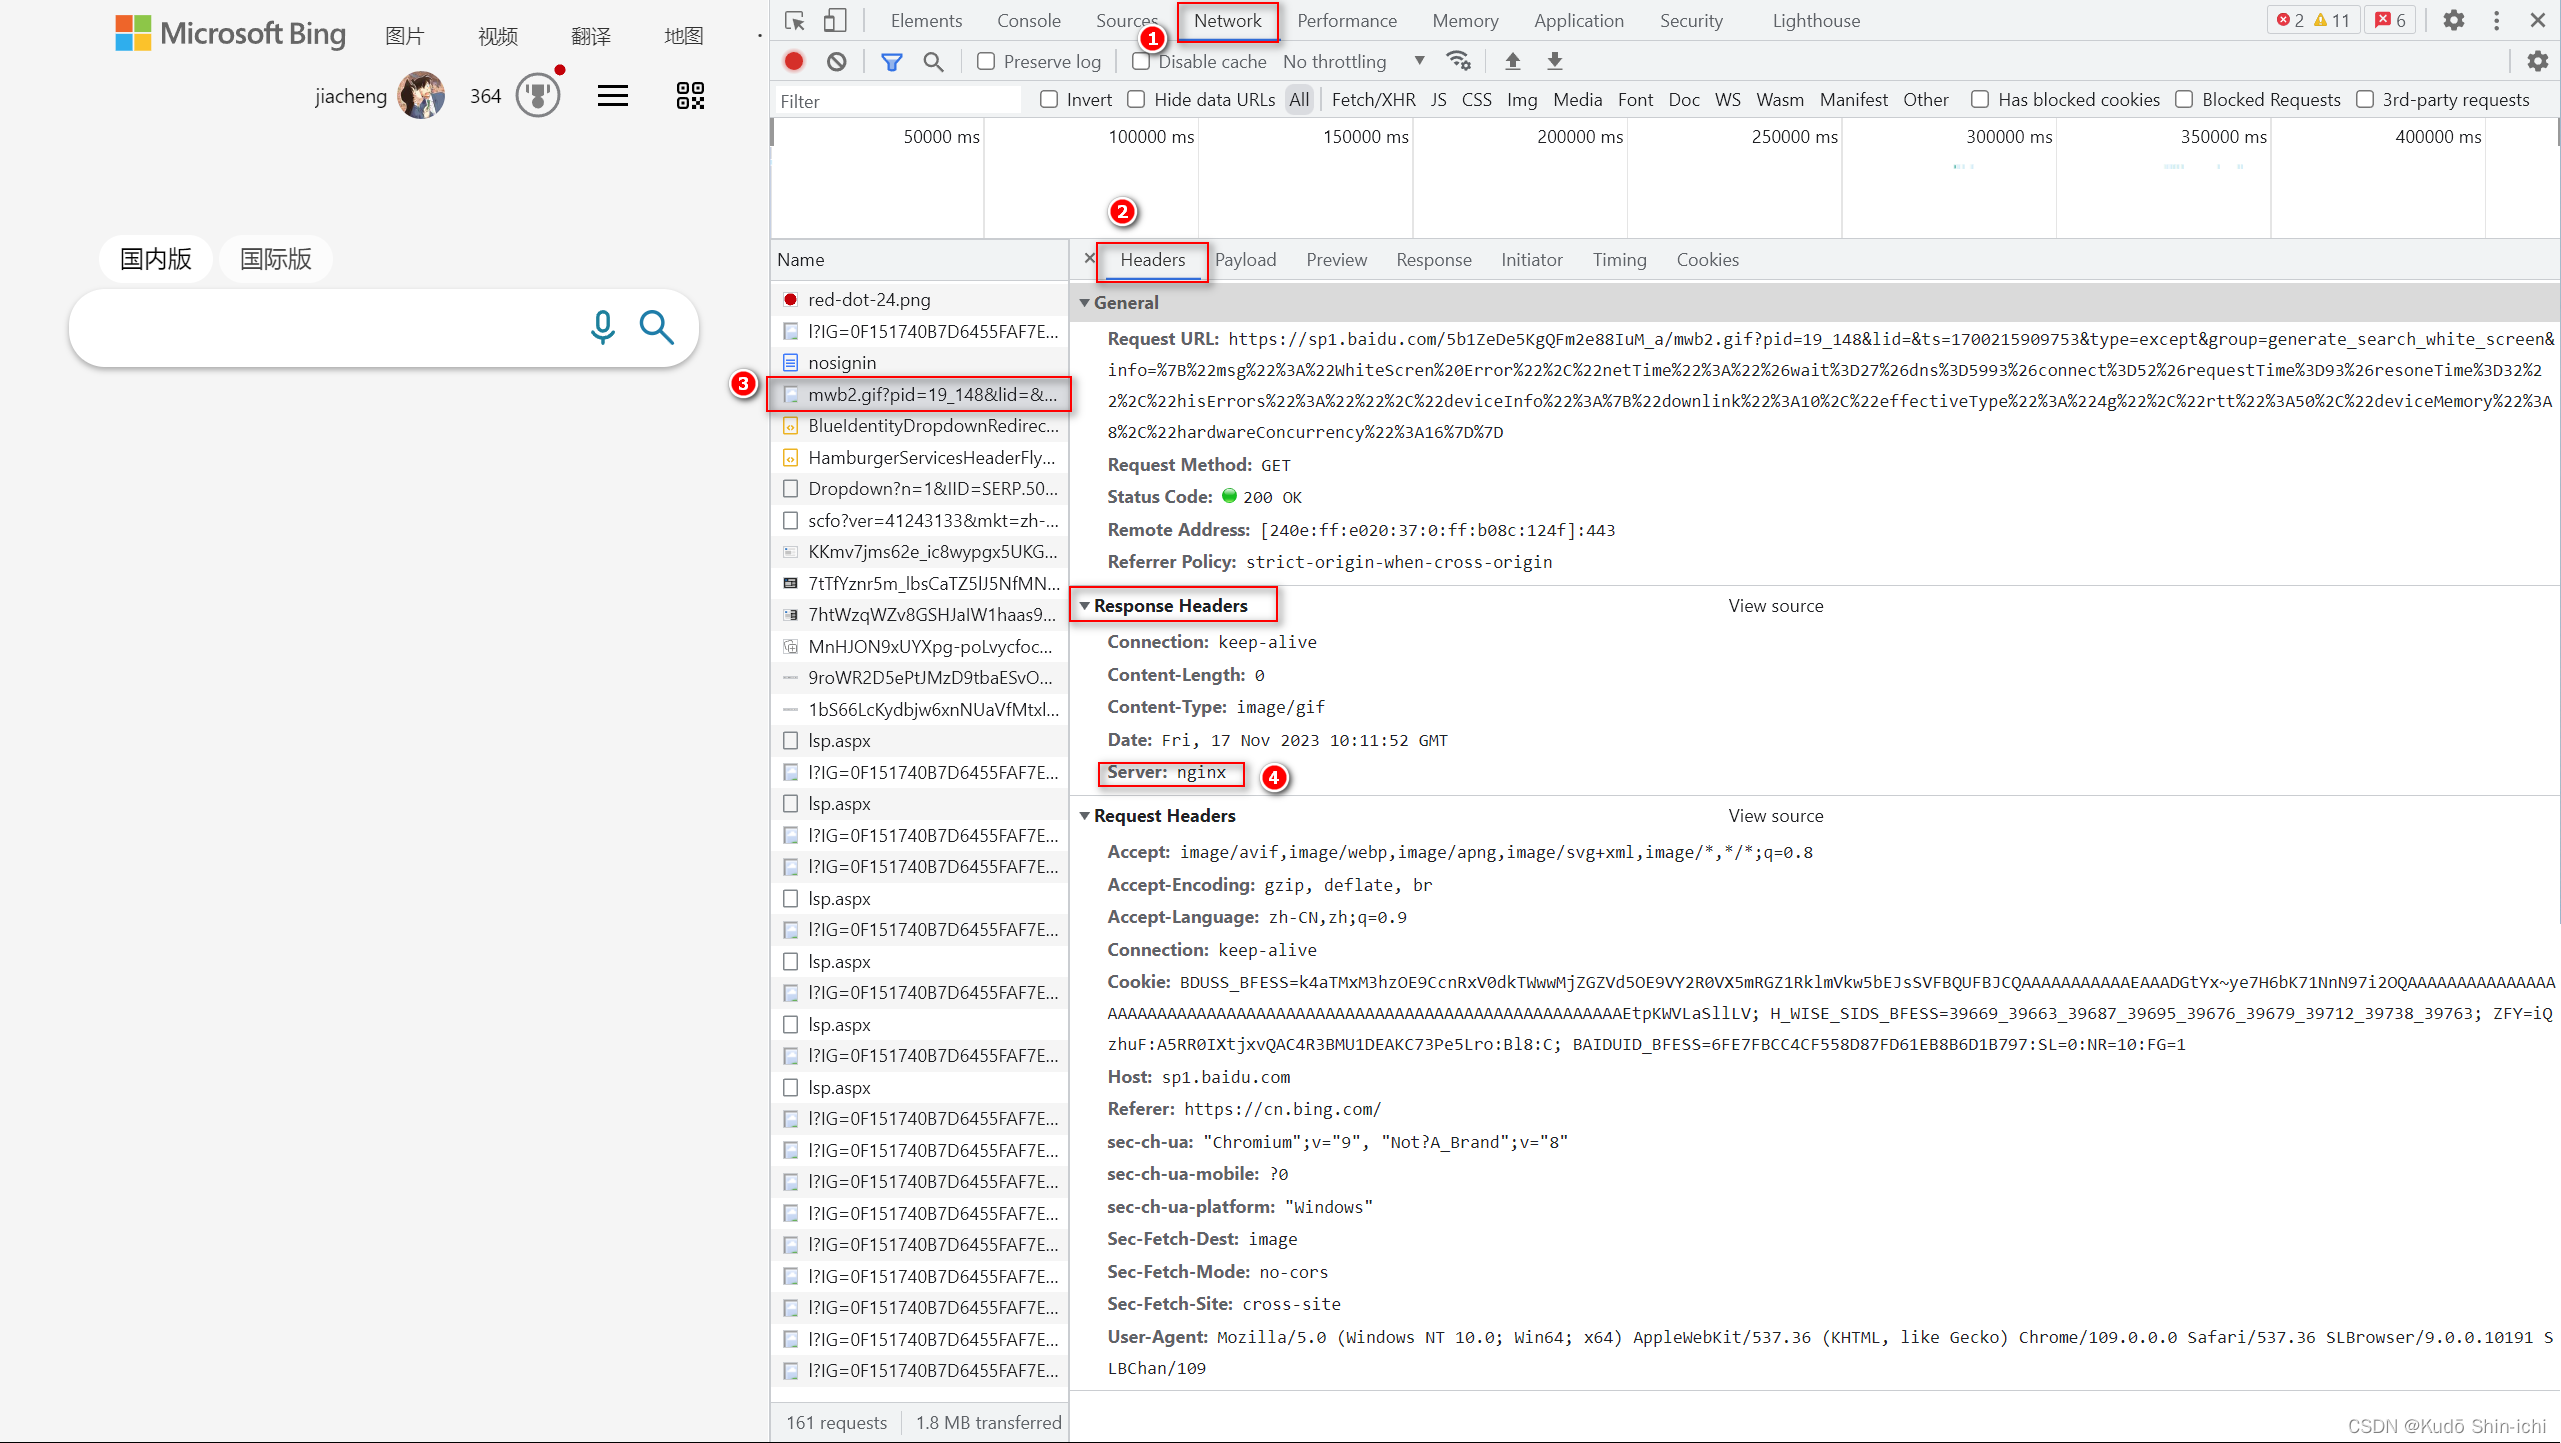
在浏览器的开发者工具中,依次点击Network,Headers,和Name中的资源,即可在Response headers中(即响应的服务器标头)找到Server:nginx。(2023-11-17_181848-server为nginx.png)
Nginx在高流量站点中非常受欢迎,因为它的事件驱动架构,大概可以同时处理超过10000个同时连接。
Nginx常用来做反向代理,充当指挥中心(红绿灯),将负载合理分配到多个后端服务器,同时还提供安全性和缓存,以实现更好的性能。
二、CentOS7.9 2009下安装配置nginx
CentOS7.9 2009下安装配置nginx可参考我这篇文章:
Windows11与CentOS7.9 2009下安装配置nginx后启动整个项目中的 二、CentOS7.9 2009下安装配置nginx
完整安装命令如下(完整安装命令的执行过程截图见上方博客链接):
//1-安装依赖项
sudo yum install gcc pcre-devel zlib-devel openssl-devel//2-下载Nginx源码包
//2-1-下载Nginx源码包
从https://nginx.org/en/download.html查找最新的版本,使用Stable version版本。
nginx-1.24.0.tar.gz
//2-2--将下载好的tar包上传到centos701的目录中  /usr/local   nginx-1.24.0.tar.gz或者//2-下载Nginx源码包
//或者直接复制tar包链接(在Windows中右击复制tar包下载链接)//2-1 CentOS系统安装wget
yum install wget -y
//2-2 Debian/Ubuntu系统安装wget,需要执行以下命令:
apt-get install -y wget//2-2-使用wget获取nginx-1.24.0.tar.gz
wget https://nginx.org/download/nginx-1.24.0.tar.gz3、安装
//3-1、解压安装包nginx-1.24.0.tar.gz
tar -zxvf nginx-1.24.0.tar.gz//3-2、进入解压后的目录nginx-1.24.0
cd  nginx-1.24.0/4、 配置编译选项,包括启用HTTPS支持
//注意这里的目录就是/usr/local/nginx1.24.0
//如果报错就执行4-1、安装依赖项
//说明:因为后续需要安装SSL证书,所以添加了几个模块;如果不需要,可以执行./configure 。
./configure --prefix=/usr/local/nginx1.24.0 --with-http_ssl_module --with-http_v2_module --with-http_stub_status_module参数说明:
--prefix=path:默认路径为/usr/local/nginx,可不配置。
--with-http_ssl_module:配置Nginx以启用HTTPS模块。
--with-http_v2_module:配置Nginx以启用HTTP2模块。
--with-http_stub_status_module:启用状态监控模块,允许查看Nginx的运行状态和统计信息。说明:因为后续需要安装SSL证书,所以添加了几个模块;如果不需要,可以执行./configure 。//4-1、安装依赖项
执行yum -y install gcc openssl-devel pcre-devel zlib-devel
----
报错:2023-9-5 02:33:41
[root@localhost nginx-1.24.0]# ./configure --prefix=/usr/local/nginx1.24.0 --with-http_ssl_module --with-http_v2_module --with-http_stub_status_module
checking for OS+ Linux 3.10.0-1160.el7.x86_64 x86_64
checking for C compiler ... not found./configure: error: C compiler cc is not found执行yum -y install gcc openssl-devel pcre-devel zlib-devel 后,
再次执行./configure --prefix=/usr/local/nginx1.24.0 --with-http_ssl_module --with-http_v2_module --with-http_stub_status_module
不会再报错。
----//4-2、编译和安装Nginx
//编译安装完成后,会发现多了一个nginx1.24.0文件夹
make && make install  或者分别执行//4-2、编译和安装Nginx
//编译安装完成后,会发现多了一个nginx1.24.0文件夹
//编译
make
//安装
sudo make install//5、启动Nginx
//关闭防火墙
systemctl stop firewalld或systemctl stop firewalld.service//进入nginx-1.24.0编译和安装生成的目录nginx1.24.0/sbin
cd /usr/local/nginx1.24.0/sbin//启动nginx
./nginx或者
sudo nginx//6、查看nginx的进程
yum install net-tools -y
netstat -lntup | grep nginx//查看启动的nginx进程
ps -ef | grep nginxyum install lsof
lsof -i :80//7、关闭nginx:
./nginx -s stop
三、nginx.conf的配置
3.1 用户名和日志
在大多数情况下,Nginx安装在linux服务器上,配置文件nginx.conf位于conf目录下(例如/usr/local/nginx1.24.0/conf/nginx.conf),可以在nginx.conf文件中,通过配置指令值,来指定服务器的行为。
指令值是键值对(key value),后跟大括号,例如http{ },则为上下文context,内部包含更多指令。
在全局上下文(main或者global context)(即http{}外面部分)中,可以设置用户名user,和错误日志error_log等内容。但大多数配置都在http{}上下文context中完成。
注意:在nginx.conf中,#号表示注释,不生效。
#user值为用户名
user  nobody;
#error_log 为错误日志
error_log  logs/error.log;
#error_log  logs/error.log  notice;
#error_log  logs/error.log  info;
3.2 配置静态内容
Nginx提供静态内容,例如图像和HTML,可以在http上下文context中处理这个问题。在其中定义一个或者多个服务器,每个服务器通过端口来区分。
Nginx将跟踪对服务器的每个请求,可以将其写入访问日志access.log。最重要的是告诉服务器在那里可以找到原始文件,在位置上下文location{}中配置此操作。
现在当用户导航到我们的服务器域名或者服务器IP时,知道文件系统哪里可以找到index.html文件,并且我们可以根据需要设置第二个位置,来将任何图像的格式与目录相匹配。
#user值为用户名
#在全局上下文(main或者global context)(即http{}外面部分)
#user  nobody;
#error_log 为错误日志
#error_log  logs/error.log;#此处为http上下文context外,在全局上下文(main或者global context)(即http{}外面部分) 中http{#此处为http上下文context中server{#端口listen 80;#访问日志access.logaccess_log /var/log/nginx/access.loglocation / {#/app/www 文件夹有index.html文件。root /app/www }location ~ \.(gif|jpg|png)${#并且我们可以需要设置第二个位置,来将任何图像的格式与目录相匹配。#/app/images目录中有png等格式的图片root /app/images}}
}
在服务器配置nginx.conf中处理的其他常见事项大概包括,配置SSL证书,重写和路由到代理服务器,
当使用代理服务器(proxy_pass)替换root时,可以指向不同的服务器。
#user值为用户名
#在全局上下文(main或者global context)(即http{}外面部分)
#user  nobody;
#error_log 为错误日志
#error_log  logs/error.log;#此处为http上下文context外,在全局上下文(main或者global context)(即http{}外面部分) 中http{#此处为http上下文context中server{#端口listen 80;#访问日志access.logaccess_log /var/log/nginx/access.loglocation / {#/app/www 文件夹有index.html文件。#root /app/www #当使用代理服务器(proxy_pass)替换root时,可以指向不同的服务器proxy_pass http://192.66.55.44:2096}}}//2023-11-17 19:07:14
//创建一个反向代理,可以处理缓存,匿名,和负载平衡。server {listen 2096;root /app/www;location /{}}
四、nginx.conf
4.1 默认的nginx.conf的配置
#user  nobody;
worker_processes  1;#error_log  logs/error.log;
#error_log  logs/error.log  notice;
#error_log  logs/error.log  info;#pid        logs/nginx.pid;events {worker_connections  1024;
}http {include       mime.types;default_type  application/octet-stream;#log_format  main  '$remote_addr - $remote_user [$time_local] "$request" '#                  '$status $body_bytes_sent "$http_referer" '#                  '"$http_user_agent" "$http_x_forwarded_for"';#access_log  logs/access.log  main;sendfile        on;#tcp_nopush     on;#keepalive_timeout  0;keepalive_timeout  65;#gzip  on;server {listen       80;server_name  localhost;#charset koi8-r;#access_log  logs/host.access.log  main;location / {root   html;index  index.html index.htm;}#error_page  404              /404.html;# redirect server error pages to the static page /50x.html#error_page   500 502 503 504  /50x.html;location = /50x.html {root   html;}# proxy the PHP scripts to Apache listening on 127.0.0.1:80##location ~ \.php$ {#    proxy_pass   http://127.0.0.1;#}# pass the PHP scripts to FastCGI server listening on 127.0.0.1:9000##location ~ \.php$ {#    root           html;#    fastcgi_pass   127.0.0.1:9000;#    fastcgi_index  index.php;#    fastcgi_param  SCRIPT_FILENAME  /scripts$fastcgi_script_name;#    include        fastcgi_params;#}# deny access to .htaccess files, if Apache's document root# concurs with nginx's one##location ~ /\.ht {#    deny  all;#}}# another virtual host using mix of IP-, name-, and port-based configuration##server {#    listen       8000;#    listen       somename:8080;#    server_name  somename  alias  another.alias;#    location / {#        root   html;#        index  index.html index.htm;#    }#}# HTTPS server##server {#    listen       443 ssl;#    server_name  localhost;#    ssl_certificate      cert.pem;#    ssl_certificate_key  cert.key;#    ssl_session_cache    shared:SSL:1m;#    ssl_session_timeout  5m;#    ssl_ciphers  HIGH:!aNULL:!MD5;#    ssl_prefer_server_ciphers  on;#    location / {#        root   html;#        index  index.html index.htm;#    }#}}
4.2 /目录中html目录下的dist的nginx.conf配置
在服务器的/目录下新建文件夹html,将dist文件夹上传到此html目录中
dist文件夹为前端打好的包。
dist,即distribution,是Vue打包后生成的默认目录名称,里面包含了前端项目所需要的HTML、CSS、JavaScript等资源文件。
npm run build 一般来说都是这个打包命令。
打包命令根据package.json文件中的命令中的配置来写,下面的打包命令就是npm run build:prod,prod是production的缩写,意思是打生产环境的包,其中的 SET NODE_OPTIONS=--openssl-legacy-provider 是为了解决Node.js版本过高的问题(Error:0308010C:digital envelope routines::unsupported)而添加的。
详情见我这篇文章:
IDEA中Node.js环境下npm报错Error:0308010C:digital envelope routines:unsupported
npm相关安装配置等,参考我这篇文章:
安装配置nvm-windows对Node.js与npm进行版本控制
package.json文件中的命令中配置的打包命令
"scripts": {"dev": "SET NODE_OPTIONS=--openssl-legacy-provider && vue-cli-service serve","build:prod": "SET NODE_OPTIONS=--openssl-legacy-provider && vue-cli-service build","preview": "node build/index.js --preview","lint": "eslint --ext .js,.vue src"},
注意:yarn init或者npm init,执行输入信息后,会生成package.json文件。
参考我这篇文章:安装并配置使用包管理工具-Yarn
启动防火墙同时开放nginx80端口:
参考我这篇 查看CentOS版本及系统位数与设置CentOS 7.9 2009 防火墙配置放开端口的命令与过程
//禁止防火墙开机启动。这种方法方便,但不安全。
systemctl disable firewalld下面  设置CentOS7.9 2009 防火墙配置放开端口80//1-防火墙设置开机自启
systemctl enable firewalld//2-查询防火墙状态
systemctl status firewalld//3-启动防火墙
systemctl start firewalld
//关闭防火墙
systemctl stop firewalld//4-查询防火墙状态,确保已经启动active(running)
systemctl status firewalld//5-查看防火墙是否放行nginx80端口 no:代表没开80端口,yes表示已开nginx80端口。
firewall-cmd --query-port=80/tcp//6-设置永久放行Nginx80端口,”–permanent“参数表示,永久生效,没有此参数重启后失效,表示重启后80端口无法通过。
firewall-cmd --add-port=80/tcp --permanent//7-【设置永久放行Nginx80端口,重启防火墙后才能查询到防火墙已经放行Nginx80端口。】
//返回no,需要重启防火墙才能更新为yes
firewall-cmd --query-port=80/tcp
//#重启防火墙
systemctl restart firewalld
//返回yes,表示永久放行Nginx80端口
//重启防火墙后再次查看就是yes,表示80端口已经永久放行
firewall-cmd --query-port=80/tcp/目录中html目录下的dist的nginx.conf配置如下:
#user  nobody;
worker_processes  1;#error_log  logs/error.log;
#error_log  logs/error.log  notice;
#error_log  logs/error.log  info;#pid        logs/nginx.pid;events {worker_connections  1024;
}http {include       mime.types;default_type  application/octet-stream;#log_format  main  '$remote_addr - $remote_user [$time_local] "$request" '#                  '$status $body_bytes_sent "$http_referer" '#                  '"$http_user_agent" "$http_x_forwarded_for"';#access_log  logs/access.log  main;sendfile        on;#tcp_nopush     on;#keepalive_timeout  0;keepalive_timeout  65;#gzip  on;server {#多个nginx,指定不同端口(设置访问端口)listen       8083;server_name  localhost;#charset koi8-r;#access_log  logs/host.access.log  main;location / {root  /html/dist;index  index.html index.htm;try_files $uri $uri/ /index.html;}#2023-8-9 02:30:13location /api{rewrite  ^/api/(.*)$ /$1 break;proxy_pass http://localhost:9092;}#error_page  404              /404.html;# redirect server error pages to the static page /50x.html#error_page   500 502 503 504  /50x.html;location = /50x.html {root   html;}# proxy the PHP scripts to Apache listening on 127.0.0.1:80##location ~ \.php$ {#    proxy_pass   http://127.0.0.1;#}# pass the PHP scripts to FastCGI server listening on 127.0.0.1:9000##location ~ \.php$ {#    root           html;#    fastcgi_pass   127.0.0.1:9000;#    fastcgi_index  index.php;#    fastcgi_param  SCRIPT_FILENAME  /scripts$fastcgi_script_name;#    include        fastcgi_params;#}# deny access to .htaccess files, if Apache's document root# concurs with nginx's one##location ~ /\.ht {#    deny  all;#}}# another virtual host using mix of IP-, name-, and port-based configuration##server {#    listen       8000;#    listen       somename:8080;#    server_name  somename  alias  another.alias;#    location / {#        root   html;#        index  index.html index.htm;#    }#}# HTTPS server##server {#    listen       443 ssl;#    server_name  localhost;#    ssl_certificate      cert.pem;#    ssl_certificate_key  cert.key;#    ssl_session_cache    shared:SSL:1m;#    ssl_session_timeout  5m;#    ssl_ciphers  HIGH:!aNULL:!MD5;#    ssl_prefer_server_ciphers  on;#    location / {#        root   html;#        index  index.html index.htm;#    }#}}
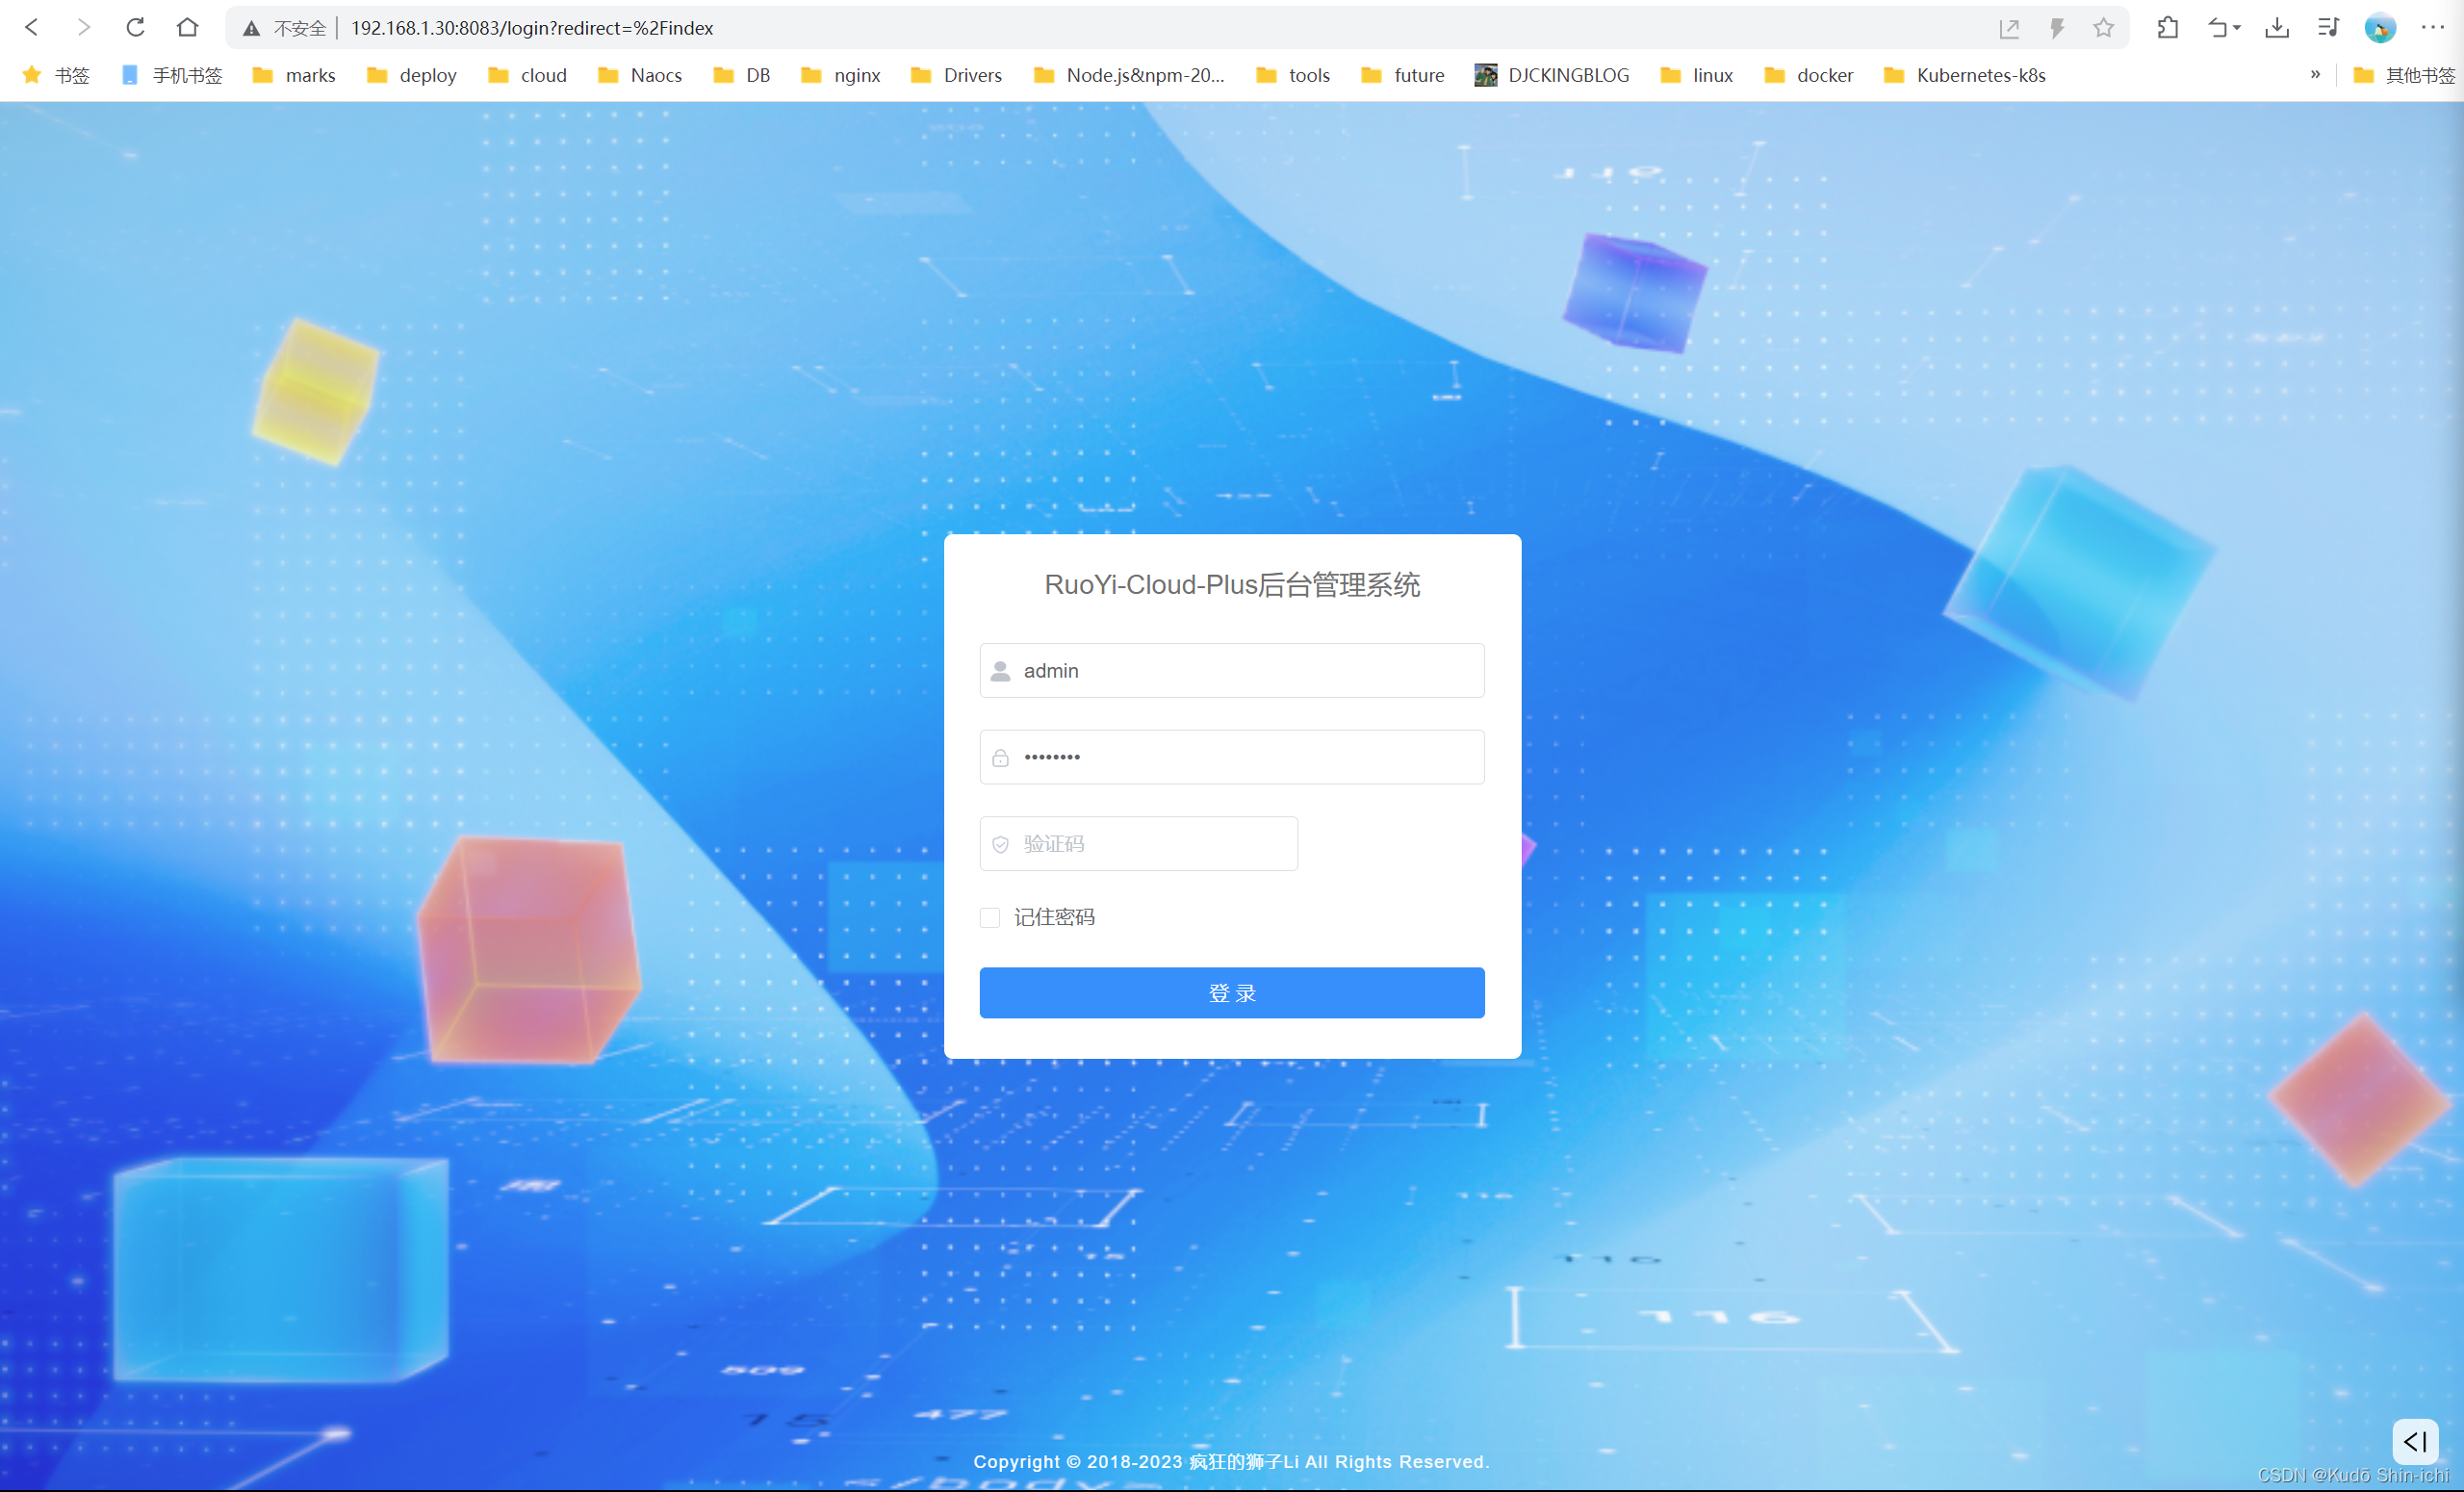
访问成功:
4.3 将dist包上传到指定目录/deploy/ruoyicloud_ui/中
参考我的这篇博客:[Windows11与CentOS7.9 2009下安装配置nginx后启动整个项目]
中的 三、配置CentOS7.9 2009中nginx开机自启 与 4.4 部署dist包 。
4.3.1 配置CentOS7.9 2009中nginx开机自启
参考我的这篇博客:[Windows11与CentOS7.9 2009下安装配置nginx后启动整个项目]
中的 三、配置CentOS7.9 2009中nginx开机自启 。
4.3.1.1 命令
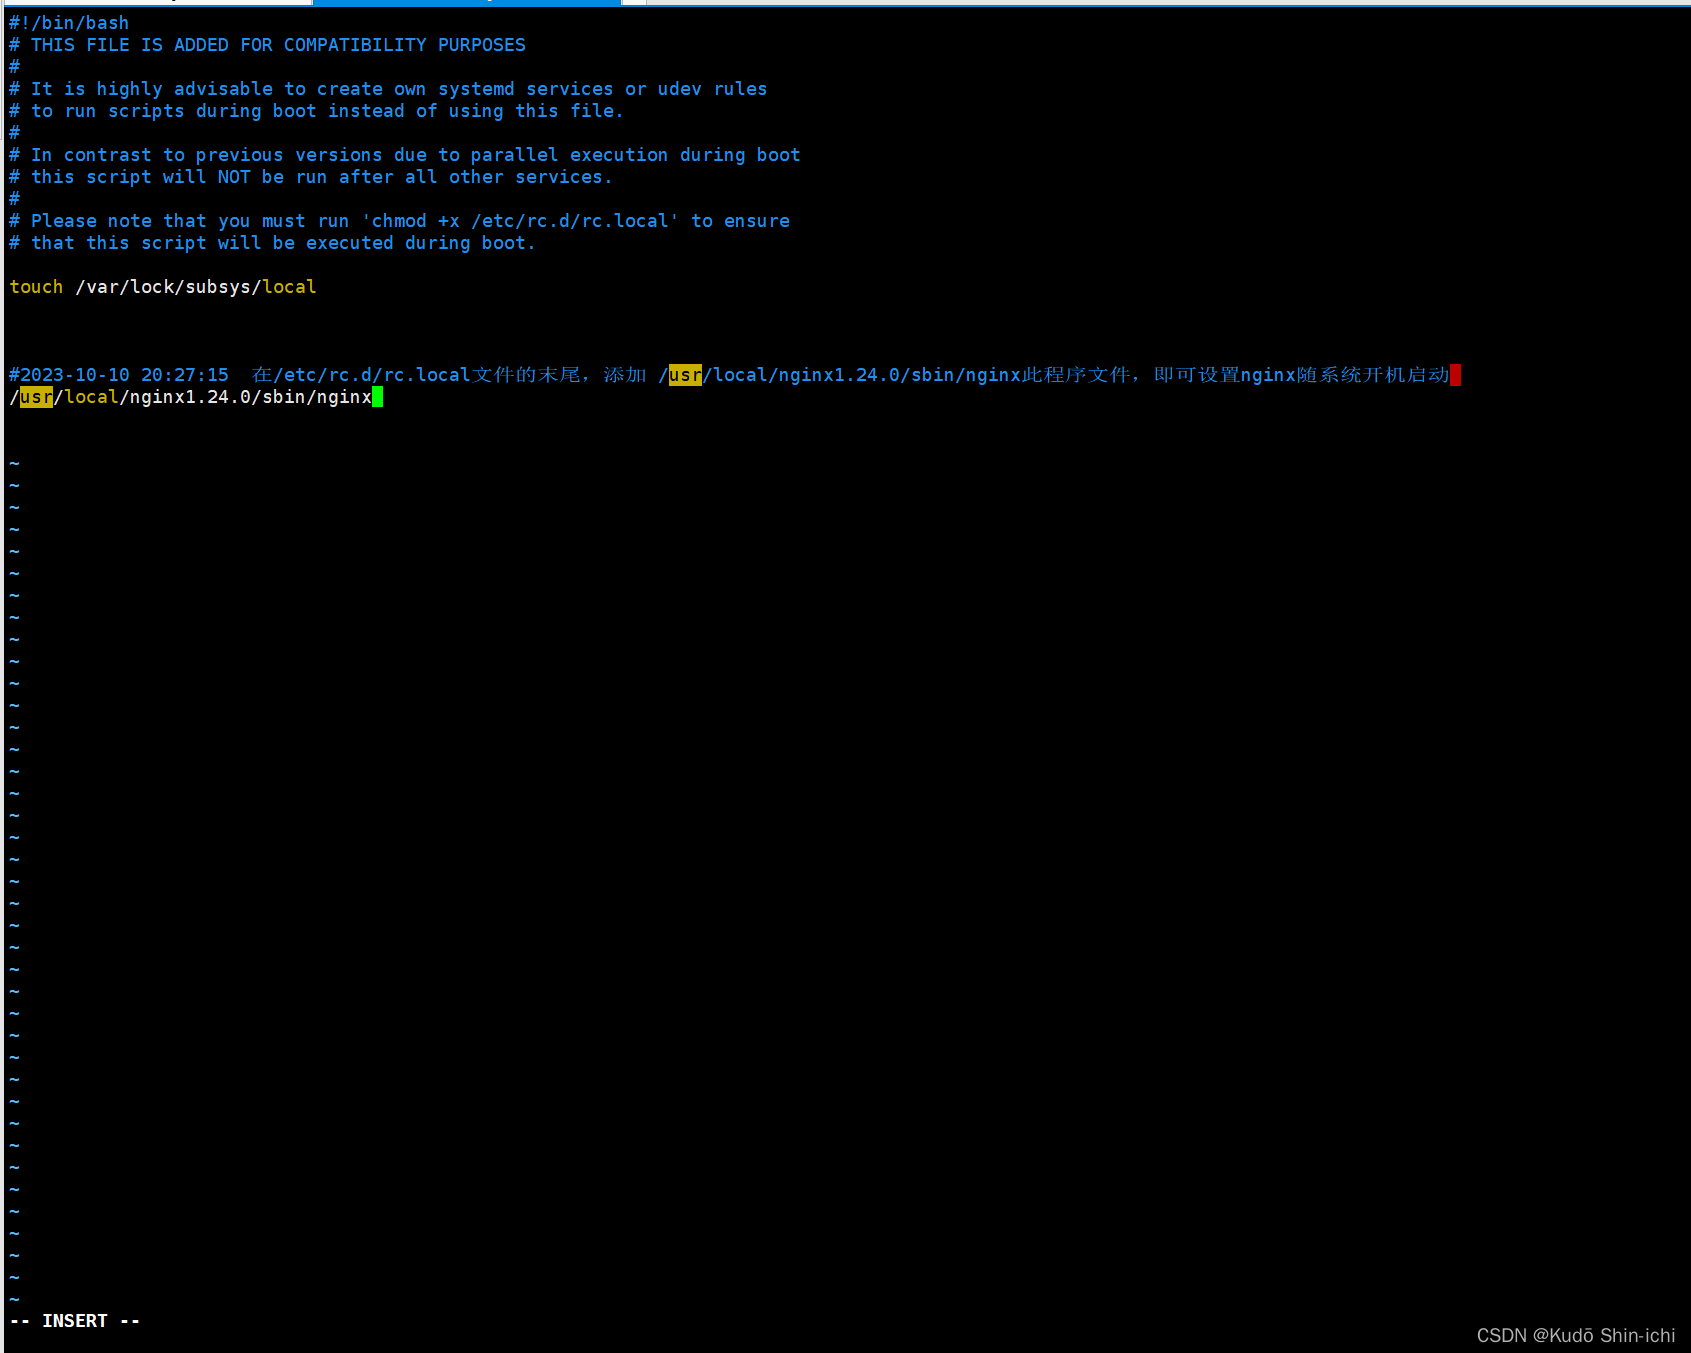
//1-修改rc.local文件的配置
//rc.local是个文件
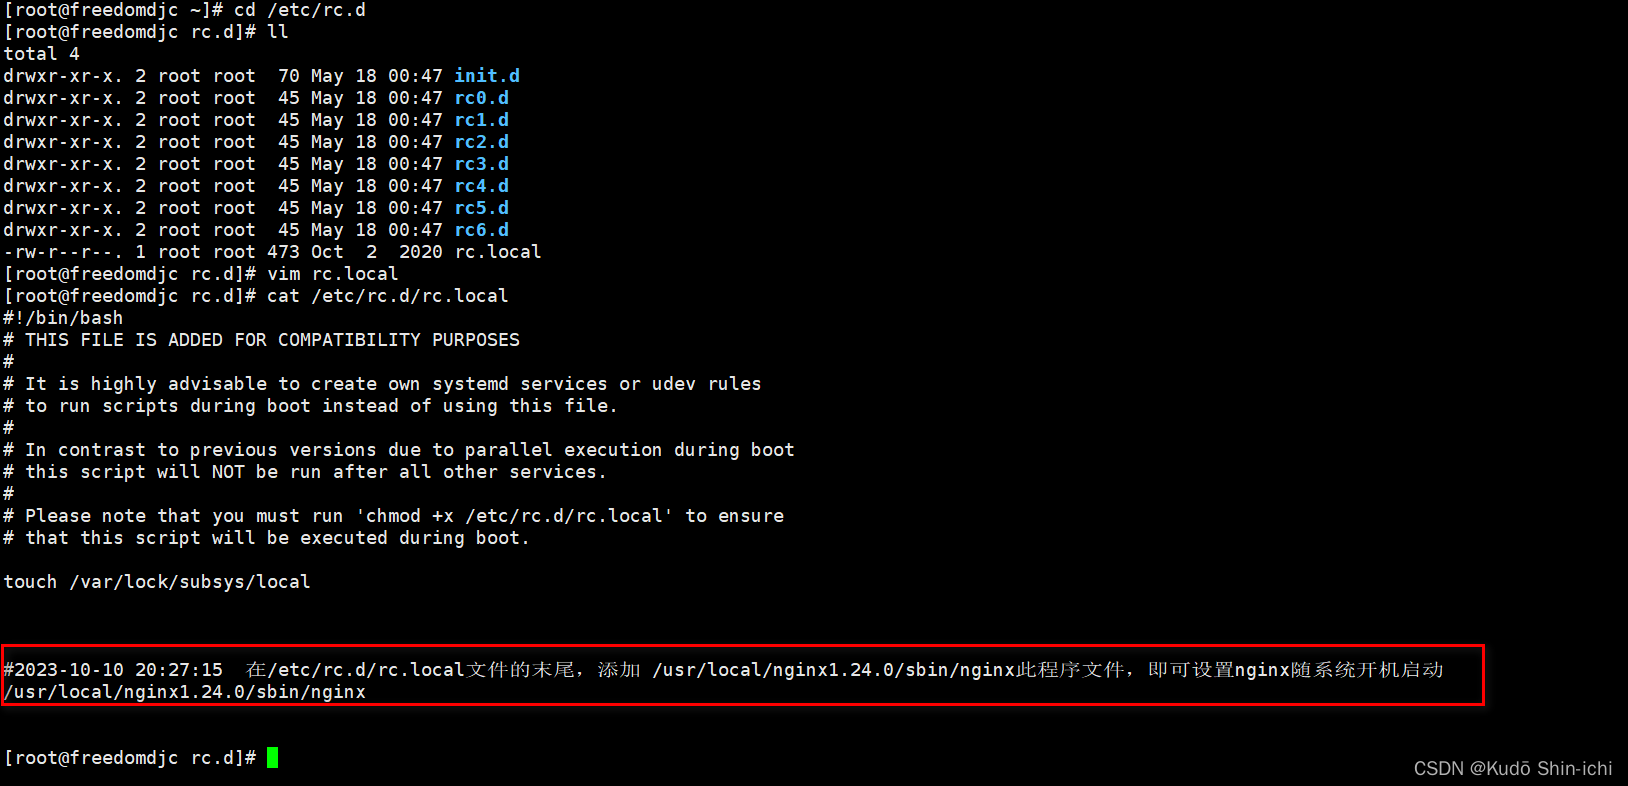
//在/etc/rc.d/rc.local文件的末尾,添加 /usr/local/nginx1.24.0/sbin/nginx此程序文件的配置//查看系统是否安装完整vim,如果正常安装肯定不止一行
rpm -qa|grep vim
//安装vim所有相关的包yum -y install vim*//2-修改rc.local文件
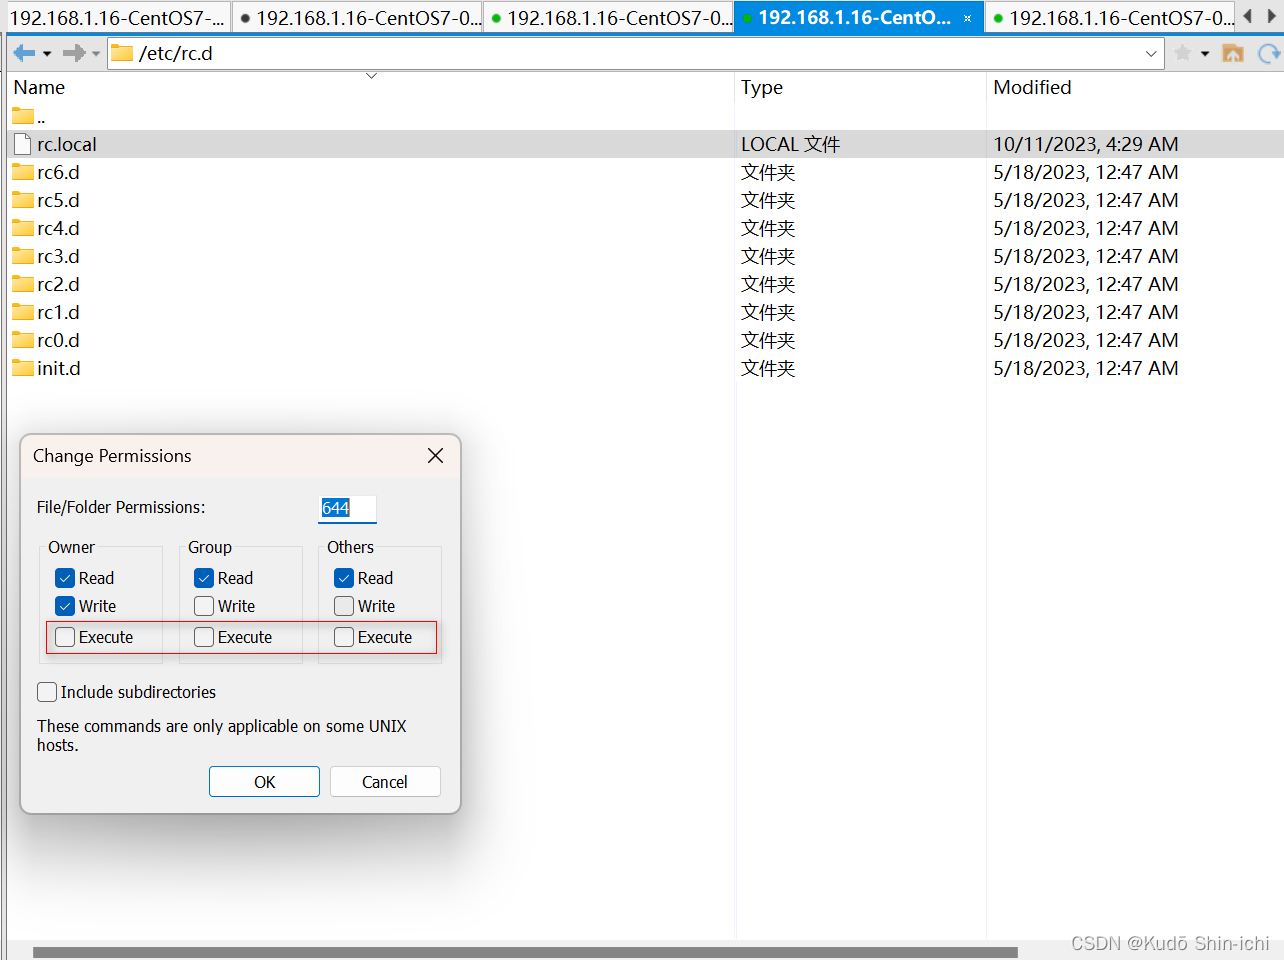
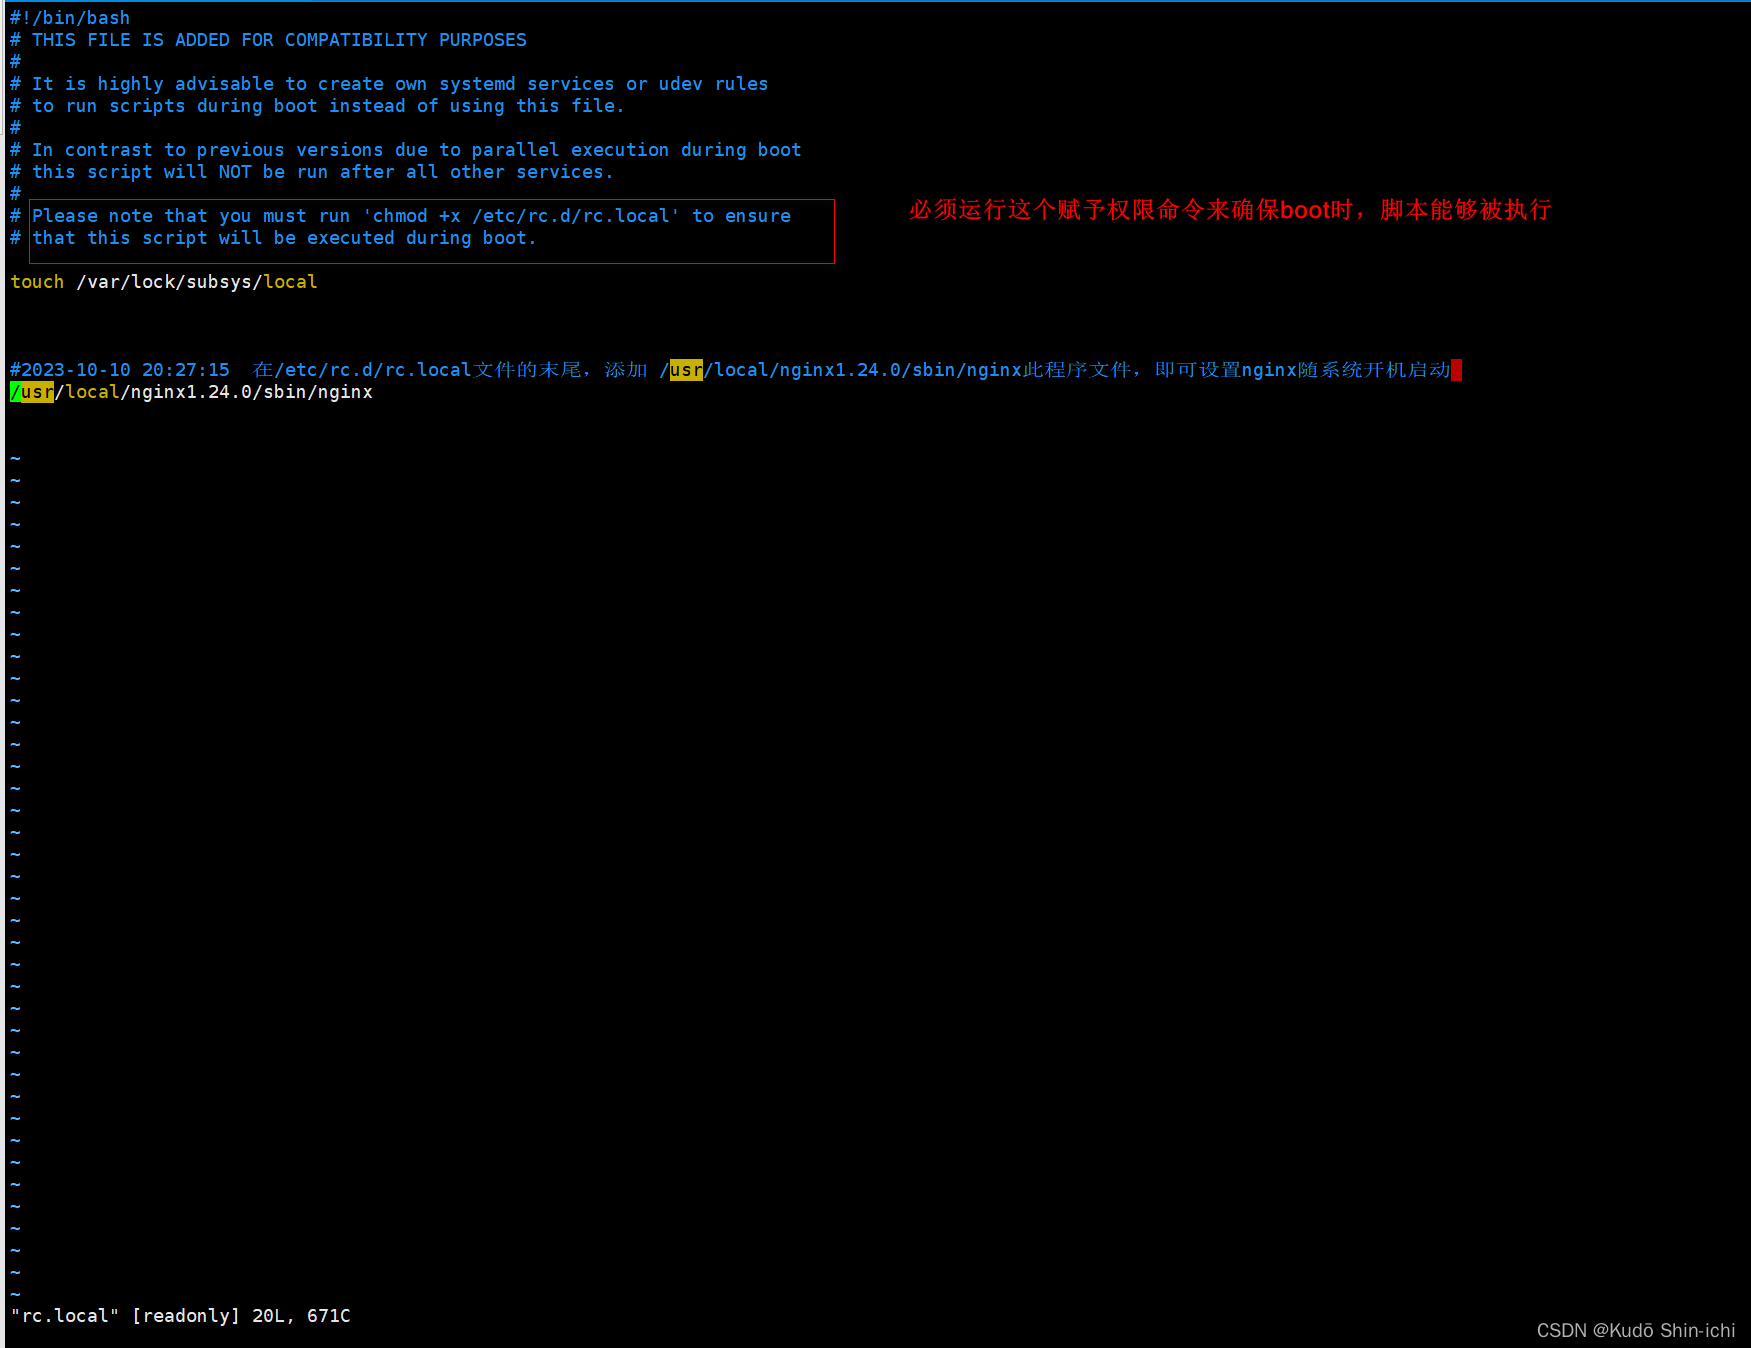
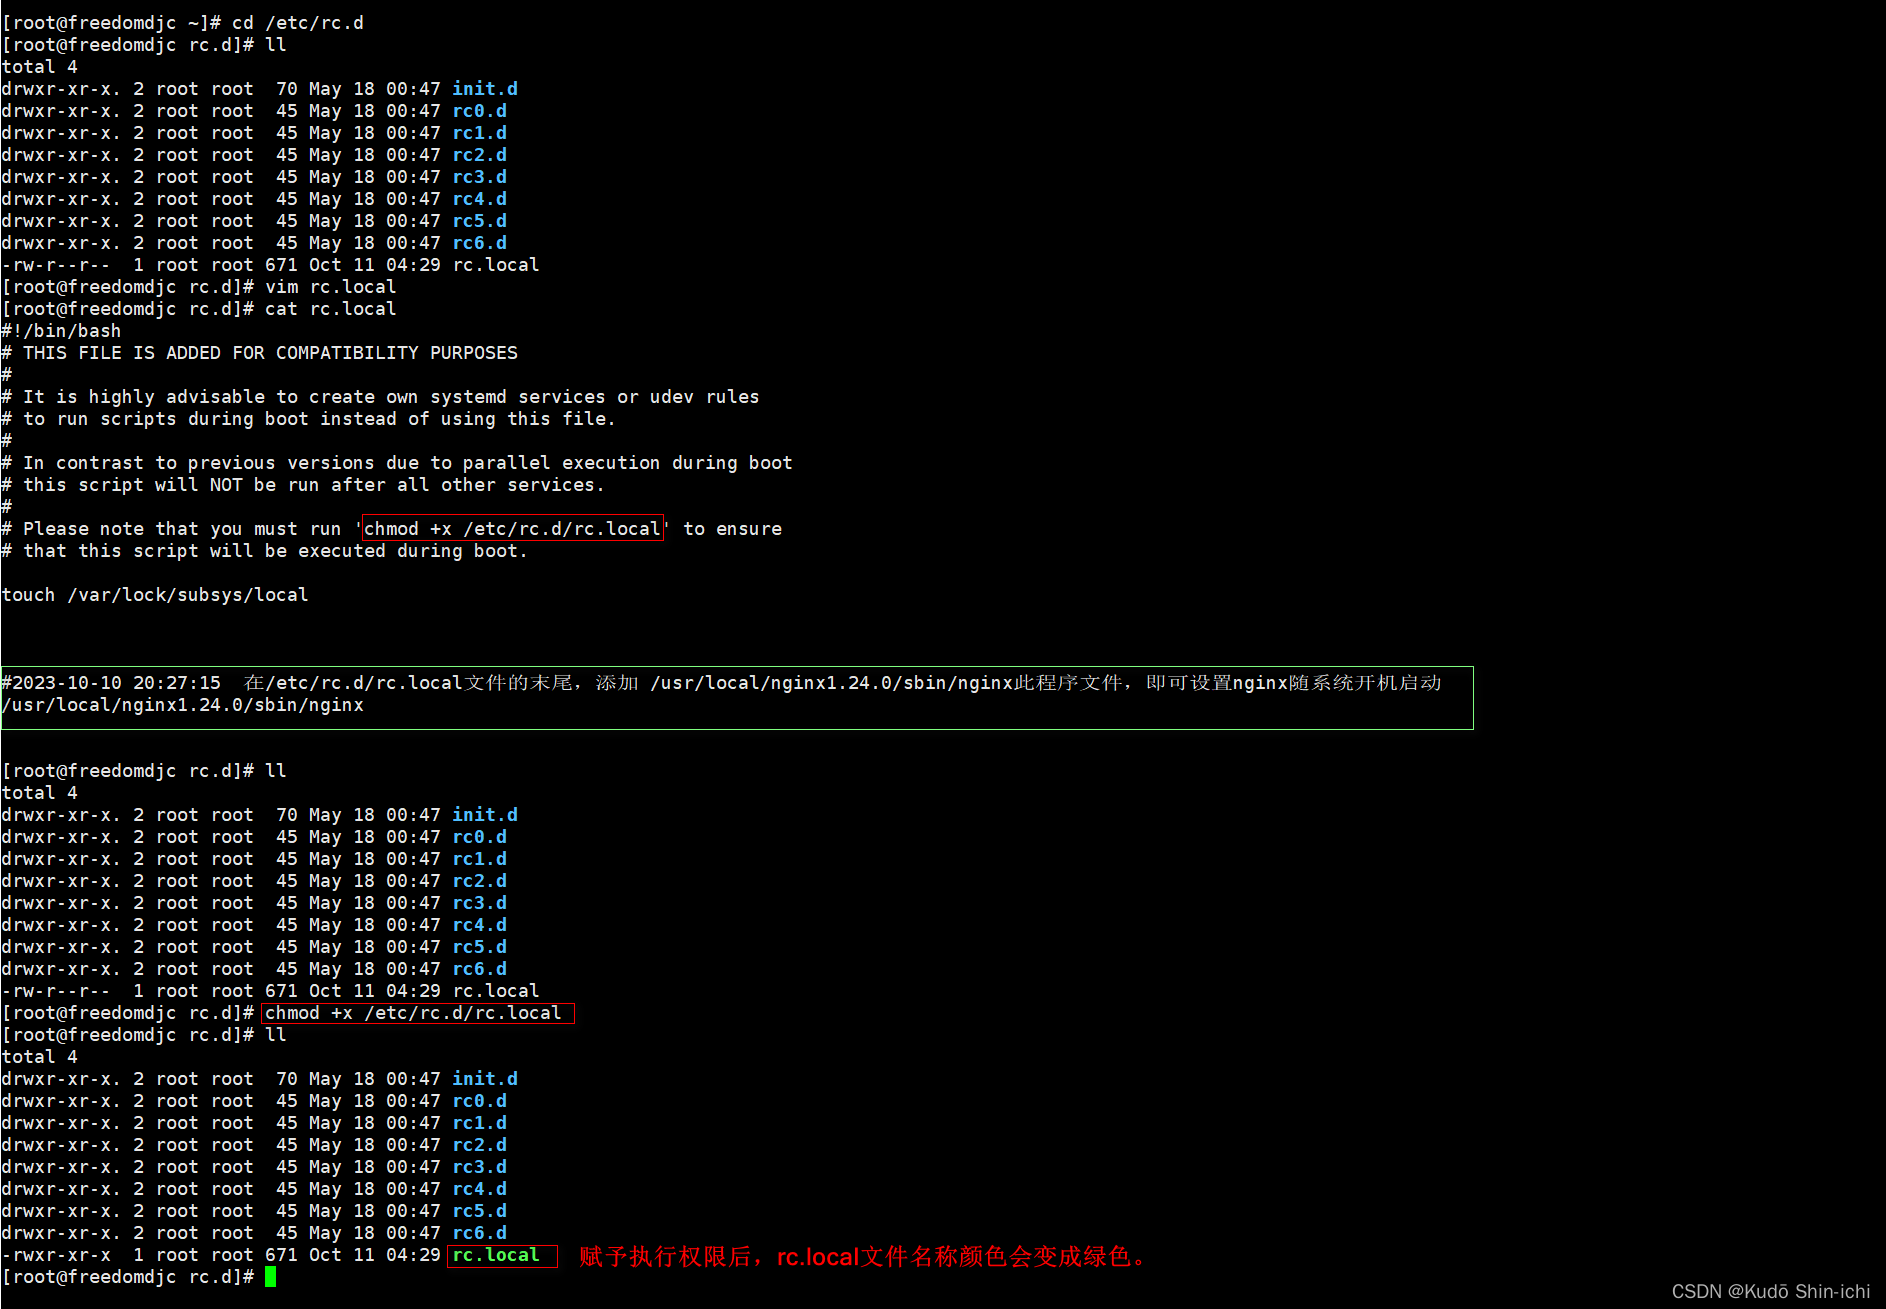
vim /etc/rc.d/rc.local//查看是否配置成功  cat /etc/rc.d/rc.local//3-赋予执行权限(必须运行这个命令来确保boot时,脚本能够被执行)
chmod +x /etc/rc.d/rc.local
4.3.1.2 截图
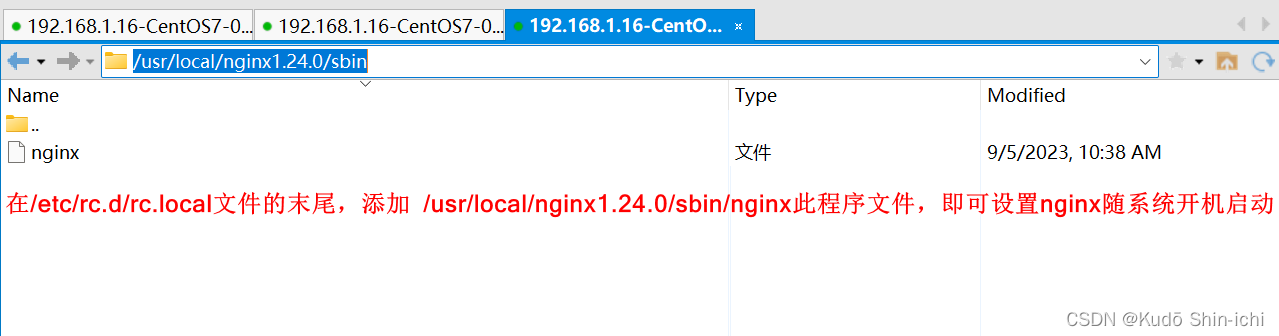
修改rc.local文件 :
vim /etc/rc.d/rc.local
查看是否配置成功 :
cat /etc/rc.d/rc.local
3-赋予执行权限(必须运行这个命令来确保boot时,脚本能够被执行)
目前所有用户均无执行权限。
chmod +x /etc/rc.d/rc.local 赋予执行权限:
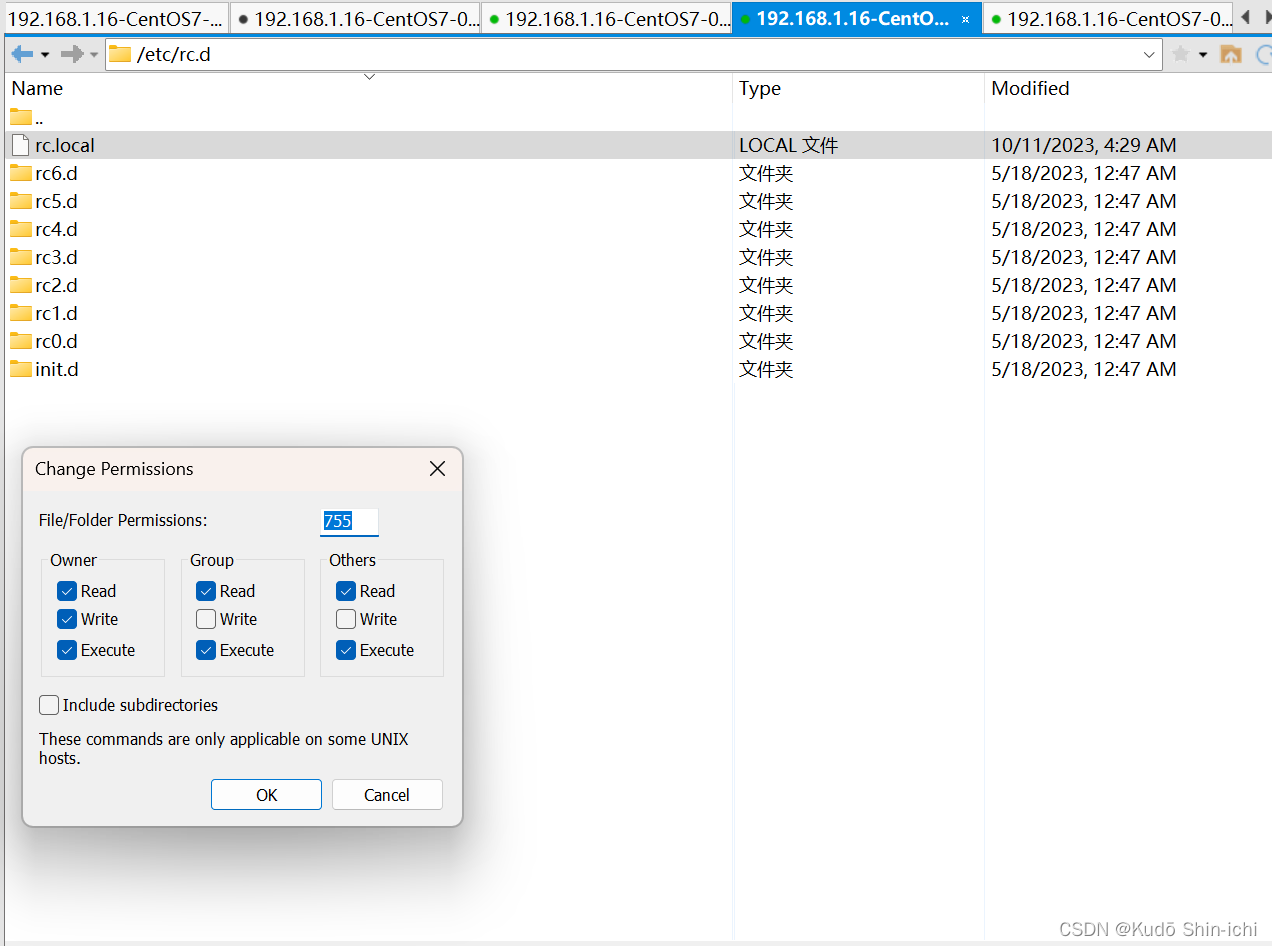
赋予执行权限后,rc.local文件名称颜色会变成绿色,变深:
所有用户都拥有了执行权限:
重新启动服务器CentOS7.9 2009后,nginx已经可以开机自启,直接访问了,不需要再去执行./nginx 启动命令了:(此处在nginx中部署了前端的dist包)
//启动nginx
cd /usr/local/nginx1.24.0/sbin
./nginx
或
./nginx -c  /usr/local/nginx1.24.0/conf/nginx.conf

查看nginx的进程 :
//查看nginx的进程
yum install net-tools -y
netstat -lntup | grep nginx//查看启动的nginx进程
ps -ef | grep nginxyum install lsof
lsof -i :80
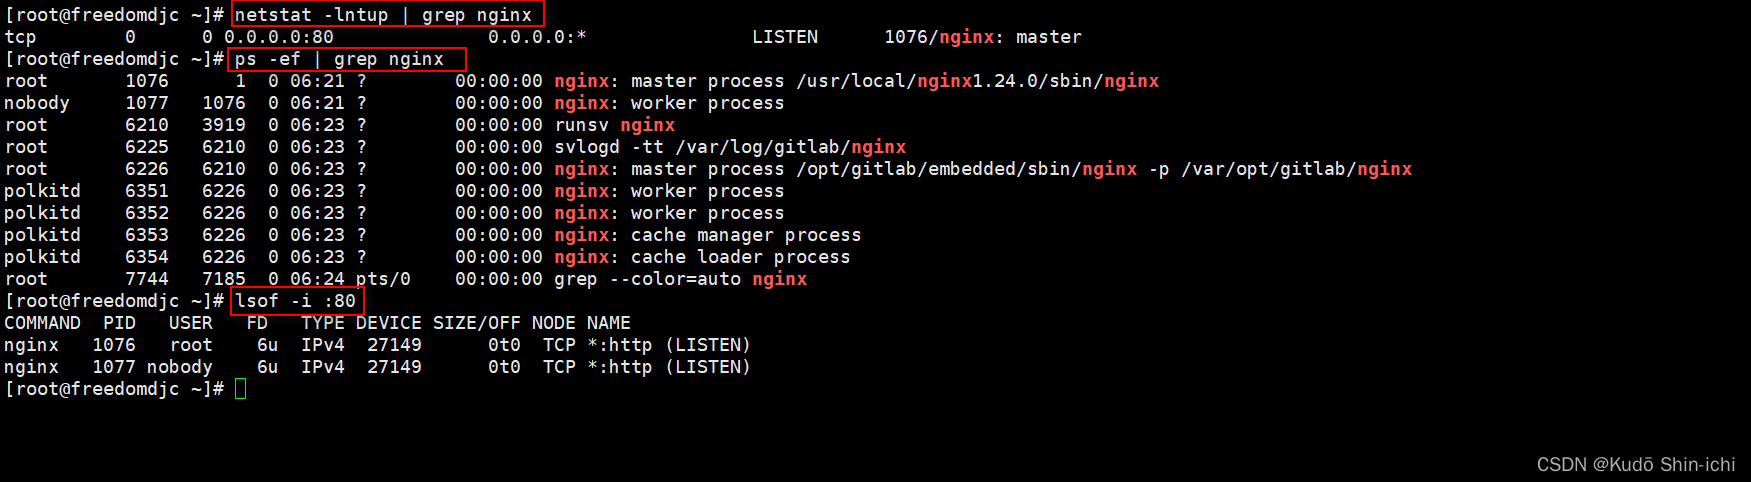
4.3.2 将dist包上传到指定目录/deploy/ruoyicloud_ui/中
参考我的这篇博客:[Windows11与CentOS7.9 2009下安装配置nginx后启动整个项目]
中的 4.4 部署dist包 。
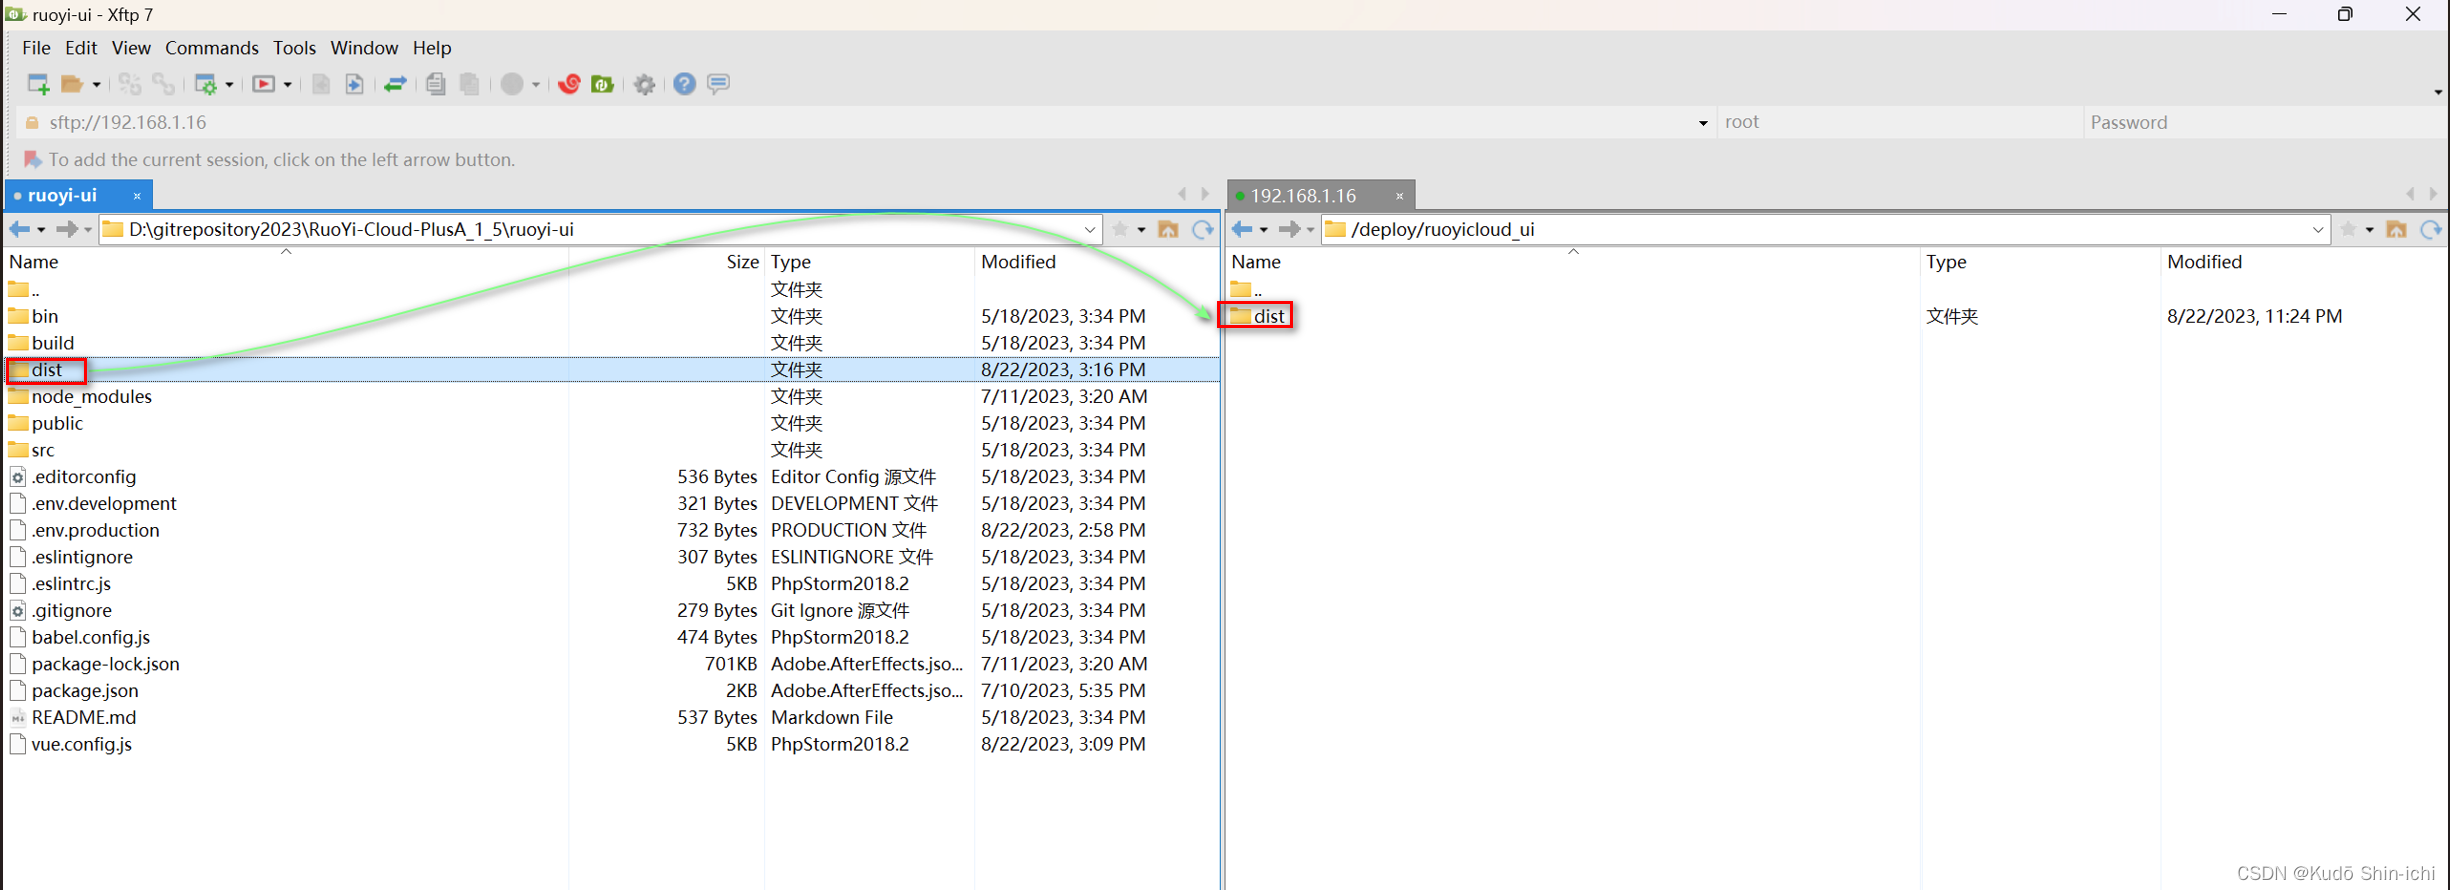
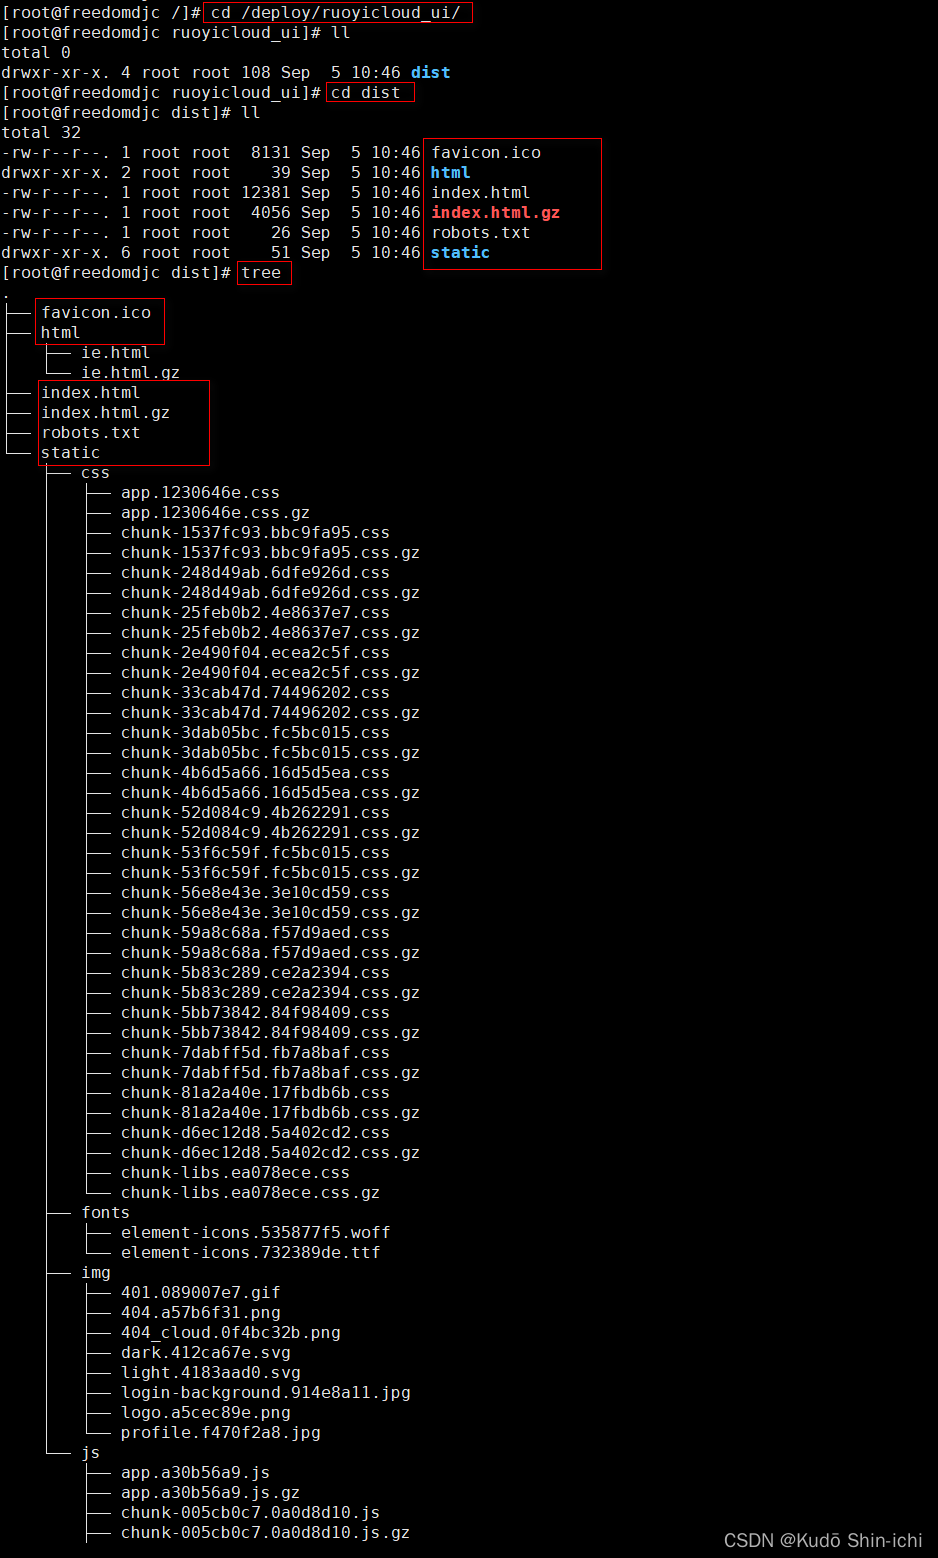
查看/deploy/ruoyicloud_ui/dist的项目结构:
修改nginx.conf中的配置
配置nginx.conf
/usr/local/nginx1.24.0/conf
/usr/local/nginx1.24.0/conf/nginx.conf
文件内容太多,为了便于修改,以及避免错误,建议下载到Windows中配置,配置好再上传回去。
//命令修改
vim /usr/local/nginx1.24.0/conf/nginx.conf
修改nginx.conf中root html为root /deploy/ruoyicloud_ui/dist 访问打好的dist包,即我们刚刚上传的dist包所在的位置。
修改nginx.conf中的server_name localhost为server_name 192.168.1.16。
#user  nobody;
worker_processes  1;#error_log  logs/error.log;
#error_log  logs/error.log  notice;
#error_log  logs/error.log  info;#pid        logs/nginx.pid;events {worker_connections  1024;
}http {include       mime.types;default_type  application/octet-stream;#log_format  main  '$remote_addr - $remote_user [$time_local] "$request" '#                  '$status $body_bytes_sent "$http_referer" '#                  '"$http_user_agent" "$http_x_forwarded_for"';#access_log  logs/access.log  main;sendfile        on;#tcp_nopush     on;#keepalive_timeout  0;keepalive_timeout  65;#gzip  on;server {listen       80;#server_name  localhost;server_name  192.168.1.16;#charset koi8-r;#access_log  logs/host.access.log  main;location / {#root   html;root  /deploy/ruoyicloud_ui/dist;index  index.html index.htm;}#error_page  404              /404.html;# redirect server error pages to the static page /50x.html#error_page   500 502 503 504  /50x.html;location = /50x.html {root   html;}# proxy the PHP scripts to Apache listening on 127.0.0.1:80##location ~ \.php$ {#    proxy_pass   http://127.0.0.1;#}# pass the PHP scripts to FastCGI server listening on 127.0.0.1:9000##location ~ \.php$ {#    root           html;#    fastcgi_pass   127.0.0.1:9000;#    fastcgi_index  index.php;#    fastcgi_param  SCRIPT_FILENAME  /scripts$fastcgi_script_name;#    include        fastcgi_params;#}# deny access to .htaccess files, if Apache's document root# concurs with nginx's one##location ~ /\.ht {#    deny  all;#}}# another virtual host using mix of IP-, name-, and port-based configuration##server {#    listen       8000;#    listen       somename:8080;#    server_name  somename  alias  another.alias;#    location / {#        root   html;#        index  index.html index.htm;#    }#}# HTTPS server##server {#    listen       443 ssl;#    server_name  localhost;#    ssl_certificate      cert.pem;#    ssl_certificate_key  cert.key;#    ssl_session_cache    shared:SSL:1m;#    ssl_session_timeout  5m;#    ssl_ciphers  HIGH:!aNULL:!MD5;#    ssl_prefer_server_ciphers  on;#    location / {#        root   html;#        index  index.html index.htm;#    }#}}
重新加载配置文件nginx.conf :
因为刚刚修改了配置文件nginx.conf(修改nginx.conf中root html为root /deploy/ruoyicloud_ui/dist 访问打好的dist包和修改nginx.conf中的server_name localhost为server_name 192.168.1.16。),所以要重新加载配置文件nginx.conf。
//检查Nginx配置是否正确,如果配置没有错误,将显示一条成功消息
cd /usr/local/nginx1.24.0/sbin
./nginx -t
或者/usr/local/nginx1.24.0/sbin/nginx -t//如果需要修改配置文件 ,修改之后要重新加载配置文件
cd /usr/local/nginx1.24.0/sbin
./nginx -s reload//启动nginx
cd /usr/local/nginx1.24.0/sbin
./nginx
或
./nginx -c  /usr/local/nginx1.24.0/conf/nginx.conf#关闭nginx
cd /usr/local/nginx1.24.0/sbin
./nginx -s stop # 停止
检查Nginx配置是否正确
//检查Nginx配置是否正确,如果配置没有错误,将显示一条成功消息
cd /usr/local/nginx1.24.0/sbin
./nginx -t
或者/usr/local/nginx1.24.0/sbin/nginx -t

到这一步,前端dist包就部署到了nginx中,nginx还设置了nginx开机自启,意味着打开服务器就可以直接访问到前端界面(地址:http://192.168.1.16:80)。
五、Nginx 服务器 SSL 证书安装部署(参考腾讯云官方文章)
参考:Nginx 服务器 SSL 证书安装部署
最近更新时间:2023-11-13 10:26:11 (现在是2023-11-18 19:05:37 ,5天前更新的)
参考的腾讯云文章链接中有视频进一步介绍在 Nginx 服务器安装 SSL 证书的操作过程。
5.1 证书安装
参考:Nginx 服务器 SSL 证书安装部署
本文档指导您如何在 Nginx 服务器中安装 SSL 证书。
说明:
本文档以证书名称 cloud.tencent.com 为例。
Nginx 版本以 nginx/1.18.0 为例。
当前服务器的操作系统为 CentOS 7,由于操作系统的版本不同,详细操作步骤略有区别。
安装 SSL 证书前,请您在 Nginx 服务器上开启 HTTPS 默认端口 443,避免证书安装后无法启用 HTTPS。具体可参考 服务器如何开启443端口?
SSL 证书文件上传至服务器方法可参考 如何将本地文件拷贝到云服务器。
SSL(Secure Sockets Layer 安全套接层),及其继任者传输层安全(Transport Layer Security,TLS)是为网络通信提供安全及数据完整性的一种安全协议,SSL端口号是443。TLS与SSL在传输层对网络连接进行加密。
第6步.编辑 Nginx 根目录下的 nginx.conf 文件。修改内容如下:
说明:如找不到以下内容,可以手动添加。可执行命令 nginx -t
,找到nginx的配置文件路径。 此操作可通过执行 vim /etc/nginx/nginx.conf 命令行编辑该文件。
由于版本问题,配置文件可能存在不同的写法。
例如:Nginx 版本为 nginx/1.15.0 以上请使用 listen 443 ssl 代替 listen 443 和 ssl on。
server {#SSL 默认访问端口号为 443listen 443 ssl; #请填写绑定证书的域名server_name cloud.tencent.com; #请填写证书文件的相对路径或绝对路径ssl_certificate cloud.tencent.com_bundle.crt; #请填写私钥文件的相对路径或绝对路径ssl_certificate_key cloud.tencent.com.key; ssl_session_timeout 5m;#请按照以下协议配置ssl_protocols TLSv1.2 TLSv1.3; #请按照以下套件配置,配置加密套件,写法遵循 openssl 标准。ssl_ciphers ECDHE-RSA-AES128-GCM-SHA256:HIGH:!aNULL:!MD5:!RC4:!DHE; ssl_prefer_server_ciphers on;location / {#网站主页路径。此路径仅供参考,具体请您按照实际目录操作。#例如,您的网站主页在 Nginx 服务器的 /etc/www 目录下,则请修改 root 后面的 html 为 /etc/www。root html; index index.html index.htm;}}
通过执行以下命令验证配置文件问题。若存在错误,重新配置或者根据提示修改存在问题。
nginx -t
通过执行以下命令重载 Nginx。重载成功,即可使用。
nginx -s reload
5.2 HTTP 自动跳转 HTTPS 的安全配置(可选)
如果您需要将 HTTP 请求自动重定向到 HTTPS。您可以通过以下操作设置:
1. 根据实际需求,选择以下配置方式:
在页面中添加 JS 脚本。
在后端程序中添加重定向。
通过 Web 服务器实现跳转。
Nginx 支持 rewrite 功能。若您在编译时没有去掉 pcre,您可在 HTTP 的 server 中增加 return 301 https://$host$request_uri;,即可将默认80端口的请求重定向为 HTTPS。
修改如下内容:
说明
1、未添加注释的配置语句,您按照下述配置即可。
2、由于版本问题,配置文件可能存在不同的写法。例如:Nginx 版本为
nginx/1.15.0 以上请使用 listen 443 ssl 代替 listen 443 和 ssl on。
server {#SSL 默认访问端口号为 443listen 443 ssl;#请填写绑定证书的域名server_name cloud.tencent.com; #请填写证书文件的相对路径或绝对路径ssl_certificate  cloud.tencent.com_bundle.crt; #请填写私钥文件的相对路径或绝对路径ssl_certificate_key cloud.tencent.com.key; ssl_session_timeout 5m;#请按照以下套件配置,配置加密套件,写法遵循 openssl 标准。ssl_ciphers ECDHE-RSA-AES128-GCM-SHA256:ECDHE:ECDH:AES:HIGH:!NULL:!aNULL:!MD5:!ADH:!RC4;#请按照以下协议配置ssl_protocols TLSv1.2 TLSv1.3;ssl_prefer_server_ciphers on;location / {#网站主页路径。此路径仅供参考,具体请您按照实际目录操作。 #例如,您的网站主页在 Nginx 服务器的 /etc/www 目录下,则请修改 root 后面的 html 为 /etc/www。root html;index index.html index.htm;}
}
server {listen 80;#请填写绑定证书的域名server_name cloud.tencent.com; #把http的域名请求转成httpsreturn 301 https://$host$request_uri;
}
通过执行以下命令验证配置文件问题。若存在错误,重新配置或者根据提示修改存在问题。
nginx -t
通过执行以下命令重载 Nginx。重载成功,即可使用。
nginx -s reload
如果浏览器地址栏显示安全锁标识,则说明证书安装成功。

如果网站访问异常,可参考以下常见问题解决方案进行处理:
无法使用 HTTPS 访问网站
部署 SSL 证书后,浏览器提示 “网站连接不安全”
访问站点提示连接不安全?
SSL 证书过期后重新申请部署依然提示 HTTPS 不安全?
在服务器上部署 SSL 证书后访问资源出现 404 报错
5.3 实操截图
六、参考
nginx官网
Nginx 服务器 SSL 证书安装部署
Nginx 服务器 SSL 证书安装部署-pdf
Windows11与CentOS7.9 2009下安装配置nginx后启动整个项目
我的相关博客:
打包命令根据package.json文件中的命令中的配置来写,下面的打包命令就是npm run build:prod,prod是production的缩写,意思是打生产环境的包,其中的 SET NODE_OPTIONS=--openssl-legacy-provider 是为了解决Node.js版本过高的问题(Error:0308010C:digital envelope routines::unsupported)而添加的。
详情见我这篇文章:
IDEA中Node.js环境下npm报错Error:0308010C:digital envelope routines:unsupported
npm相关安装配置等,参考我这篇文章:
安装配置nvm-windows对Node.js与npm进行版本控制
注意:yarn init或者npm init,执行输入信息后,会生成package.json文件。
参考我这篇文章:安装并配置使用包管理工具-Yarn
启动防火墙同时开放nginx80端口:
参考我这篇 查看CentOS版本及系统位数与设置CentOS 7.9 2009 防火墙配置放开端口的命令与过程


